My Royal Enfield Cafe Racer project.

@coolatula: Check out the brake rod on this brand new Enfield. The problem is the rod cannot be fully straight, because the rear footpeg is in the way. I'd like to meet the bloke who thought about having a footpeg bracket right where the brake rod's supposed to pass. The brake rod on my Enfield is a bit more bent than this. I'll buy this rod and try.

4yjbq1dde0.jpg


P.S. The bent rod is only on Enfields that have the brake pedal on the RHS.
 
Sweet,but remember just because some Engineer at some factory designed around a problem doesn't mean they did it correctly!

Ask one and if they are honest they will tell you that even among their own kind there can still be some idiots out there! ;D
If you doubt that just sit down and watch the episodes of "Engineering Disasters" on the History Channel or do a web search.
Engineers are only human and humans don't always make perfect/correct decisions all the time.

http://www.thehistorychannel.co.uk/site/tv_guide/full_details/Technology/programme_559.php

http://www.matscieng.sunysb.edu/disaster/

But,I agree try a NEW rod as at least it should hold it's strength better than your already bent up one. That should at least narrow down your braking problems.
 
This is another drag spec Cafe Racer. 1/4 mile in 15.5 seconds. I think thats great for a tuned Enfield 500 at least in India.

It has:
  • Fibreglass tank and body panels
  • Perforated Clutch case and other parts
  • Fins have been shaved off to give it a flat profile
  • Rear-set pegs
  • Forged aluminum wheels?!
  • Clutch case runs dry!

80687289sp7.jpg
 
Hi guys, Good News. Finally the rear-sets are ready and have been fitted. Made it on my own using parts from various other bikes. However the brake pedal is still pending. So the gear-lever is rear-set, but the brakes are still in the normal position. We'll paint the brackets and polish the linkages.

rearsets2rr7.jpg
 
Need Help!

brakefm8.jpg


  • What about the brake pedal?! The pedal should come almost before where the front footpeg is at the moment (see pic) or in the line of the kick lever. I also have to ensure that it doesn't come in the way of the kick lever. The brake is actually on the left side, but the pedal is on the right. Moreover, unlike the brake pedal on other bikes, this one has a cam.
  • Another issue is the kick lever. I've taken it a bit ahead, because it touches the leg and hurts. But it doesn't kick properly now. Its a pain to start the bike.
 
Gordon said:
Need Help!

brakefm8.jpg


  • What about the brake pedal?! The pedal should come almost before where the front footpeg is at the moment (see pic) or in the line of the kick lever. I also have to ensure that it doesn't come in the way of the kick lever. The brake is actually on the left side, but the pedal is on the right. Moreover, unlike the brake pedal on other bikes, this one has a cam.
  • Another issue is the kick lever. I've taken it a bit ahead, because it touches the leg and hurts. But it doesn't kick properly now. Its a pain to start the bike.


This is going to be a challenge.
1 -Can you see if Royal Enfield has a kit they already make for this? Is there an easy way to convert it to right hand shift? The yellow bike pictured in this thread has a nice clean rear brake set up.

2- You're fighting for clearance for the brake arm over the pipe, and the kickstart arm with the brake arm. You may need the kickstart arm to clear the peg when its folded up as well so you have full travel.

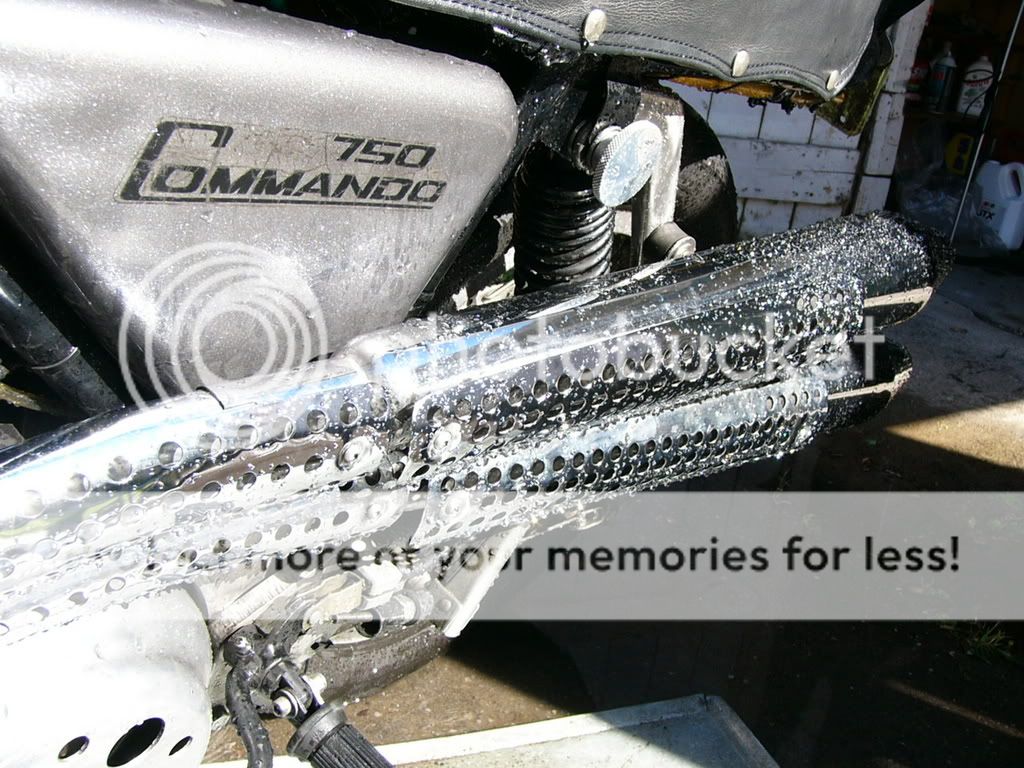
The way the kit on my Norton is done is there is an offset arm that curls around the kickstarter, thought it is the shifter in my case the concept is the same- fab an arm out of 3/8 to 1/2 diameter rod and weld it to a mounting plate that rotates on the footpeg mount shaft. Hopefully you have some space on the footpeg mounting thread to do this- if you have space you can have a pair of bushings machined up to capture the plate. I don't have a pic of it right now but it's a big loopy thing that isn't rigid as it needs to be.

contros.jpg


3- Convert the brake to cable- you can see here if you look closely the cable running from the mount plate back to a stop on the rear drum. This method does away with the cam, and linkage arms and offers a degree of flexiblity for routing. The picture of the bike shows the brake side, just imagine the same type assembly on the other side. Though cables can be spongy feeling; if they are kept short you may be able to improve on the willowy rod you now have.

This still means a fair bit of fabbing work, perhaps replacing the pipe with a different bend would simplify your problems. The frustrating thing is that changing one thing means seven more things have to follow suit.
Keep in mind that you also need enough leverage to activate the rear brake, and you need ground clearance.

c

ps- machismo- great name for a bike!

house145.jpg
 
Awesome c. Thanks for the detailed post. Will be very very helpful, when I get a right shift Enfield.

c said:
Can you see if Royal Enfield has a kit they already make for this? Is there an easy way to convert it to right hand shift? The yellow bike pictured in this thread has a nice clean rear brake set up.

They are not available in India. Mine is a left shift bike from the company. Don't want to shift it to right shift. The yellow bike above is a Enfield that came with a right shifter from the company itself.

c said:
You may need the kickstart arm to clear the peg when its folded up as well so you have full travel.

The kick lever clears the rear footpeg (when folded). No issues with that.

c said:
You're fighting for clearance for the brake arm over the pipe, and the kickstart arm with the brake arm.

Yes, and I have to resort to that technique, because even the Royal Enfield 65 Sportsman has a similar setup. The brake pedal comes from below the silencer towards where the front footpeg was previously mounted.

smantc3.jpg
 
Gordon said:
Awesome c. Thanks for the detailed post. Will be very very helpful, when I get a right shift Enfield.


Try this address they have race bits listed under accesories and full kits. Might be able to get some info off them.. never know...
http://www.royal-enfield.com/
 
Went for an Auto Show today. Got an oppurtunity to click the cafe with its stock counterpart in the parking lot. Difference is, thats a 500 and mine is a 350 ;D


Looking at them, lets see what is left on the cafe:
  • Rear indicators
  • Fork Gaiters
  • Painting of front mudguard/rearset brackets/left gearbox cover
  • Change Rear Tyre to 100/90 or 110/90
  • Probably, a new tank too! Although I'm having doubts, don't want to change EVERYTHING of the bike. The tank, sideboxes and front headlight cowl retain the originality of the bike. What say?!

About the updates, I got the brake pedal thats almost perfect, but it doesn't have the minning cam. So I'll be cutting a cam and welding it on the pedal.

Guys, what about the kick pedal?! Don't want to change it but I'm frustrated with it since it stabs my leg when using the rearset.
 
The front mudguard is done. Judging by its state and the numerous bumps it had, we never thought it'd be chromed. So we visited the plating guy. He buffed and stripped the paint from a part of the mudguard and it was smooth enough. He said he'd give it a try. After three days, we went to pick it up today and were we in for a surprise!!! The chrome has come very well. But the same can't be said about the brackets of the mudguard which had tooo many bumps. So he just buffed it and removed the paint off.

We may paint the brackets black completely
OR
Tape it with black radium on the bumpy area and keep the lower area paintless

mgkx2.jpg


mdgday8.jpg
 
Gordon, pick up the November issue of Classic Bike Guide. There's an article on Enfield Bullets and modifications.
 
Fossil, couldn't find that magazine here in Bombay. If you have a copy, could you please scan that article and post it or send it to me via PM?!

The brake rearsets are done. They are a bit far from the footpeg though. I can't get them closer, since the kick pedal is in the way. And as usual the rear brake is awfully weak!!!

Will post the pics later.
 
Sorry for the late updates and no pics.

Front Mudguard:
The front mudguard brackets have been painted black. The border of the now black brackets was supposed to be given a golden radium border. But since the guy was out of it, we put black border temporarily.

Rearsets:
The brake pedal was very annoying and it still is. Did a lot of cutting, welding, gas heating and bending to get it in proper shape.

cowlzb6.jpg


IMPORTANT!!!!!!! REAR COWL!!!!
The cowl has been untouched for two months. The cowl is short in length and height, so more metal will be added appropriately. Moreover, there aren't any mounting points. I desperately need some ideas. I'll be reaching the sheetmetal guy in an hour. So it'll be great if I could get some ideas in that time ;D I'll be checking the board on my cell when I reach there. I'm looking out for ideas regarding:

How to mount the cowl on to the existing seat?!
The cowl is supposed to be removable. What we thought of was to use helmet clips to mount it on the seat. One end of each of the four clips will be below the seat and the other four ends of the clips will be on the cowl. Any other ideas?!
 
Cotter clips. add some tabs to the inside, drill holes thru em. drill corrosponding holes in your cowl/seat pan...clippy clippy..
 
We were only supposed to get the cowl and mudguard stickers done today, but surprisingly we did do a lot that we didn't expect to finish.

Parts fitted today :
  • HP Air Filter.
  • Fork Gaiters (Boots).
  • Front fork reflectors.
  • Rear Indicators.

Apart from these:
  • Engine oil changed.
  • Front mudguard is ready.

HP Air Filter : I'm not sure how much of a difference the HP has over the stock one, but the first ride confirmed that there is a marginal difference. The Bike pulls out well in all the gears. The pickup has increased marginally. There is a little hissing sound while starting the bike. We had to remove the side square box.

hpzc7.jpg


Fork Gaiters : The Fork Gaiters are from Honda. They are of much better quality than the original Royal Enfield ones. The biggest pain of fitting these (or any fork covers) is that you have to open up the entire front assembly.

bootsni1.jpg


Fork Reflectors : These are the stick-on types. Fitted them on the side of the forks.

Rear Indicators : The Indicators have been mounted at the rear frame where the seat has been mounted. Not sure if we really like it. Might fit them on the rear shocks after a few days if we're bored.

indivg4.jpg


Front mudguard : Painted the brackets black first. Then put radium sticker on it with a golden stripe running at the center of each bracket. Looks good IMO, you tell me yours. Initial plan was to put a golden border on the edge of the bracket. But since it wouldn't stick onto the chrome area, plan was changed.

mgau5.jpg
 
paintgr3.jpg

The clutch case cover has been painted, changed the oil too in the clutch casing. Initial plan was matt black, but its now a "little" shiny.

pedalqg5.jpg

Brake pedal and other brackets have also been painted black.

The sticker job on the front mudguard was lacquer coated to protect it. The gap between the mudguard and the tyre is barely a centimeter.

::) The bike is as good as complete minus the rear seat cowl!
Wait for the pics. Will take some awesome ones and upload them here and the "Before & After" thread.
 
The cowl work has been ridiculously slow. I was supposed to add some sheetmetal and increase the height of the cowl, this would also ensure that the seating area would be 15 inches long. The welder at my garage is just too busy with work. So I decided to directly bolt the cowl onto the seat pan. Made four holes at the side of the cowl and seat pan and bolted it.

Now is this okay?! The cowl is 5.8 inches tall from the bottom of the seat pan. The seating area is now 16 inches long!

How high should I make the seat foam?!
The side of the seat pan is 1 inch and at the center there is yet another 1.5 inch. Looks like the seat will reach an inch from the top of the cowl.

I'm also thinking of cutting the rear part that tapers downwards.

cowl2wb3.jpg


cowlei5.jpg
 
THERE IS PLENTY OF LOVE FOR THE NEW ENFIELD.
JUST YOU ARE SO FAR AWAY IT TAKES A WHILE TO REACH YOU
I HAVE BEEN WANTING AN ENFIELD FOE A WHILE.
DO YOU HAVE ACCESS TO THE DIESEL CONVERSION OVER THERE?
JUST BASIC TRANSPORTION YOU CAN WORK ON YOURSELF.
PART OF THE REASON I LIKE THE OLDER BIKES. YOU NEED A DEGREE IN COMPUTER ENGINEERING TO WOKR ON TODAYS BIKES

KEEP IT UP

CHEERS KYLE
 
Back
Top Bottom