Follow along with the video below to see how to install our site as a web app on your home screen.
Note: This feature currently requires accessing the site using the built-in Safari browser.
We noticed you are blocking ads. DO THE TON only works with community supporters. Most are active members of the site with small businesses. Please consider disabling your ad blocking tool and checking out the businesses that help keep our site up and free.
Updated electronics/battery box from stock regulator and new rectifier, to a combination kohler rectifier/regulator unit. Pretty sweet, and compact package. Also found out that my stator was fine, and the reason it wasnt charging was due to the fact that the regulator (-) was not connected properly to ground. Simple fix!
Got resourceful, and scoured the garage for some material.... and found the original CL350 fender brace that was on the bike, and turned it into a mono gauge mount.
Check this out! Stock CL Fender brace to Gauge Bracket
Little rough trimming
Mounting holes...
Install in original bar mounting holes on the tree. Will replace bar clamps with button head stainless cap screws...
mock up
Transfer the gauge bolt holes to the mount
Drill the holes, and mount it up. One factory gauge, in a good spot, nice and low like the top crown.
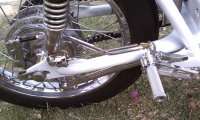
Have you had any issues with where you have relocated the brake switch to? The spring looks a bis susceptible to being kicked around as you ride. Or is it just the camera angle that makes it look like that?
Have you had any issues with where you have relocated the brake switch to? The spring looks a bis susceptible to being kicked around as you ride. Or is it just the camera angle that makes it look like that?
I havent yet. I dont think I have even bumped it yet. I'm running non stock controls, and the simple brake lever had no room for a switch. I've heard a CB175 front brake cable may be the answer? (switch built in?)
Also, the guys at motobits said typically people just use the front switch... but they shared one picture of a customers ride...
Holy crap, the bike only has a few rides on it... and it wouldnt go past 4000 rpms. It had to be timing or carbs...
so the lovely wisdom of DTT told me to check my advance mechanism.
(http://www.dotheton.com/forum/index.php?topic=43813.new#new)
Sure enough, no centrifugal advance. The advance was locked up solid. I popped it off... soaked it for a while, cleaned it up, lubed it up, and re-installed her. AND HOLY CRAP! the bike feels amazing now. She definitely goes now!
Before
After
Note: dont install the advancer sleeve (the part the points ride on... CAM?) 180* out.... I timed the motor like this and realized it was on the wrong TDC.... FUN. Got to do it all over again.
Yesterday, before checking the advancer mechanism... I thought I was overly fat on the mixture.
I stepped fown from 72/120 jets and needle in stock position to 70/115 jets, and shimmed the needle up with one washer. Also made sure the 3D CV's were set at 26mm float height.
Now that the advance is fixed... I think it needs the 72's and 120's back in it. Thoughts on shimming the needle?
This site uses cookies to help personalise content, tailor your experience and to keep you logged in if you register.
By continuing to use this site, you are consenting to our use of cookies.

")