Follow along with the video below to see how to install our site as a web app on your home screen.
Note: This feature currently requires accessing the site using the built-in Safari browser.
We noticed you are blocking ads. DO THE TON only works with community supporters. Most are active members of the site with small businesses. Please consider disabling your ad blocking tool and checking out the businesses that help keep our site up and free.
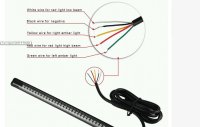
Im trying to hook up the LED integrated taillight and I have a few questions. They all boil down to how do I install it to the stock wires of my 77 cb750f. I know what each color represents but the LED wires are a much smaller gauge. I also am unsure what the best way to connect them are. Thanks in advance.
Well the wire nuts are not the way to go. They are fine for temp work to make sure everything works and doesn't short out.
Do you know how to solder? You can twist the wires together, solder them and then use some heat shrink tubing or even electrical tape. The other way to go would be crimp connectors. You can use the cheap auto parts stuff or get the better ones online.
Honestly, as long as the wires do t move around when riding, the chance of failure is slim.
Yep. A lot of LEDs and a ton of cheap Chinese parts use really small 20-22ga wire. I solder a lot of the connections since it's tough to get a good bite with a crimp connector.
One trick I did use on a few crimp connections was to strip back about 2x the length of wire you need, fold the copper in half and twist it up. Gives you a thicker strand to bite onto.
What I do to crimp small gauge wires is to use a larger gauge helper wire.
Strip back about 1" of insulation from the small gauge wire and the normal amount from a larger gauge wire (18 for me). Then, with the wires adjacent and parallel, wrap the exposed portion of the small gauge wire around the exposed portion of the larger gauge wire. Now, you can complete your crimp and the extra meat on the larger gauge wire will help keep things tight.
After that, use a diagonal cutter to remove the excess 18 gauge wire from right behind the terminal and slide the insulator over everything.
Well I got the wires sorted out except for 2 black ones. One from each blinker. Are they the ground? If so do I just ground them to the frame? I blew the main fuse when i tried testing the blinkers so gotta go get a few more as well
Nice light. The LED's shift a little inside, but overall I liked how it went for my wife's bike.
Adding pinout just in case You shouldn't be blowing fuses unless a positive is touching a negative. (or your open wires accidentally touches the frame resulting in the same thing)
http://www.cmsnl.com/classic-honda-fansite/honda_wiring_diagrams/CB750F(77).jpg
According to the diagram you should have two wires. One is a green wire going to earth ground (- on the battery) and the other one will be your + wire going to the bulb to turn it on. Unless you are referring to the FRONT turn signals. Those have running lights as well. So they are always on when the bike is on and get brighter when you use the blinkers.
Hope some of that helps. Some of the old blinkers even had just one wire coming out and used the metal stalk as a ground through the frame attachment. So the one wire would be the positive wire.
Nice! Hope mine turns out looking as good as yours. How did you mount it in the bike, just use the sticky or the little brackets that came with it? I'm sure that's how I blew a fuse lol. I am not a fan of wiring so thanks for the imput.
Nice! Hope mine turns out looking as good as yours. How did you mount it in the bike, just use the sticky or the little brackets that came with it? I'm sure that's how I blew a fuse lol. I am not a fan of wiring so thanks for the imput.
Her tail was just a hoop. So I welded a flat bar the length of the tail light and used the sticky back tape provided. I'm certain it was the VHB stuff that doesn't come off without a lot of swearing.
Yep, good tape on those but if it's cold and you're adhering it to a decent radius I'd apply some heat before. I use 2 universal tail lights for added visibility but I would solder and heat shrink either way. If you want a quick disconnect terminal just solder to the larger gauge wire so you have more meat.
Well it all lights up. Blinkers just stay solid so I installed an electronic flasher relay and now I'm going to check all my ground wires. The ground have to be on BARE metal or does it not make a difference?
The idea with any ground is that you're supplying a route for the electrons to flow back to the negative terminal of the battery.
If you're not wanting to scrape off paint or powder, you can run a wire directly back to the battery for the same effect. If you don't want to run wires and don't want to scrap off paint or powder, you can drill a hole and tap into any area of non-structural steel on the bike and you will get the same effect.
This site uses cookies to help personalise content, tailor your experience and to keep you logged in if you register.
By continuing to use this site, you are consenting to our use of cookies.


") You shouldn't be blowing fuses unless a positive is touching a negative. (or your open wires accidentally touches the frame resulting in the same thing)
You shouldn't be blowing fuses unless a positive is touching a negative. (or your open wires accidentally touches the frame resulting in the same thing)