kief90
Engineering Student
So I have been reading around on DTT for quite sometime and thought it was necessary to finally do my first post and my build thread!
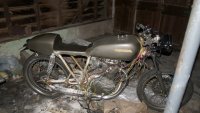
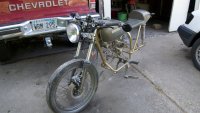
While visiting my parents for Thanksgiving break all I could think about was how gas was killing my wallet. My truck gets around 12 mpg in town and 18 if I drive slow on the highway... So I started looking into getting a bike. After searching the interwebs for hours I found this piece of junk on Craigslist in Kansas City. It is a 1974 Honda CB360. Since I was picking up my girlfriend at the airport I thought I would commit and buy the bike. While everyone was trampling each other at the malls and what not on Black Friday I drove 281 miles to Kansas City (my parents live in central Kansas) to pick up my new project. Afterwards I had another 130 miles back to good old Kansas State. It was a wonderful 7-8 hours of driving that day.
Here is how she was when I picked her up (not the girlfriend of course!)...


I was fortunate enough to have been renting a house with a detached garage. Tdhere previously was a dog that lived in there, so it smelled like piss and shit with fur everywhere. This is a huge down grade from working for a crop duster that has a nice shop with Snap-On tools and work benches. I have been doing the best I can do with what minimal tools I own. This is my first build and I am learning as I go!
I knew I had a lot ahead of me so I so I started to tear her apart. The last owner said it needed a headlight, seat, coils and battery to get it going again. That wasn't good enough for me so I wanted to make it my idea of a Cafe Racer. Here is what I wanted to do...
-New all-in-one gauge
-New Tires
-h4 Headlight
-LED turn signals (Kansas Requires them on bikes built after 73')
-LED Tail Light
-New Ignition Switch
-Newer Coils
-Small Battery
-Clip-on Handle Bars
-End Bar Mirrors
-All-in-one Control Switch
-New Clutch Lever
-New Throttle Assembly
-Homemade Seat
-DIY Paint
-Rearsets (When I can afford them)
-Stainless steel allen engine bolts
-New Chain
-Petcock
-K&N Style Air Filters
The first major item I tackled was the fuel tank. It got a nice helping of Aircraft paint remover first thing. BEWARE: I wasn't using safety goggles (foolish of myself to do so) and somehow the tank dropped on the floor when I was removing the paint. Unfortunately some of that harsh chemical splashed up on the ridge of my nose and close to my eye. Immediately I grabbed the can and ran upstairs to flush my eye and skin as a precaution. Luckily I didn't suffer any injuries besides an ugly mark on my nose for a week.


Then the lovely bondo-ing began.

After having a few parts removed, I mounted the tank.

Over the next couple of weekends I spent what little free time I had between studying for finals (Mechanical Engineering Student...) and my girlfriend to tear it down.

A good friend and I started to tear down the engine. This really worried me because I had no idea what I was tearing into. The odometer that the previous owner gave me with the bike showed it had 4,938 miles on it.


Surprisingly the engine is in extremely great shape. The cylinders still had the hatches from honing and the piston and rings looked awesome. There was some carbon build up on the pistons and valves though. For being in such great shape I wondered if it had a full rebuild before it sat for awhile. After getting a good look at everything I decided to clean, replace gaskets, stainless steel bolts, and paint. There was no need (and no money) to do a full rebuild.


The next item is the seat. After spending many hours on it, I have decided to completely redo it. I could possibly save it, but it isn't what I envisioned. First thing I did was buy some floral foam to carve it into shape. Using some 3M Super 77 adhesive, I glued the pieces together and left to dry for a couple of day. Using a large Buck knife I shaped the foam. I initially wanted to make a removable seat pan, but abandoned the idea.


Next I laid down some aluminum tape over the foam. This is so the fiberglass wouldn't stick to the foam. Then I started to cut and lay out the fiberglass.

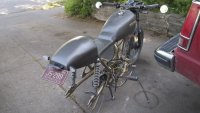
I started to get ahead of myself and forgot to take some pictures as I go. Luckily over winter break we had many days in the 50s' and 60s' in late December and early January, so I worked my ass off to get the frame painted. I also started to bondo the seat. It came out very half assed. Luckily the fiberglass was left overs from a project.


More glass work..

Forks and wheels painted and installed!

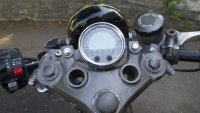
Here is the Danmoto gauge. It is an Acewell ripoff, but I am on a budget.

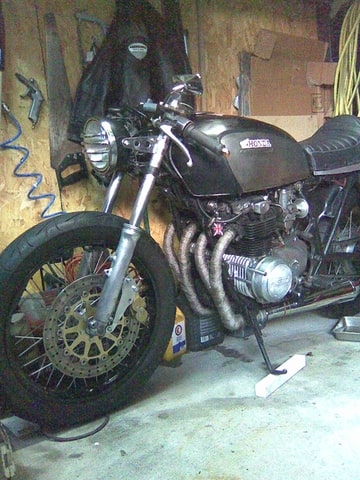
Recently I had installed the back wheel and now have a kickass rolling chasis. As soon as it isn't below freezing again I am going to get back to work on her. I will keep updating as I go along. Thanks for looking!
While visiting my parents for Thanksgiving break all I could think about was how gas was killing my wallet. My truck gets around 12 mpg in town and 18 if I drive slow on the highway...
So I started looking into getting a bike. After searching the interwebs for hours I found this piece of junk on Craigslist in Kansas City. It is a 1974 Honda CB360. Since I was picking up my girlfriend at the airport I thought I would commit and buy the bike. While everyone was trampling each other at the malls and what not on Black Friday I drove 281 miles to Kansas City (my parents live in central Kansas) to pick up my new project. Afterwards I had another 130 miles back to good old Kansas State. It was a wonderful 7-8 hours of driving that day. Here is how she was when I picked her up (not the girlfriend of course!)...
I was fortunate enough to have been renting a house with a detached garage. Tdhere previously was a dog that lived in there, so it smelled like piss and shit with fur everywhere. This is a huge down grade from working for a crop duster that has a nice shop with Snap-On tools and work benches. I have been doing the best I can do with what minimal tools I own. This is my first build and I am learning as I go!
I knew I had a lot ahead of me so I so I started to tear her apart. The last owner said it needed a headlight, seat, coils and battery to get it going again. That wasn't good enough for me so I wanted to make it my idea of a Cafe Racer. Here is what I wanted to do...
-New all-in-one gauge
-New Tires
-h4 Headlight
-LED turn signals (Kansas Requires them on bikes built after 73')
-LED Tail Light
-New Ignition Switch
-Newer Coils
-Small Battery
-Clip-on Handle Bars
-End Bar Mirrors
-All-in-one Control Switch
-New Clutch Lever
-New Throttle Assembly
-Homemade Seat
-DIY Paint
-Rearsets (When I can afford them)
-Stainless steel allen engine bolts
-New Chain
-Petcock
-K&N Style Air Filters
The first major item I tackled was the fuel tank. It got a nice helping of Aircraft paint remover first thing. BEWARE: I wasn't using safety goggles (foolish of myself to do so) and somehow the tank dropped on the floor when I was removing the paint. Unfortunately some of that harsh chemical splashed up on the ridge of my nose and close to my eye. Immediately I grabbed the can and ran upstairs to flush my eye and skin as a precaution. Luckily I didn't suffer any injuries besides an ugly mark on my nose for a week.
Then the lovely bondo-ing began.
After having a few parts removed, I mounted the tank.
Over the next couple of weekends I spent what little free time I had between studying for finals (Mechanical Engineering Student...) and my girlfriend to tear it down.
A good friend and I started to tear down the engine. This really worried me because I had no idea what I was tearing into. The odometer that the previous owner gave me with the bike showed it had 4,938 miles on it.
Surprisingly the engine is in extremely great shape. The cylinders still had the hatches from honing and the piston and rings looked awesome. There was some carbon build up on the pistons and valves though. For being in such great shape I wondered if it had a full rebuild before it sat for awhile. After getting a good look at everything I decided to clean, replace gaskets, stainless steel bolts, and paint. There was no need (and no money) to do a full rebuild.
The next item is the seat. After spending many hours on it, I have decided to completely redo it. I could possibly save it, but it isn't what I envisioned. First thing I did was buy some floral foam to carve it into shape. Using some 3M Super 77 adhesive, I glued the pieces together and left to dry for a couple of day. Using a large Buck knife I shaped the foam. I initially wanted to make a removable seat pan, but abandoned the idea.
Next I laid down some aluminum tape over the foam. This is so the fiberglass wouldn't stick to the foam. Then I started to cut and lay out the fiberglass.
I started to get ahead of myself and forgot to take some pictures as I go. Luckily over winter break we had many days in the 50s' and 60s' in late December and early January, so I worked my ass off to get the frame painted. I also started to bondo the seat. It came out very half assed. Luckily the fiberglass was left overs from a project.
More glass work..
Forks and wheels painted and installed!
Here is the Danmoto gauge. It is an Acewell ripoff, but I am on a budget.
Recently I had installed the back wheel and now have a kickass rolling chasis. As soon as it isn't below freezing again I am going to get back to work on her. I will keep updating as I go along. Thanks for looking!