"Poor Kid" 1981 CB750K - first build

Lastly, I have read and reread the info in the link above, but I think I am too new for it to be effective with my skill set.

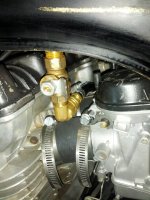
So the little fuel back sprays... That shit can't be healthy man. What am I doing wrong there?

1981 CB750K (reluctant racer)
 
Did a little research, your stock mains were 102's. I would imagine you're running fairly rich. I would try 110's, maybe 115's?

No? Am I wrong?
 
Dudes on the CB1100f site say that between 122.5 and 125 seems to work for stock 750s. I need to test.

I haven't jacked with valves at all... I do know that people say the valve clearance affects vacuum (and thus fuel/air)
 
You definitely need to do your valves before you have any chance of setting the carb up properly.

You also need to ascertain if you have a dynojet kit installed or not, As I said before the main jets on a dynojet kit do not have the same numbering system as Mikuni. If the needle is stock it will have the mikuni symbol and a code next to it like 6ZD16 (unlikely to be that code as that's a euro needle) just under the clip rings. If you have a 126 dynojet its like a 117 mikuni jet. Genuine Mikuni jets also have the symbol in front of the number.
See here http://www.jetsrus.com/FAQs/FAQ_mikuni_vs_dynojet_vs_keihin_sizes.htm

The needles and emulsion jets are very susceptible to wear on the BSTs you can look for needle wear just under the ring clips the needle will be shiny and marked and there will be a ring worn about an inch further down from the clips from the needle rattling about in the emulsion tubes. If those are worn you never get it running right either.

This one shows wear just under the ring clips
jet_needle1.jpg


The squirt of fuel under the slides is a good thing. The fact that it is blowing back out of the carb is not, could be that the inlet valves are not sealing and blowing back through the carb on compression or you getting pre ignition which could be your timing out.

As said by a number of posters, set your valves correctly as otherwise your never going to get it right and when you do your valves your gonna have to do it over again.
 
Just thought of something else. You say you have set and checked the float height a few times. However the way the carbs sit on your motor may not be the same as they were meant to on a GSXR. Therefore the float height may not be correct. The link I sent you to at factory pro explains how to do that correctly.
 
Thanks lob.

These are all pertinent and useful tips, links, etc. I appreciate you sitting down to do it.

Valve clearance? Trial/error float height selection?

Yeah, I'm just gonna lock the garage door for a few weeks. I wanted to ride not take my fucking engine back out.

Again, thanks for the help. I wish I could seem more positive about it
 
The needles are in spotless shape as well but I think they need to be set at the correct clip yet

IF that would even matter here
 
And for anyone who doesn't read and bookmark that awesome jet conversion page, I have DJ126 mains so roughly 117 in Mikuni jet sizes. Fucking revolutionary. Couldn't just use metric sizes I guess

1981 CB750K (getting nowhere)
 
kraptastic k said:
Thanks lob.

These are all pertinent and useful tips, links, etc. I appreciate you sitting down to do it.

Valve clearance? Trial/error float height selection?

Yeah, I'm just gonna lock the garage door for a few weeks. I wanted to ride not take my fucking engine back out.

Again, thanks for the help. I wish I could seem more positive about it

You can check valve clearance just pulling the tank and valve cover. Feeler guages are pretty cheap. They may be in spec in which case you just button it up and drop your bowls to check flaots. Sounds like your jetting is close. You'll have it nailed soon.

here's a quick valve check video.
https://www.youtube.com/watch?v=elKilUuKM8U
 
...and if they ARE out, it really isn't that bad of a task. Shim and bucket used to intimidate me coming from an automotive background I was used to adjustable rocker arms. But now that I have done it, the shims are pretty easy with the cheap tool from Motion Pro.
 
So I should stop dicking with carbs and ditch the dream of riding until these valves are all checked and/or reset. More tools and money; a few weeks of waiting will pass. I'm at the "almost listing it for sale" stage of anger. Sucks!
 
kraptastic k said:
So I should stop dicking with carbs and ditch the dream of riding until these valves are all checked and/or reset. More tools and money; a few weeks of waiting will pass. I'm at the "almost listing it for sale" stage of anger. Sucks!

every now and then there comes a time of frustration in a build that you feel like you're beating your head against the wall...just bums ya out. Then the best thing for me to do is walk away from it for a day or two. Then reapproach it with a fresh clear head.
You'll get there bud, might take a little longer than you hoped, but you'll get there.
 
A few shots of the finalized carb setup after wrench party Sunday. Note the yellow vent lines on top, clear fuel lines on bottom, which meet at a tee under the center carb boots. A filter is in place above the tee, and the petcock on the other side of the filter.

Look at that stupid petcock. Hilarious. It's dying when choke is off now. Another night of headscratching
 

Attachments

  • uploadfromtaptalk1372819154119.jpg
    uploadfromtaptalk1372819154119.jpg
    93 KB · Views: 510
  • uploadfromtaptalk1372819167313.jpg
    uploadfromtaptalk1372819167313.jpg
    115.7 KB · Views: 273
  • uploadfromtaptalk1372819182944.jpg
    uploadfromtaptalk1372819182944.jpg
    87.7 KB · Views: 653
  • uploadfromtaptalk1372819191600.jpg
    uploadfromtaptalk1372819191600.jpg
    103.6 KB · Views: 667
kraptastic k said:
A few shots of the finalized carb setup after wrench party Sunday. Note the yellow vent lines on top, clear fuel lines on bottom, which meet at a tee under the center carb boots. A filter is in place above the tee, and the petcock on the other side of the filter.

Look at that stupid petcock. Hilarious. It's dying when choke is off now. Another night of headscratching
You will persevere! Hang in there!
 
Dont get too down hearted, If it was easy everybody would be doing it. Think of the satisfaction you will get when its sorted and your out riding.

A couple of things,

You say it dies when off the choke. If you can get it to idle between 1000 and 1500 rpm try spraying wd40 or hairspray, something combustible near the the carb to head joints, if the idle rises it means you have an air leak on those joints.

Secondly I pretty sure those yellow tubes should not be joined up, they are the vents for the float bowls and joining them up will effect the action of the other. Also they should be at least 8" long. It wont effect the problem you have now but smooths out the running when you get them working properly.

Another thing Just realised your carbs must be off a Canadian model as the US ones did not have thee powerjet circuit enabled.

Let me know if you had an air leak, if its fixed and how it runs now.

Did you replace the four very small o'rings on the air screws?

One day at a time sweet Jesus.
 
Tell you what when I was working on getting all of my electrical finished up on my 1981 CB750K I was about to throw the entire thing out the door. :mad:

It was frustarting and doing really weird stuff. I spoke to a friend and he recommended adding another ground to the original Buss Connection in the stock wiring harness and I decided to remove the fuse block I was trying to use and go with all inline fuses and I read where one of the digital head unit swithched wire should go online after some research and I changed that.

So after all of the changes and removing and installing the wiring harness 5 times this is it I am done if this doen't work I am loading the bike up and hauling it to the engine builder and telling him I give up. My engine guy had sent me an email instead of helping said when i get tired of playing with it bring it to him an he would fix it. That just pissed me off and I was determined to get it to work.

So after all of the last changes got everything installed double checked the connections and first thing I see is the clock is now working. So I made sure everything was connected and stepped back and turned the key on and EVERYTHING WORKED! I have to say I just about wet myself I was so happy because I had persevered and got it working myself.

But anytime you are putting parts on a bike that arenot made for that particular bike you are going to have issues just be prepared to take a step back and reevaluate the job and take it one step at a time.

Good Luck
 
I noticed in your pictures that you have removed the air pods.
Is that how you are trying to run now?
Because now you may be getting too much air and a quick way to check this is run a piece of 1 to 1 1/2 inch say painetrs tape (not horribly sticky) right across the middle of all of the intakes and see if it will at least idle without the choke.

Try both sizes just fo the heck of it and see if anything improves.
Also if it idles and you still turn the throttle and it dies watch your fuel line and make sure you still have good flow when you turn the throttle could have a small blockage.
 
Is it up to temp when you take off the choke? The choke isn't just for starting, may need to be 1/2 way out or more to stay running, then gradually taken off choke until it is warmed up a bit.

Maybe it would play nice if you quite flipping it off... ;)

index.php
 
Back
Top Bottom