Ryan,
You don't need any special anything to do everything needed for your carbs.
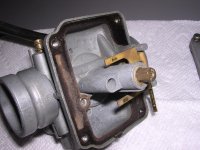
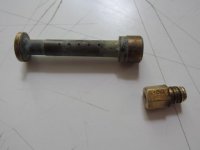
Looks like I offered some info that does not apply to your carbs. Should have looked at your pics more thoughtfully. Looks like your carbs have both float attached to a single arm. AFAIK, all US RD came with separate floats that ride on guide pins mounted in the bowl. Here is a pic for what it's worth. The two shiny spots near the end of the two brass arms are where the pins on the floats push against the arm. The area on this one is pretty broad, but this came off one of my own bikes, which I run with the fuel shut off until the bowls are empty because it sometimes is a while till the next ride. Ride the bike a lot, and this area gets worn down to a notch eventually and can hang up. So most of what I said does not apply to your carbs.
You should be aware that while ultra sonic cleaning if great, it isn't any more foolproof than anything else. I would spray carb cleaner through everything while it is apart to know with certainty that they are clean. It is vital that the emulsion tubes are removed and cleaned and checked. The emulsion tubes are part that the needle goes into. It installs through the top of the body where the throttle slide goes. To remove it, remove the main jet and washer. The brass part you see underneath is the emulsion tube. Note that there is a little brass pin that you can see that keeps the emulsion tube from rotating. Be careful not to damage it when tapping the tube out, and make sure it is aligned when putting it back. Set the body upside down on a surface that will not damage the threads where the top cover screws on, and with a wood or aluminum drift, tap it out. They can virtually fall out, or be nearly impossible to drive out, but they are not pressed in, just a precise fit, and the bodies get varnished which can make them very hard to remove. If they are difficult, use lots of carb cleaner and very patiently wiggle and slide them back and forth until they slide all the way out. Once they are out, make sure they are clean. Most have a series of vertical holes that bubble air into the fuel as it is supplied by the main jet. But there are different variations.
Next, make sure the air jet is clean. Looking into the intake side of the body, you should see a small round opening at 6 o-clock. Spray carb cleaner in there while looking through the bore where the emulsion tube came out, you should be able to see a clean jet of carb cleaner shoot through. That is pretty much it for the main fuel system.
The pilot system is easy too. Remove the pilot jet. If you do not have an absolutely perfect fit screwdriver, make one. Take out the air screw. That's the one you adjust to set the low speed air supply, the one you turn out 1 1/2 turns with a screwdriver. You can see how it works by looking again into the intake side of the body. The pilot air supply is another small round opening at about 7:30 0-clock. You can see the tip of the air screw needle through this opening. When it is screwed in all the way, it closes off the opening. The farther you screw it out, the more air it lets in. So it is basically an adjustable air jet for the slow speed (pilot) system. Anyway, take out the screw and spring, and pilot jet, and spray carb cleaner through both openings. You should get a clean stream vertically through the main bore, and another angled toward the engine. They are very tiny holes, easily clogged, but must perfectly clean. Not much more to it than that. Hopefully, your technician has already had them apart and you will have a very easy job verifying they are clean.
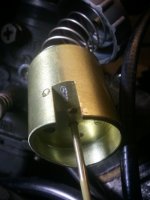
Looks like we have a slight terminology issue. I believe what you are calling shafts I am calling slides. These would be the large cylinders which the throttle cables attach to which throttle the engine. The needles are slid through holes in the top of the slides and held in by a plate which rests on top of an "E" clip on the needle. The marks in your pic are no problem at all. Just wear from the slides banging on the idle stop screws every time the throttle is closed. Your parts look perfectly fine, and assuming they slide smoothly and easily up and dow, should not be touched.
Once you are happy everything is clean, put it all together. Set up is very easy. Screw the idle stop screws out so that the slides are all the way at the bottom of there bores, and are no longer touching the slides. Adjust the throttle cables at the top of the carbs. The goal is to get both slides to start moving at exactly the same time from a fully closed position. There are a lot of ways to do this, but I stick my fingers into both bores at the same time, start cracking the throttle at the grip, feel for which throttle moved first, and then keep adjusting until they both move at the same instant.
Next, while looking into the bores, screw in the idle stop screws until each slide move up a few millimeters. We will come back to this later, this is just a rough guess. Just to clarify, the idle stop screws are the big ones you can turn with your fingers on the left and right of the bike. The pilot air screws or slow speed screws need a flat blade screwdriver and are on the left of both carbs when sitting on the bike. Turn the pilot air screws out 1-1/2 turns from fully screwed in. Think about how these work. If you look at them, they have a cone shaped end. This is so they can close off the pilot air supply when screwed in all the way. So don't ever screw them in too tight - just until they stop. They are brass, and soft an fairly easy to damage. Get everything else done and start the engine. Warm it up, and you can set the idle speed. It is a combination of how far the throttles are open, and how rich the fuel mixture is, and you can adjust both easily. If the idle is high, lower it by backing out the idle stop screws. Obviously, if it won't idle by itself, screw them in until it does! Estimate that you are doing this equally by holding the palm of your hand close to the exhaust outlet and feeling the pressure pulses. Compare the right and left side exhaust pulses and keep the strength of the pulses equal, and get the rpm you want. Then take a screw driver and adjust BOTH the pilot air screws in (or out - whatever is needed) 1/8 turn at a time, then rev the motor once or twice and wait a few moments for things to stabilize until you get highest engine speed. Keep the turns the same for both carbs. Start over if you lose track. When you have the smoothest highest speed, bring it back down with the idle stop screws. That is it. You may have to repeat this, and you may have to tweak the pilot air screws a bit after you ride the bike around to get it perfect, but that is all there is to it. If the carbs are clean, there are no air leaks, and the ignition and compression are good, this will work perfectly as described.
The oil pump is easy to bleed but messy. Obviously make sure there is plenty of oil in the tank, and remove the bleed screw (yes, in your pic, the one with the red fiber washer on it. These can be really tight, so get a new #2 phillips ( or JIS) driver and don't let it slip. DO NOT use a hand impact driver (the kind you use with a hammer) on the oil pump! If oil does not immediately come out, it will eventually. Hold the throttle wide open, and turn the nylon thumb wheel (looks like a gear on the bottom of the pump, it only goes around one way) about a million times or until no more air bubbles come out of the hole. I think if you just let it sit by itself for 5 minutes with the bleed screw out you achieve the same thing. Put the bleed screw back in, and thats it. You can bleed the lines to the carbs too as I described in the previous post, but likely you will have already achieved that bleeding the pump itself.
Hope this helps.
Good Luck!