RD350 project

dugsgms

New Member
Hello all! This is my first post here so I'll go ahead and introduce myself. My name is Doug and this thread will be about my RD350 cafe build.

First I'll give a little backstory as to why I chose to build a cafe racer. About a year ago I sold my 2013 Triumph Speed Triple R. While I enjoyed the bike, the more I rode it the more I found out that with a bike like that you really have to bring it to a track to really enjoy it. On normal mountain/back roads, for the bike to come into its own you were really pushing your luck due to unknown road conditions and other vehicles. I decided I needed something that was small and light enough that it would be fun on the tighter/slower stuff that is around the area I live in.

It didnt take too long for me to really start gravitating towards 2 strokes for their weight savings and overall uniqueness. First was set on a Kawasaki triple, looked at a couple but most of the bikes in my price range were in pretty sad shape and after riding the best of them found them to be large/tall feeling and uncomfortable when pushed. Then started to look into rd350/400s, pretty cheap, plentiful and well known as a great handling bike when new.

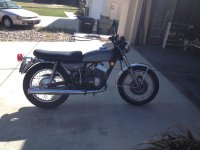
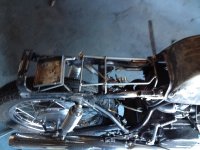
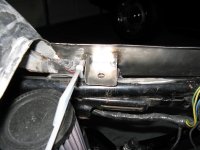
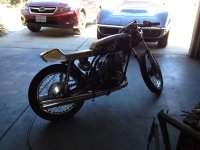
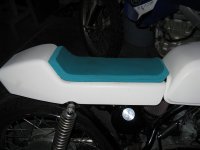
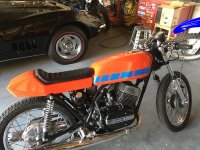
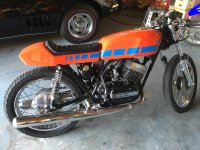
After a bit of looking found one locally, owner claimed to have owned it for years and recently had a case split rebuild done(over size pistons and all new lower end bearings/seals). Bike was poorly painted metallic gray, sported a Brit bike sized 4.00x18 tire on the rear and had what looked like a entire couch worth of filling stuffed into a stock style seat cover but otherwise was all there and in pretty good shape.

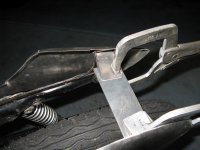
Ran pretty good but was tough to start cold and would intermittently drop cylinders on anything but brand new plugs. After a carb rebuild tune-up and new coils(a must do on these bikes still running original coils) ran great, started second kick in the cold and never missed a beat.

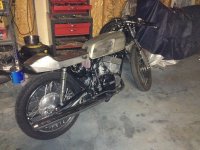
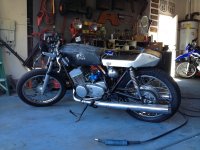
Here is the only pic I have as it was all it came home to me.
 

Attachments

  • IMG_0531.JPG
    IMG_0531.JPG
    360.3 KB · Views: 329
Welcome to the Family! 8)

However...

dugsgms said:
It didnt take too long for me to really start gravitating towards 2 strokes for their weight savings and overall uniqueness. First was set on a Kawasaki triple, looked at a couple but most of the bikes in my price range were in pretty sad shape and after riding the best of them found them to be large/tall feeling and uncomfortable when pushed.

Easy there big fella! Them's pretty close to fightin' words! :eek:

;D


Good choice on the RD though. They make a great reliable street machine. :D
 
Then started to formulate a plan. Started by doing the typical removal of non-essentials like fenders and passenger pegs then made a new gauge cluster to lower the gauges and get rid of the speedo altogether. Didnt like the factory tank(looked too peanut like) so got a hold of a Ebay RD400 coffin tank. Tank was locked, had a peeling previous coat of sealant and seeped fuel when full. After welding up a couple of the larger holes, I cleaned and resealed the tank and got a new cap(still available from Yamaha). Also replaced the rear tire with the correct size, started playing around with bars(its nice to have a few those cheap Bikemaster bars in differnet bends) and shapes for a tail.
 

Attachments

  • IMG_2095.JPG
    IMG_2095.JPG
    341.3 KB · Views: 317
  • IMG_0532.JPG
    IMG_0532.JPG
    449.5 KB · Views: 340
  • IMG_0536.JPG
    IMG_0536.JPG
    454 KB · Views: 320
Easy there big fella! Them's pretty close to fightin' words! :eek:

Oops, sorry. I guess I should have figured there was at least one Kawi triple owner on the forum. Trust me, if I would have found a decent one in my price range I would have bought it on the spot, ignored what I didn't like about it and enjoyed the sound and power from that awesome engine!
 
dugsgms said:
Oops, sorry. I guess I should have figured there was at least one Kawi triple owner on the forum. Trust me, if I would have found a decent one in my price range I would have bought it on the spot, ignored what I didn't like about it and enjoyed the sound and power from that awesome engine!


Haha! No worries. There are quite a few Kawi Triples guys here and we're a forgiving bunch. :D

More than a few RD/RZ guys too. They'll chime in soon I expect. 8)
 
After finding a shape I liked I started working on the tail. Ended up making a structure out of 1/4 steel bar to support the rider relocate the voltage regulator and battery(ended up using a anti gravity since the battery ended up being mounted so high).
 

Attachments

  • IMG_0539.JPG
    IMG_0539.JPG
    428.2 KB · Views: 318
  • IMG_2103.JPG
    IMG_2103.JPG
    226.5 KB · Views: 299
Then started working on the tail. Made it out of steel sheet using my 110v welder, a piece of tube to use as a rounding die, a nice straight edge to bend on and a pair of tin snips. It sandwiches between the framework and seat and is located fore/aft by grommets mounted on tabs and bolted to frame.
 

Attachments

  • IMG_2101.JPG
    IMG_2101.JPG
    233.4 KB · Views: 290
  • IMG_2102.JPG
    IMG_2102.JPG
    396.8 KB · Views: 301
Top welded on and ready for final shaping. The two holes are to access the front mounting bolts(rear bolts are removed from the underside of the tail.
 

Attachments

  • IMG_0546.JPG
    IMG_0546.JPG
    502.9 KB · Views: 301
  • IMG_0540.JPG
    IMG_0540.JPG
    255.3 KB · Views: 292
Final shaping done and ready for paint prep. After relocating the battery and voltage regulator to clean up the looks I decided to change out the reservior for the oil injection system. Had a local chopper place make me a custom sized tank then using some tabs from Lowbrow rubber mounted it under the seat. Holds about 1.5 qts and is enough for around 3-4 tanks of fuel.
 

Attachments

  • IMG_0543.JPG
    IMG_0543.JPG
    420.4 KB · Views: 305
  • IMG_0542.JPG
    IMG_0542.JPG
    354.4 KB · Views: 299
Body work on tank and a seat pan. Pan uses 3 nylon mounting pegs that fit into corresponding holes on tail. 2 holes are in the seat area and one is where the rear of the pan kicks up so the seat has to be slightly bent to fit in and locks into place when the pan relaxes.
 

Attachments

  • IMG_0553.JPG
    IMG_0553.JPG
    208.9 KB · Views: 293
  • IMG_2109.JPG
    IMG_2109.JPG
    2.4 MB · Views: 293
Primered up and seat padding. Used a walmart yoga mat for padding, nice and soft, a bit stretchy and solid enough to form easily with a electric turkey carver and a grinder disc.
 

Attachments

  • IMG_0556.JPG
    IMG_0556.JPG
    276.7 KB · Views: 299
  • IMG_2120.JPG
    IMG_2120.JPG
    236.8 KB · Views: 289
Dude, I'm digging the work you are doing. Im finding it really hard to look at your bike in detail when all of these pictures are taken in your dark garage and the bright sun is 7ft away outside. Roll that thing out there for us!
 
Dude, I'm digging the work you are doing. Im finding it really hard to look at your bike in detail when all of these pictures are taken in your dark garage and the bright sun is 7ft away outside. Roll that thing out there for us!
Thanks! Sorry about the pics, most were taken awhile ago but there are more coming and most were taken in better conditions.
 
Decided to go with orange for the color. Used Hugger Orange from a 2016 mustang for a baseline and just made it a couple of shades redder. Went with a single stage urethane for ease of repairs later.
 

Attachments

  • IMG_0564.JPG
    IMG_0564.JPG
    287.9 KB · Views: 283
  • IMG_0563.JPG
    IMG_0563.JPG
    260.5 KB · Views: 283
Here it is painted and reassembled. Liked the color but with all the additional tin from the new tail looked a bit too plain, I'd have to fix that somehow. Had to use a Pingel petcock as the factory 400 petcock interfered with the cylinder head.

During the paint process alot of other parts showed up. Removed the factory headlamp ears and replaced with some generic aluminum ones. Got a set of rear sets from Fast from the Past(very nice piece of hardware), replaced the rear shocks with Hagon ones and rebuilt the front forks with Race Tech springs, cartridge emulators(probably the best thing I've done to this bike so far as far as riding enjoyment)and a new set of fork caps with built in preload adjusters. Also did a 520 conversion while adding a few teeth on the rear sprocket. Made a rubber mounted, fast removal license plate holder using a LED frame and some scrap metal. Had the seat upholstered and replaced the levers with a set from a 2015 XT250(nice and short). Painted the case covers and replaced hardware with socket head stainless bolts and installed some Tarozzi clip-ons with Beston style grips.
 

Attachments

  • IMG_0613.JPG
    IMG_0613.JPG
    400.8 KB · Views: 277
As I said before, the bike looked too plain, had to do something to break up all the orange. Decided to do something that looked at least somewhat OEM(the idea behind the overall build was to make something that Yamaha could have offered to the public similar to Daytona special). Played around a bit with a few designs but ended up with a Yamaha style racing stripe and had it printed up by a local shop that does wraps on vehicles. Hers a few pics of the evolution and the final product.
 

Attachments

  • IMG_0566.JPG
    IMG_0566.JPG
    450.6 KB · Views: 277
  • IMG_0569.JPG
    IMG_0569.JPG
    403.5 KB · Views: 285
last mockup in tape and finished product.
 

Attachments

  • IMG_0605.JPG
    IMG_0605.JPG
    375.4 KB · Views: 275
  • IMG_0637.JPG
    IMG_0637.JPG
    352.4 KB · Views: 293
Back
Top Bottom