Second bike, More of a finisher rather then full build. CB450

SouthPaw

Been Around the Block
Well I am back to the world of DTT and bikes! After spending the last almost 2 years in Sudbury, away from my CB550 baby, I stumbled across this little cutie while browsing through Kijiji.

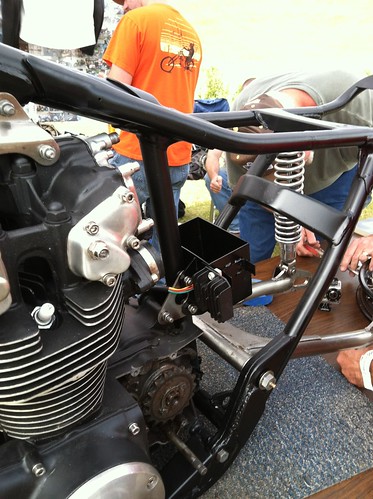
There are a ton of toys in Northern Ontario, however there is not that much in the cafe area. When I saw the add on Kijiji for a 1973 CB450 with 15xxx km on the engine, I got curious. After emailing the owner and getting more details, he had it all cafe finished and on the road last summer, then took apart some things for his CB750 Project. All the parts I need were either given to me by the PO or I have at home in Waterloo. The only big issue is the seat. I have to fab one myself.

Here is the best part of it all. My lovely fiancee decided break the misery of this depressing winter and give me an early gift! She financed the entire purchase! It was delivered by the owner last night when I took a few pictures!

So here she it, Nameless at the moment,

IMG_0559_zpsb0e652b9.jpg


IMG_0540_zps6514d45f.jpg


IMG_0543_zps7a8e6812.jpg


IMG_0546_zpscab01267.jpg


IMG_0547_zps622f41e4.jpg


IMG_0555_zpscd477f0f.jpg


IMG_0561_zpse38fdfad.jpg


IMG_0541_zpscfd80edd.jpg
 
Well got time today to start working away at the front end / total electrical system. I am either a little confused / electrical stupid,. or this bike is electrically completely different from my CB550....

Ill use this picture as the overall view, also my dslr cant focus clearly any closer then this so I was forced to switch to my iPhone camera for the rest. I apologize for the quality / bush league questions but since this was purchased already customized I am a tad confused / secretly intimidated.

IMG_0555_zpscd477f0f.jpg


Somethings I have no issues identifying as they are idiot proof, there is only one place to connect this to
D24A9D54-6D5E-4B2F-9C31-8DB8DDCC3CEF-4549-0000046311501850.jpg


and it is to here. Please correct me if I am wrong in this / any other area.

13124601-F07A-4FB7-B59A-F665278DDDFC-4549-00000461AFF42FAD.jpg


I will keep an order of issues just in case anyone is nice enough to help identify them :)

Unknown wires #1 - Blinker / blinkers possibly?
EDF3D5BA-B5A0-49F2-81EB-88D5C63318F8-4549-00000461E11A8D5D.jpg


Unknown wires #2 - these are coming from the main control on the LHS... Other side blinkers?
9A2DD651-DFCD-4811-978F-67E694186D6B-4549-000004619D417806.jpg


Unknown wires #3- No clue.... best guess more blinkers? haha
196E0364-54E0-4C8E-88B2-8C0B46E6E069-4549-00000461FEEC63E7.jpg


Unknown wires #4 Not from the main spaghetti mess but not sure where these will go..
5B5590F0-2B24-4881-92BC-A22BECE7DDA7-4549-0000046240E38822.jpg


Ill need a new Tach cable...
3E1F0D40-4859-4AFB-8E9F-87A3F0E7CDCE-4549-000004626D8C9565.jpg


Unknown spring - Not a wire but not sure what this is exactly. Right side.
4FDDEA19-3A5D-490B-BE0B-AA5D436E5555-4549-000004627C94C920.jpg


The rest of the wiring that I need to do is now in the back! YAY REAR ENDS!

Back Overall - Not sure which kind of battery PO used... Looks like it was relocated here.
1A2D6D7C-E01F-4892-9647-AB2A94D850ED-4549-000004629F4AB071.jpg


Unknown cluster 1 - What is that little black thing by my thumb?
3C9857DD-9566-4D88-B6FC-1375CF26A07D-4549-0000046295165255.jpg


Unknown cluster 2- I am assuming break light / signals.
F998353E-7B10-499F-B50C-D808ED43186D-4549-0000046288DB577C.jpg


Unknown wire 3- Rear wheel, cut wire, followed trail with the following three pictures
8849FAE3-9836-46AD-A20E-4B9D96C192C2-4549-00000462CC6F6F35.jpg


Zip tied along the frame
F1AF5F6B-1416-4B01-8016-560F1A896593-4549-00000462DFB32E48.jpg


Runs up the middle
CD570A53-88BA-47F3-AFC3-25541844B531-4549-00000462F4EF0366.jpg

63EA9D00-0908-40EF-9C16-C302C4EBB6CB-4549-00000462EF5628C6.jpg


To here?
234A7145-688C-4A63-AF0C-82F53234B1B7-4549-00000462FC2F93FD.jpg
 
Forgot to include.

What is the best way to make all these connections? Hook and loop the ends and electrical tape?

I would also like to use this or the Cateye popular All in one tail section...

http://www.ebay.com/itm/LED-Motorcycle-Quad-ATV-Turn-signal-Brake-License-Plate-Integrated-Tail-Light-A-/251146183727?pt=Motorcycles_Parts_Accessories&hash=item3a797aa42f&vxp=mtr
 
Well I am off on a hunt for some wiring and other materials. Any other places I should check out besides Canadian tire / princess auto? Home depot perhaps?
 
Hey SP -
I'm no expert, but I would also go looking for a good wiring diagram and start from scratch. I'll be facing that issue with my build soon. I think it might be less frustrating doing your own wiring, plus you'll be starting with new fresh connections. I would definitely get to know shrink tubing. Much better for permanent connections than just electrical tape.

Just my 2 cents.
 
Your 2 cents are very valuable. Especially because starting from scratch is what I will be doing on my CB550 project.

This bike is a get it together and ride it for minimal cost and effort. I just don't want to be doing two all out wiring projects in the same year, fully knowing I am not going to be hanging on to the 450.

I picked up 18Ga wire, Butt connectors, 10Ga for the grounding wire and some nuts and bolts to mount my headlight and speedo. Tonight I study the wiring diagrams I have found online,

If anyone has a high res version for the CB450 I can plop onto my iPad to have with me that would be wonderful!
 
I'm pretty sure that black thing with the spring near the rear-set is the back brake light switch. Also this was posted a couple of days ago, should help with the wiring: http://www.dotheton.com/forum/index.php?topic=45678.msg501628#msg501628
 
Well taking a break from electrical today. I studied the wiring diagram and I think I have a good understanding of where to connect all of my loose ends. I am certain the battery I got with the bike is dead... Will be looking into a smaller AGM or ballistic battery? Battery store in town wants 95$ for a 12v AGM...There has to be a better price out there? Even for the standard acid battery they wanted 74$. Is it just me or is that a bit pricey?

I thought I would play around with the seat idea and foam. and let me tell you something... Either I picked up the wrong florist foam and adhesive, or this stuff just refuses to stick together! the local dollar store did not carry the green stuff I have at home, rather this gray junk.... I think I wasted 14$ on it. We will see in a few hours one the glue dries. Here is the general look of it... i have it drying in the basement.. 3h later and its still super soft. Is it possible to use too much glue? What are you guys using?
E33EA617-C570-4F50-9F3A-7BD74D10DD6E-2887-000003A4FF158E88.jpg


However I stopped by the thrift shop and picked up an almost brand new black leather bomber for 9$! I think I found the leather for my seat. Feels tough and durable as it is a heavy winter bomber jacket.

4f6acdcd3894dda4c17b429dd9219fe9.jpg
 
While I was looking for a good pair of pliers in the basement I ran into this thing. No idea what it is. but it is Identical to the idea I had for my seat setup! If you guys know what this might be please let me know as I am really curious. It says its made in New Zealand, company name is Tulloch i believe.

898bdc0fafd0528b40e6cc42df3dd5c8_zps680001c3.jpg


a335e16be29375be17fce44fb8b8544d_zps6fb84e64.jpg


76a5c24638f191f348e615db29a7b6e9_zpsbe6b3154.jpg


Back to work for a while, bigger update when I get home!
 
Looks like a cafe seat? If its not then its just awesome
 
http://hondatwins.net/forum/viewtopic.php?f=50&t=20623&p=161792#p161792

Diagram located at the bottom of the first page is checked and should be correct. There is a diagram on page 2 as well that will help.

You have some modifications to the charging system that are not stock. Nothing wrong with that other than figuring out what the PO used.

Can't go through pictures well at work but I will check things out once I get home if need be.

GOOD suggestion is get a good USED harness and keep on hand or replace, some of the wires look a little heated to me, which means someone wired something wrong and might have burnt something.
 
that barbie doll cafe looking seat is actually a wall mount for a pair of spring loaded scissors. I grew up in south africa and it seemed every kitchen had a pair of these mounted somewhere. you'd grab the scissors, squeeze them closed, then pull them from this case.
 
SouthPaw said:
Unknown wires #3- No clue.... best guess more blinkers? haha
196E0364-54E0-4C8E-88B2-8C0B46E6E069-4549-00000461FEEC63E7.jpg

Yellow/Red is for the starter button.

SouthPaw said:
Unknown wires #4 Not from the main spaghetti mess but not sure where these will go..
5B5590F0-2B24-4881-92BC-A22BECE7DDA7-4549-0000046240E38822.jpg

Guage lights


SouthPaw said:
Unknown spring - Not a wire but not sure what this is exactly. Right side.
4FDDEA19-3A5D-490B-BE0B-AA5D436E5555-4549-000004627C94C920.jpg

Rear Brake Switch


SouthPaw said:
The rest of the wiring that I need to do is now in the back! YAY REAR ENDS!

Back Overall - Not sure which kind of battery PO used... Looks like it was relocated here.
1A2D6D7C-E01F-4892-9647-AB2A94D850ED-4549-000004629F4AB071.jpg

The black finned thing is a newer combination Regulator/Rectifier. The round thing is the starter solenoid/relay. The old rectifier went in the bracket to the left of the round thing. In another pic I can see your regulator. You have two regulators in your system. :D

SouthPaw said:
Unknown cluster 1 - What is that little black thing by my thumb?
3C9857DD-9566-4D88-B6FC-1375CF26A07D-4549-0000046295165255.jpg

Looks like a battery tender socket so you can plug your bike in to charge it when not using. I have one, though different, on mine.


SouthPaw said:
Unknown cluster 2- I am assuming break light / signals.
F998353E-7B10-499F-B50C-D808ED43186D-4549-0000046288DB577C.jpg

Yes


SouthPaw said:
Unknown wire 3- Rear wheel, cut wire, followed trail with the following three pictures
8849FAE3-9836-46AD-A20E-4B9D96C192C2-4549-00000462CC6F6F35.jpg

My guess is license plate light or brake light. Did it have a license plate bracket on the rear axle?
 
Sweet! Thanks for the help guys! I will be ordering a battery this weekend and when it comes in I can actually get to testing this sucker and maybe even get it started soon.

More on the scissor holder seat tomorrow / late tonight.
 
Ah, so the PO was kind enough to upgrade the fuse holder to a modern one. However, these bikes should have a 15 amp fuse. And yes, there is only one for the whole bike (unless he added more).

Yes, you can put a new starter switch anywhere, and it can be any kind of momentary switch you want. When I got my bike it had a cheap autozone switch under the seat. I scrapped that and fixed the one on the bars.

I do not know what two regulators in your system will do. I'm guessing the PO didn't realize the new rectifier he got was also a regulator. Maybe it isn't. ????? It looks just like the one I put on my bike.

8091801704_2e966e7ed7.jpg
 
Well I got some tinkering / curiosity work done this evening. Took apart all of the lights, used my buddy's drill battery to test the lights. LEDs were good, wire got loose on both of them and fell off. What got my curiosity was the regular / non LED signals. they were grounded and both just had a black wire bringing power in and they are bloody bright. Will probably paint them black and use them as front signals.

the gauge lights, 2 were burnt out, and I remember someone mentioning plug in LED bulbs to replace the originals... BS9A? something along those lines. I will look around as I need new ones and why not get LEDs?

2bd212f0903caf54418cac4f99da5bf0_zps51d55594.jpg

66f4f27c6c442db3ea7c77b3f7b3ebe4_zpsc3dbd060.jpg


I also went out and bought some better foam. Blue construction stuff. 8 foot by 2 foot sheet. So much easier to work with its insane. AND it cost less then the dollar store garbage.

I made a seat pan cut out of cardboard, as well as a new alteration of the pattern. After a little bit of sanding and trimming this is what I have come up with.

83F2EC17-9648-4467-8263-30F3E5EF5D31-6349-0000078B949B5E3C_zpsafd0ab35.jpg


7B27E4BC-BA19-4D8D-86E8-6BF9723E8DA7-6349-0000078B9E69C333_zpsd67e2893.jpg


B1F8DA91-C640-42E5-9542-9470CDA4CC37-6349-0000078BA4804DE7_zps31dfff34.jpg
 
SouthPaw said:
Unknown wires #2 - these are coming from the main control on the LHS... Other side blinkers?
9A2DD651-DFCD-4811-978F-67E694186D6B-4549-000004619D417806.jpg

Well I have been chipping away at the electrical stuff here. Ordered new bulbs, got my AGM battery, and now I am setting it all up. Connected regular binkers at the front, all in one for the back, and the tach / center console. There are 2 cables left unidentified, the Wiring diagram I was looking at did not contain a blue/white wire, or a black / white wire.

Help?

Also I would like to upgrade my headlight. to an H4? something that will be brighter and draw less power then the stock.
 
I think I saw a glimpse of your controls in one of your pictures, they are not stock. Better picture would help.

I say that because from the STOCK left side there is NO White striped black or blue. Black/white should be the right side and that is power to coils. There is no white/blue any where on the bike.

If you can figure out which controls you have, you can then find the wiring diagram from that manufacturer and match wiring.
 
With my fit test behind me, all of my focus is back on the bike. It snowed this week in Sudbury and it should be the last of it.


Image for the controls. I picked up a digital volt meter that does quite a few things, and testing the wires, My regular grounded off state was around 12.87v. Turning the key into the On position, checked my gauge wires. both the green and the brown/white stripe were at 12.87. The blue white stripe and black white stripe wires were all over the meter, however, it seemed to settle at 0.360. I will make a video later tonight to post showing all these things.

I am not having much luck, I tried wiring up the connections loosly just to test out and see what works where, but I had no luck. Will try a full connect tomorrow with actually securing the headlight brackets, and mounting the signals / gauges to see what we get. Still have not started it. Haven't tried yet actually. Might be a stupid question but do I need to have the wiring totally complete before I can start it? What do I need to have hooked up in order to kick it up and see how it starts/ runs?
 
Back
Top Bottom