Second chance, A cb350 build

Hello all, I hadnt planned on doing a build thread or anything like that but for this bike but I stumbled across this forum and said why not.

ill start off with a short history of the bike.. it was first built by a friend of my brothers about 5 years ago but it never really was finished. i first saw the bike a couple years ago myself and def thought it was neat but i had just finsihed a cb 550, which i have since sold so i didnt think much about it after that .. fast forward to a couple months ago and i get a call from my brother asking me if was interested in it.. the price was way to good to pass up so i jumped on it..

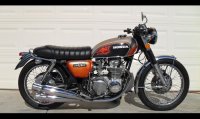
the bike def has a lot of new parts and a bunch of cool hand made stuff too.. but like i said it was never really finished so it was def going to be a project to get it how i wanted it.. the first thing i did when i got it back to my shop was complete the frame.. there were no support braces from the seat to the frame so i hadnt even got to sit on it yet..

heres a pic of the bike the night i got it after the supports were welded in..

FE41C071-3B9C-4D36-AC19-85E832BD5CB1-1251-00000242501C66D8.jpg


from there i went ahead and tore the bike down and started building the gas tank.. the one in the picture was hand made in aluminium but was just a little boxy for me and it sat really high on the back bone..

96E8B2F2-9B80-42B2-A30E-0CECFAD91028-5668-000009E59FB796FC.jpg


C5E1CC86-3F4F-4AED-893E-25806E414EBF-5668-000009E5A5CC277D.jpg


03F1F5B6-BC76-4C89-A2FC-6C19AF362FA9-5668-000009E5B05D9CDE.jpg


3190D927-B2EB-4583-A741-C790FA0215BF-5668-000009E5B5E0BD47.jpg


next up was tackling the wheels.. i knew i wanted to keep them as they aluminium from an older kx 125 from what i gather.

im bummed i only took one pic of them before.. they were pretty grimey though..

heres the front
4B9E7A12-E0D8-4ABA-AF54-F130E0B03642-4179-000005B98F549056.jpg


and a couple of them during and after..
4AF6CCF4-F617-4702-8E92-07B7AB44B2FD-229-0000000CA7B1293A.jpg


04756E81-4832-4566-BE8C-2EA221FC1638-4179-000005BCB25B752F.jpg


couple detail shots..
50ED8DDC-5FA4-4F7A-88E3-641428977417-4179-000005BCBCFAE57D.jpg


5E7AFBE9-F980-4876-84D1-FF037A65356A-4179-000005BCB7EE0EF5.jpg


obviously once the wheels where done the bike was a roller again.. i had put the motor back in the frame/done a bunch of powder coating and polishing and bought a couple little odds and ends (new clip ons,headlight and mounting ears) i had also done the first round of body work to the tank/ sealed it and also built a seat pan so i could send it out for upholstry

here she is as a roller again

20A742D2-939C-4EF7-A248-CC03FC3F9A88-229-0000000CBE2ABEAE.jpg


the seat pan and tank pad all ready to be sent out

F0B6AFEB-AF10-4457-83C1-918A936E29CF-4179-000005BDB3DBE346.jpg


couple pics of the seat and tank pad all finished.. cant wait to get these back.. should be today!

9D851EBF-2F06-4157-85C6-A5A6C9703767-229-0000000CD62C1DA7.jpg


CB9E92F5-3591-4761-BE3E-33D08D4B01B2-229-0000000CD860395C.jpg


0B4D248E-24ED-438B-BB8A-0322439EEE60-229-0000000CDD538973.jpg


the only pic of the tank pad i pulled off instagram, if your on there give this guy a follow, his work is fantastic. his user name is "lovestrim"

9E19D960-FFC0-4543-8B25-3F436EC9A1E2-229-0000000CDB3FBA9E.jpg


well that about brings things up to speed, i deff just skimmed over things really quick for the first post, but ill be able to do more detailed updates from now on.. the last thing i did was test the gas tank for leaks after leting the sealer dry for a while.. im happy to say it was dry as a bone which is a huge relief! from there i contiuned on with some more sanding and body work.. hope to have the bike in paint by the end of the week :)

CEB462C8-7000-4838-AA81-0BC7535E3655-4179-000005C00270EDF9.jpg


Cheers! - Jay
 
Subscribed. Looks like you got a sweet custom to start with - that seat, monoshock setup, and exhaust are killer!
 
Wow thanks gents! its always a toss up coming in to a new forum and sharing your project, Thanks for the warm welcome :)

BarnBurner said:
Subscribed. Looks like you got a sweet custom to start with - that seat, monoshock setup, and exhaust are killer!

absolutley dude, its hard trying to make it my own with all the really cool things the previous owner had done. I've got a new muffler coming that should compliment the exaust well. I was also very close to making my own seat/tail section to go with the tank but i just like that one too much ahahhhaha.. i think ill end up changing it at some point down the road but for now im more than happy with it .
 
bit of an update.. im super excited to have gotten my seat back from upholstry so i had to hit the shop and try it on..

this is just placed on so its not centered up or anything. I def cant wait to get everything in paint now after seeing them on the bike..

12BFA037-3011-4211-A500-870AD88F7C28-6492-0000087291722989.jpg


next up was a couple things that have been bothering me for a while.... granted when i got this bike my goal was to just clean a few things up and ride it but im quickly learning that once i start diving into things i have little self controll ahahhaha.. anyway standing back and looking at the bike 2 things kept bothering me.... 1st was the coil spring for my rear shock is all beat up and its blue and second being that next to everything else all painted and clean, the cylinder head and jugs along with the carb bodys just jumped out at me.. even though they are clean they just look out of place.. so then of course this happend

8E032FC7-7DF2-4418-B729-018BEDB91B71-6492-00000872982293CE.jpg


took the rear coilover apart and tried sandblasting it but the coating is much too strong so im going to try some powder coat remover next and see if that will work.. im curious if any of you gents have ever powder coated your rear shocks when refinishing them?

pulled the motor/carbs back out and prepped them for paint.. im gonna use eastwoods alumiblast on them.. its a really nice "clean aluminium" looking finish.
 
david.boettcher said:
builds looking really sharp! who's your upholster? great work...

thanks man! my buddy Kip at loves trim shop in GA did the seat and tank pad for me.. amazing work

BarnBurner said:
What, no side shot of that fancy seat and tank strap? Way to tease us :p

i know i know! ahaha since the tank pad is custom made, i still have to come up with a way to mount it .. from the side it pointed up way off the tank.. :p
 
Re: Re: Second chance, A cb350 build

took the rear coilover apart and tried sandblasting it but the coating is much too strong so im going to try some powder coat remover next and see if that will work.. im curious if any of you gents have ever powder coated your rear shocks when refinishing them?

Yep, I have powder coated the springs and have used appliance epoxy on them both with good results. That factory coating is super tough, I ended up taking mine to a buddy with industrial blasting equipment and he made it happen, but my home blasting set up wouldn't touch it. You can powder the body, but you'll have to strip it of all of the seals and fluids because they don't like heat. Joe on here has shown how they do it over at PowderPro.
 
Kanticoy said:
Yep, I have powder coated the springs and have used appliance epoxy on them both with good results. That factory coating is super tough, I ended up taking mine to a buddy with industrial blasting equipment and he made it happen, but my home blasting set up wouldn't touch it. You can powder the body, but you'll have to strip it of all of the seals and fluids because they don't like heat. Joe on here has shown how they do it over at PowderPro.

great info my friend! yeah my blast cabinet wouldnt touch it either.. im hoping the chemical stripper does the trick. the shock body itself is in nice shape so that will just get a quick clean up.. just the spring was in poor shape. Ill def post pics of my expieriance :)
 
Little update on the rear coil spring. I went to a buddies shop to make use of some of the powder coat stripper he has.. It took alittle while but it worked a treat!

This is after about 15 minutes

57CD6F44-86AE-4F2F-9C03-92806F957B30-122-00000003E2677CB8.jpg


After that I took it out and hit it with a wire wheel to try to get some of the heavier stuff off.. This is after the wire wheel and another 20 or so minutes

C97A601B-355A-451E-ADAC-15C0CD445E7A-122-00000003E8F42A99.jpg


And finally all cleaned off and ready for some media blasting

F5B295F9-D13A-4181-B909-F5D2B79BC477-122-00000003ED4362DE.jpg


Next up is media and some fresh powder coat :) pics to follow!
 
Thanks so much for posting on my build, because it made me curious enough to go look at yours. A compliment from someone with taste means so much more....and I'm glad I did.

I want to get a map of the roads you travel, so I can "stumble across" a nice start like you did.

You got me to Subscribe with the line .. "bunch of cool hand made stuff".

Really love the exhaust, drum brake venting, alloy rims. Also nice seeing a hand made steel butt on her too.

looks like you will be continuing the great work started with the tank and upholstery designs and work.

Drooling over the seat, Gotta ask...How much $ and Who did it? I need someone to do my seat and your design is very similar to what I had in mind.

Do I see you sneaking some Brass into the design, like I think I see on the Points Cover?

Would like to see what you did with the CB550, I just finished one too, more of a styling exercise and admittedly a need for more immediate gratification than I was getting from the long term projects I was into.

Here is mine.
 

Attachments

  • my 550.jpg
    my 550.jpg
    579.8 KB · Views: 169
Thanks so much for the kind words gents! I was def lucky to have come across the chance to scoop this bike up.. of course i would have loved to do the work myself and there are some things i would have done alittle dif, but all in all i think once im done doing the things i still want to do ill be comfortable saying that i built the bike

the seat was done by loves trim shop in GA. amazing work and for the 200.00 i paid i couldnt be happier

as far as my old 550, i def miss that bike. i was unfortunaly kinda forced to sell it.. heres a pic of that for you to check out though

e51afd9a.jpg


In a bit of other bike related news, i was asked to build an art bike for a good buddy of mine. the bike was quite literally pulled out of a horse barn as a bare frame with a back wheel on it. all the other parts were in boxes..you can imagine the state they were in.. not pretty ahahaha. anyway i say art bike because this will not be a runner, but rather a representation of a "survivor". it will most likely sit in the lobby of his office building along with an assortment of other vintage awesomeness..

heres the scene the night we started sorting through the parts..

BBDA4DAD-4B5C-4538-8E3A-A735F2F1F52D-2909-00000502A0B2E691.jpg


and as of yesterday.. bout 5 days in

61 BSA 10
AB22AC47-52D0-424D-91BA-7FF09B34D939-2909-00000502A6C20AE9.jpg


Now last but def not least.. due to the BSA project i havnt been able to put as many hours in on the 350 as id like but still trying to make some headway on it.. after tinkering with the BSA for a while yesterday i decided i should play with my bike a bit.. i had pulled the motor to clean a couple things up so i was able to get that back in along with my rear shock and carbs. I was also excited to get my exhaust all painted up and mounted with my new muffler..

12123A36-D8C6-40C3-9108-67556FF81A32-2909-00000502926C473E.jpg


up next is building a battery box and waiting for some more parts to show up.. hopefully ill be able to work on it a little this week and have some more updates to share.. thanks for looking! :)
 
Perfect choice on the muffler..... (Not that you asked) but, I liked the Satin Silver on the Exhaust. IMO, The Black Exhaust gets lost/busy with Black Frame.

And by the way the BSA is a vintage show piece...what you do with your bikes is more Art.

Love the 550, I even did an image search for more pics cuz you were so stingy with only one pic....lol.

Really like the drilled front fender... I will probably pay you the ultimate compliment and steal the idea on a future build.
 
Back
Top Bottom