
We noticed you are blocking ads. DO THE TON only works with community supporters. Most are active members of the site with small businesses. Please consider disabling your ad blocking tool and checking out the businesses that help keep our site up and free.
You are using an out of date browser. It may not display this or other websites correctly.
You should upgrade or use an alternative browser.
You should upgrade or use an alternative browser.
Shake the Box CL360/378 - The Hedgehog - Done
- Thread starter ridesolo
- Start date
crazypj
Split personality, I fake being smart
Re: Shake the Box CL360
I haven't been able to verify through any channels but it looks like Honda changed the height of cylinder block at some time with later models.
The CJ definitely needs checking as it seems to have a shorter block than a 74 CB which can be milled around 0.030" without issues
I haven't been able to verify through any channels but it looks like Honda changed the height of cylinder block at some time with later models.
The CJ definitely needs checking as it seems to have a shorter block than a 74 CB which can be milled around 0.030" without issues


3DogNate
"You Meet the Nicest People on a Honda"
Re: Shake the Box CL360
Cool... I'm probably going to have to
Looking forward to your report... I'm probably going to have to revisit my clutch again... mine just got back up and rolling again.. and my first jaunt around the neighborhood and I could feel it slipping still even after upgrading to new EBC springs...
Cool... I'm probably going to have to
ridesolo said:Got the new clutch springs in today:
Yup, they're a bit longer than the stockers:
All installed and torqued to 90 inch pounds. About ready to button the thing back up.
Looking forward to your report... I'm probably going to have to revisit my clutch again... mine just got back up and rolling again.. and my first jaunt around the neighborhood and I could feel it slipping still even after upgrading to new EBC springs...
Re: Shake the Box CL360
As long as I'm taking on this build I'm looking forward to that report too! I'm getting there slowly. I've made so many changes that I have no idea where it's going to be at first. I'm using the the Ninja 17" wheels and that rear sprocket is several teeth larger than the original on the Honda. I plugged all the info into a ratio calculation site and it looks like if I put about the smallest sprocket I can buy to fit the Kawi carrier on there I'll get the thing back to about the same engine RPM to Highway speed as what came original on the Honda. Once I get it all worked out so I have a decent, workable highway RPM range then I'll worry more about the clutch. Might be a fun bike to ride w/ the healthier engine and the 42 tooth rear sprocket, though.
3DogNate said:Cool... I'm probably going to have to
Looking forward to your report... I'm probably going to have to revisit my clutch again... mine just got back up and rolling again.. and my first jaunt around the neighborhood and I could feel it slipping still even after upgrading to new EBC springs...
As long as I'm taking on this build I'm looking forward to that report too! I'm getting there slowly. I've made so many changes that I have no idea where it's going to be at first. I'm using the the Ninja 17" wheels and that rear sprocket is several teeth larger than the original on the Honda. I plugged all the info into a ratio calculation site and it looks like if I put about the smallest sprocket I can buy to fit the Kawi carrier on there I'll get the thing back to about the same engine RPM to Highway speed as what came original on the Honda. Once I get it all worked out so I have a decent, workable highway RPM range then I'll worry more about the clutch. Might be a fun bike to ride w/ the healthier engine and the 42 tooth rear sprocket, though.
Re: Shake the Box CL360
top out at 45mph, but the front end will be up the whole way there =)
ridesolo said:Might be a fun bike to ride w/ the healthier engine and the 42 tooth rear sprocket, though.
top out at 45mph, but the front end will be up the whole way there =)
Re: Shake the Box CL360
And to think I was actually considering putting a XR600 lump into that frame! Pish posh, silly boy!
hurco550 said:top out at 45mph, but the front end will be up the whole way there =)
And to think I was actually considering putting a XR600 lump into that frame! Pish posh, silly boy!
Re: Shake the Box CL360
I'm still gonna do it =) then we'll race haharidesolo said:And to think I was actually considering putting a XR600 lump into that frame! Pish posh, silly boy!
Re: Shake the Box CL360
(I still will if I get the chance.)
ridesolo said:And to think I was actually considering putting a XR600 lump into that frame! Pish posh, silly boy!
(I still will if I get the chance.)
crazypj
Split personality, I fake being smart
Re: Shake the Box CL360
Your not the only pair ;D
If I come across an XL or XR motor you know where it's going 8)
ridesolo said:And to think I was actually considering putting a XR600 lump into that frame! Pish posh, silly boy!
hurco550 said:I'm still gonna do it =) then we'll race haha
ridesolo said:(I still will if I get the chance.)
Your not the only pair ;D
If I come across an XL or XR motor you know where it's going 8)
3DogNate
"You Meet the Nicest People on a Honda"
Re: Shake the Box CL360
I say that because my clutch was slipping and I replaced the springs with the CSK4 springs and I still have a bit of slip. It might be my plates though, next oil change I'll have to address my clutch with an in spec set of plates and maybe even heavier springs. Will see...
ridesolo said:As long as I'm taking on this build I'm looking forward to that report too! I'm getting there slowly. I've made so many changes that I have no idea where it's going to be at first. I'm using the the Ninja 17" wheels and that rear sprocket is several teeth larger than the original on the Honda. I plugged all the info into a ratio calculation site and it looks like if I put about the smallest sprocket I can buy to fit the Kawi carrier on there I'll get the thing back to about the same engine RPM to Highway speed as what came original on the Honda. Once I get it all worked out so I have a decent, workable highway RPM range then I'll worry more about the clutch. Might be a fun bike to ride w/ the healthier engine and the 42 tooth rear sprocket, though.
I say that because my clutch was slipping and I replaced the springs with the CSK4 springs and I still have a bit of slip. It might be my plates though, next oil change I'll have to address my clutch with an in spec set of plates and maybe even heavier springs. Will see...
Re: Shake the Box CL360
Not sure how I just now got on board with this. I love it. Time to button her up.")
I used Barnett CB350 heavy duty race springs in the clutch on my other 360.
Not sure how I just now got on board with this. I love it. Time to button her up.
I used Barnett CB350 heavy duty race springs in the clutch on my other 360.
Re: Shake the Box CL360
Thanx Eric. Since I didn't get my hands on a CJ oil pickup I went ahead and put the clutch side cover back on, ready to go. (Thanx, PJ, Yeah, I did the oil transfer mod, too.) I got my travel trailer project done so I'm now going to try and get some work done on this thing. I've got a little bit of cutting/grinding to do and then take it back down to my friendly neighborhood welding instructor. I still have to decide what to do for an electrical tray, battery location, etc. After that I should be able to sand, prime, and paint the frame.
I've decided to pull the forks back apart and put another inch back into the height. I like them as they are now, but they're way too stiff. I lowered them two inches so putting an inch back in ought to free them up a little. Right now the fork lowers are black but since they'll be apart I'm going to change them to the color the frame will be.
The tank, seat, and front fender just need a little more sanding and primer and I should be able to put color on them as well. Before I do that I'm considering laying up a fiberglass base for the upholstery. I've never laid up any glass like that, but I think (hope : ) I can pull it off.
Time to get moving here... any comments/suggestions welcome.
deviant said:Not sure how I just now got on board with this. I love it. Time to button her up.
I used Barnett CB350 heavy duty race springs in the clutch on my other 360.
Thanx Eric. Since I didn't get my hands on a CJ oil pickup I went ahead and put the clutch side cover back on, ready to go. (Thanx, PJ, Yeah, I did the oil transfer mod, too.) I got my travel trailer project done so I'm now going to try and get some work done on this thing. I've got a little bit of cutting/grinding to do and then take it back down to my friendly neighborhood welding instructor. I still have to decide what to do for an electrical tray, battery location, etc. After that I should be able to sand, prime, and paint the frame.
I've decided to pull the forks back apart and put another inch back into the height. I like them as they are now, but they're way too stiff. I lowered them two inches so putting an inch back in ought to free them up a little. Right now the fork lowers are black but since they'll be apart I'm going to change them to the color the frame will be.
The tank, seat, and front fender just need a little more sanding and primer and I should be able to put color on them as well. Before I do that I'm considering laying up a fiberglass base for the upholstery. I've never laid up any glass like that, but I think (hope :
) I can pull it off. Time to get moving here... any comments/suggestions welcome.
Re: Shake the Box CL360
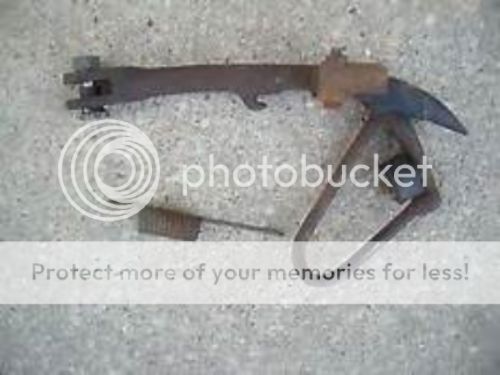
Got to spend some time today. Little stuff, but it all adds up to getting stuff done. I've decided to use the side stand from a CB500T because it's an inch shorter than the CL360 stocker which is now too long because of the lower stance. The 500T piece, though, has all kinds of junk added to it, junk I don't need/want, like a pad to keep it from denting the exhaust pipe, a foot pedal sort of thing, and the mount for that rubber finger thing. (You know, that "hey idiot, you left your kick stand down" thing.) I forgot to take a picture of it before cutting the junk off, but it was just like this:
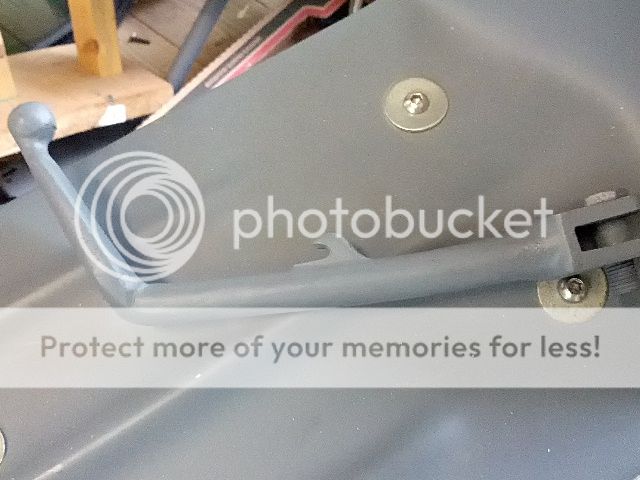
Now it's "adjusted", cleaned up, and primed:
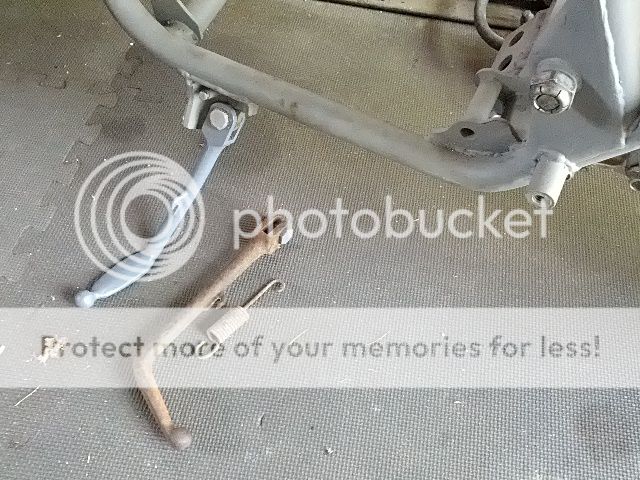
And here it is stuck in place for the moment:
Next little project. I've been putting this one off for a while because I didn't want to mess it up. Last time I was at Mid-Ohio I picked up another EX500 front fender to make into a hugger fender to mount on the swinger. I put off cutting it because there wasn't much of anything like a flat plane anywhere on it to use as a guide for an even cut. I finally decided to stretch a piece of line between Point A and Point B and go for it w/ the Dremel.
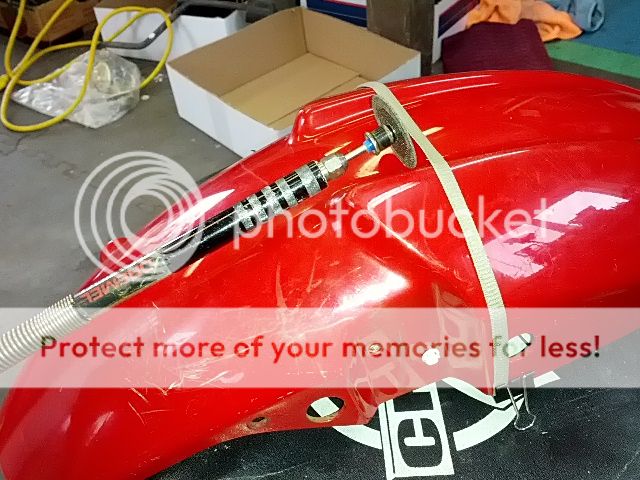
I managed to get it cut w/o error:
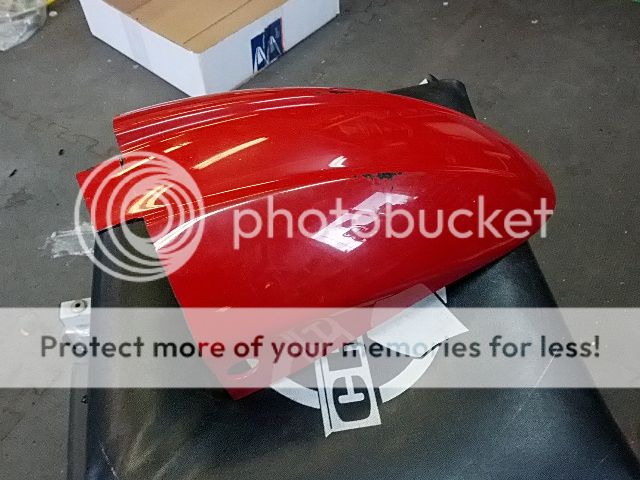
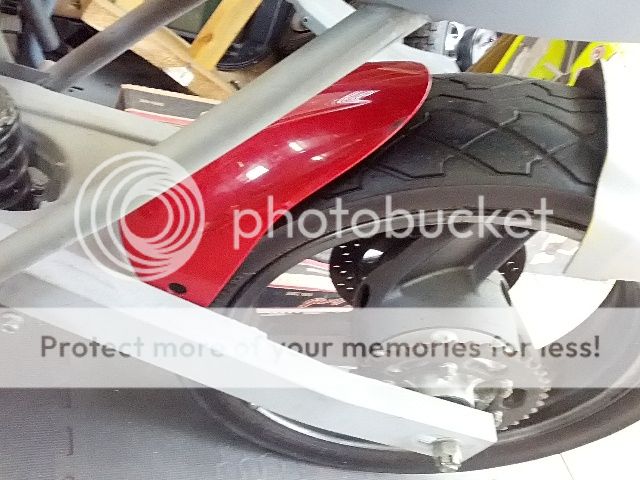
Here it is stuffed into place after some "adjustments" made with a belt sander. Once everything is painted and together probably very few will notice or care that the hugger fender matches the front fender, but I'll know, so I guess that's good enough.
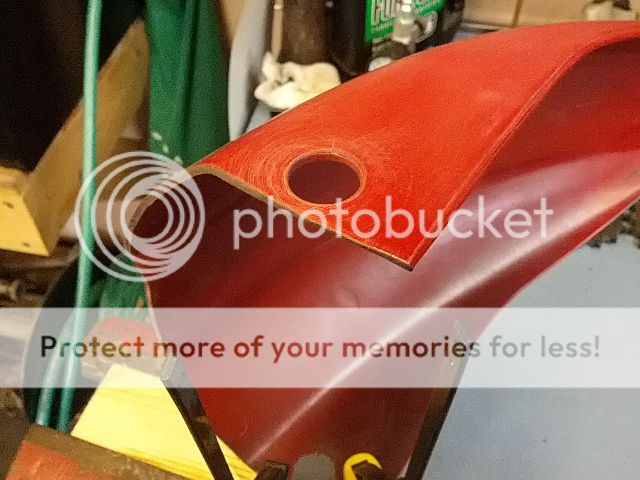
The thing has those big holes for mounting onto the fork lowers and I don't need holes there so I cleaned 'em up:
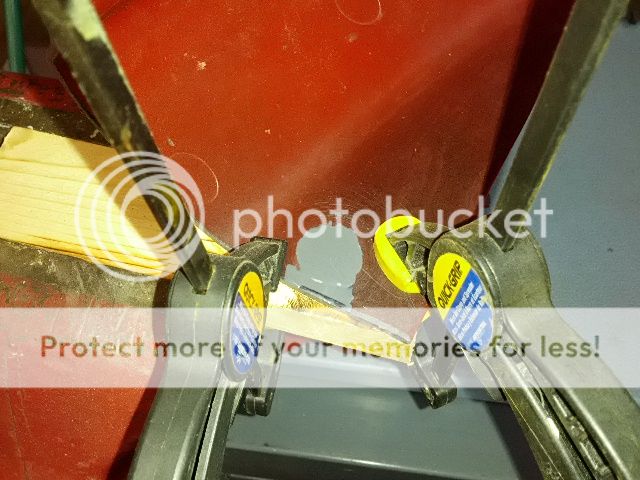
And then taped the "pretty side", clamped 'em flat, and filled the holes. Once the filler cures on that side I'll duplicate the process on the other side then prime. After that I'll work on the mounting brackets for the swinger.
Nothing real exciting, I suppose, but progress is progress.
Got to spend some time today. Little stuff, but it all adds up to getting stuff done. I've decided to use the side stand from a CB500T because it's an inch shorter than the CL360 stocker which is now too long because of the lower stance. The 500T piece, though, has all kinds of junk added to it, junk I don't need/want, like a pad to keep it from denting the exhaust pipe, a foot pedal sort of thing, and the mount for that rubber finger thing. (You know, that "hey idiot, you left your kick stand down" thing.) I forgot to take a picture of it before cutting the junk off, but it was just like this:

Now it's "adjusted", cleaned up, and primed:

And here it is stuck in place for the moment:

Next little project. I've been putting this one off for a while because I didn't want to mess it up. Last time I was at Mid-Ohio I picked up another EX500 front fender to make into a hugger fender to mount on the swinger. I put off cutting it because there wasn't much of anything like a flat plane anywhere on it to use as a guide for an even cut. I finally decided to stretch a piece of line between Point A and Point B and go for it w/ the Dremel.

I managed to get it cut w/o error:

Here it is stuffed into place after some "adjustments" made with a belt sander. Once everything is painted and together probably very few will notice or care that the hugger fender matches the front fender, but I'll know, so I guess that's good enough.

The thing has those big holes for mounting onto the fork lowers and I don't need holes there so I cleaned 'em up:

And then taped the "pretty side", clamped 'em flat, and filled the holes. Once the filler cures on that side I'll duplicate the process on the other side then prime. After that I'll work on the mounting brackets for the swinger.

Nothing real exciting, I suppose, but progress is progress.
Re: Shake the Box CL360
Time has come, again, to get at something that I've been putting off because I've never done it before. It's gotta get done so this ol' dog will have to learn another new trick.
The gray seat from Raretromoto.com will work and so will the more traditional one that I got from J-Rod at Slipstream Cycle. For the moment I'm planning to set things up so that either can be used so I need to make an upholstery pan for the Slipstream seat. I've never messed around w/ laying up fiberglass n resin before so after watching several different YouTube instructionals I'm going to dive in.
The seat is located where I want it to be as is the tank. In order to better transition between the front of the seat and the back of the tank I'm going to have the seat cover that area slightly up onto the tank. I'm going to lay up the pan well oversize and then trim it down to the size I need. I've got the area masked off and have contoured tape over the area to be glassed. Before I lay the glass n resin I'll be putting on a couple heavy coats of car wax for release.
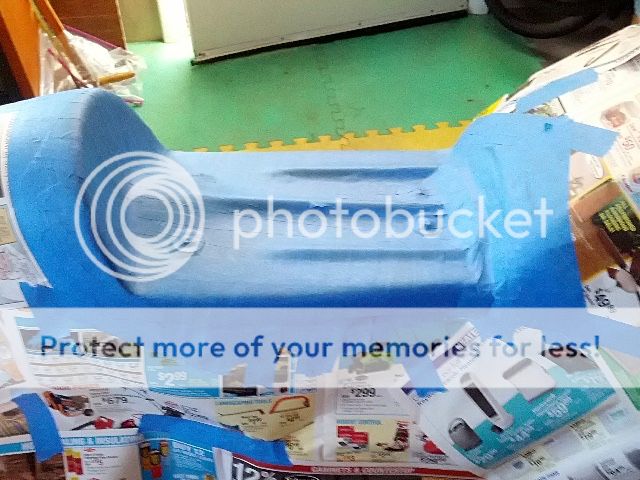
One YouTube vid I saw recommended laying the fabric over the area and leaving it overnight to let it "sag itself" into shape. OK, what the heck... Yeah, I know my fabric is pretty thin, I'll have to use a little more, but I'm going to run the resin pretty thin so an extra layer or two won't hurt anything.
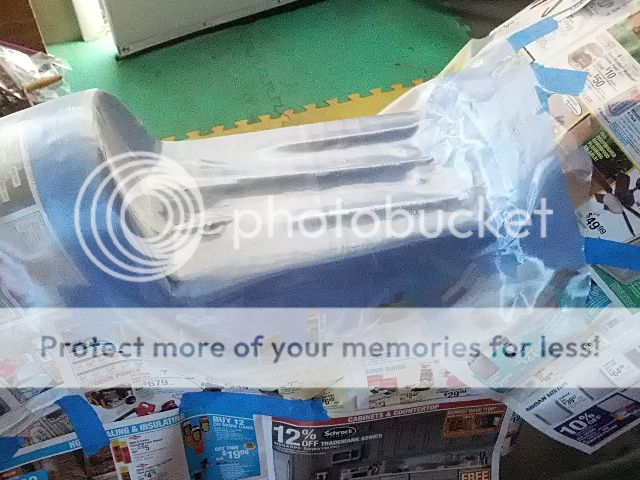
So, tomorrow I'll apply the wax, mix up the resin, and see what happens with layer #1.
Shake the Box CL360
I'd recommend laying up all your cloth at once, It will save you from sanding in between layers which is a huge pain in the arse but very necessary for proper adhesion. I usually lay up anything 4 layers and under all at once and never end up with any air pockets (with no vacuum bag or anything).
The only thing you need to make sure of if you do it this way is that your epoxy has a long enough working time so you can properly wet it out. I like to pour it on right out of the mixing can, let it soak in a bit and then squeegee off the excess. You can wet out a small piece of 3-4 layers to get a feel for the amount of epoxy you need. Just my .02, but it'll save ya some time if you do all your layers in one shot
Sent from my iPhone using DO THE TON
Re: Shake the Box CL360
Thank you for that. I have my layers of cloth cut and ready to lay up. I will have at least 30 minutes. if not more, of work time. According to what I've been reading, thinning it down w/ akliehaul will speed up the flash a little, but I'll be putting it on thin and that slows it down so I'm hoping for adequate working time. Any additional comments/suggestions welcome!
Thank you for that. I have my layers of cloth cut and ready to lay up. I will have at least 30 minutes. if not more, of work time. According to what I've been reading, thinning it down w/ akliehaul will speed up the flash a little, but I'll be putting it on thin and that slows it down so I'm hoping for adequate working time. Any additional comments/suggestions welcome!
Tune-A-Fish
BOTM LOSER Proudly Deplorable
Re: Shake the Box CL360
Wear gloves, cover drip zone... carry on soldier.
Wear gloves, cover drip zone... carry on soldier.
Re: Shake the Box CL360
Yup, safety glasses, gloves, shop apron. Bike is covered, but nothing is getting as far as the floor.
Tune-A-Fish said:Wear gloves, cover drip zone... carry on soldier.
Yup, safety glasses, gloves, shop apron. Bike is covered, but nothing is getting as far as the floor.
Re: Shake the Box CL360
Acetone! ;D
Acetone! ;D


