Follow along with the video below to see how to install our site as a web app on your home screen.
Note: This feature currently requires accessing the site using the built-in Safari browser.
We noticed you are blocking ads. DO THE TON only works with community supporters. Most are active members of the site with small businesses. Please consider disabling your ad blocking tool and checking out the businesses that help keep our site up and free.
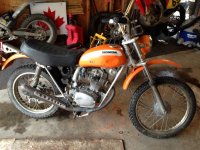
I was pleased to see so many steampunk themed builds on this forum so I decided to share my own.
This 1971 SL100 was sitting behind a garage for 10 years and was given to me. With a bit of work it was running and rolling and was amazingly complete.
I wasn't quite sure what I was going to do with this bike. Leave as is as a barn find and just ride it, tear it completely down and do a full resto, or tear it down and do a customized cafe style bike.
After a bit of thought I decided to go with a slightly modified cafe racer style.
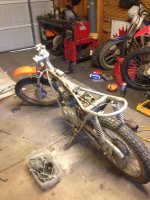
With that figured out it was time to start tearing the bike down.
The goal of this bike was to make a fun, safe, and cheap build. With the bike stripped down and inventory taken of what was salvageable I started envisioning what I wanted this thing to look like. Of course drop bars and possibly a pair of rear sets. Also a chopped exhaust and a single seat common on cafe racers.
Paint or no paint? I still wasn't sure if I wanted to reshoot the entire bike or leave it a more ratty look. Being lazy and wanting to stay cheap I decided to not repaint. Until.....
After a few weeks of deciding what I needed to buy and what I wanted the bike to look like it hit me. Steampunk. I love the style and thought it would be a fun challenge.
So much for cheap and lazy.
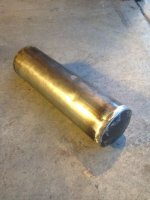
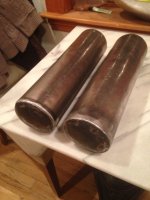
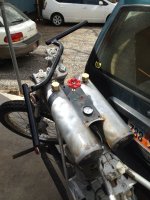
The stock tank did not fit the design so a custom tank was needed. I've never built a gas tank but I've watched enough American west coast chopper shows. How hard could it be? Well without a fully decked out shop, it's a lot of work. I do have a basic welding set up but no rollers or shaping tools. With the theme in mind I knew I wanted a tank that resembled a cylinder or cylinders. 4" exhaust tubing will do the trick. I had some 6" wide plate steel laying around that was just under 1/8" that I figured I could use for the cylinders ends. With an oxy/acetylene torch I cut four 6x6 squares. I then took the squares and laid them on the end of a scrap of the 4" tubing, heat them glowing red and hammered the squares into the tube. Once a nice little bowl was formed I was able to torch cut a rough 4" circle and then bench grind to fit the pipe perfectly. Weld grind repeat.
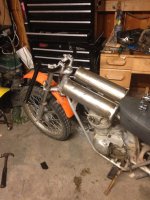
With the twin cylinders made it was now time to figure out how to attach them to the bike. I taped the two tanks together with a scrap 2x4 between them. That was about the spacing I wanted. Because of the tank design and spacing the stock coil location was not going to work but the bracket that the coil bolts to would. I welded a piece of steel on the bottom between the tanks that would work for the front mount bolted to the stock coil mount. For the rear or closest to the seat I welded another piece of steel between the tanks. This piece would have a hole that will slide onto a bolt that I welded to the top tube of the frame.
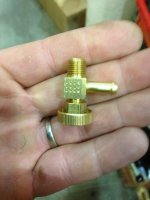
For the tank petcocks I found these really nice brass valves.
I figured I would have one on each tank. That way I could run one tank and when that one was dry I could open the second one. Kind of a reserve. For the petcock bungs I used a 1/8 galvanized threaded coupler cut in half to produce two bungs. For the filler neck I bought a piece of 1" steel pipe about 3" long and threaded at both ends. This cut in half would make the two filler necks. I found two brass threaded caps for gas caps. I love Ace.
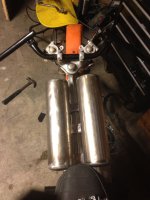
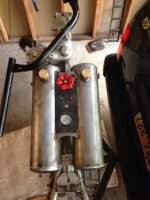
Because I wanted a clean look on the bars I wanted to relocate all the switches and just go with perches and levers. The gears began turning. I knew I wanted to relocate the electrics between the tanks so I did this. I picked up a 6 volt light switch for a 50's-60's GMC at NAPA. With a bit of rewiring and modding this switch would become headlight control and kill switch. To make the switch look right I added a red faucet knob like used on an outside hose bib.
Pull the switch one position and headlight/taillight comes on. Second position is high beam. Turn the knob for kill switch.
I also added two LEDs green for neutral and red for high beam. The toggle switch serves a purpose. When I tore into the stock switch assembly I noticed there were two more wires than just the headlight/taillight wires. These two wires complete a circuit when the lights are on. From the looks of the wiring diagram when the lights are on it adds in an extra coil from the stator to give the battery extra juice to compensate the power drain. So when the lights are on so is the toggle switch. The pressure gauge is just a dummy for looks.
Next up paint.
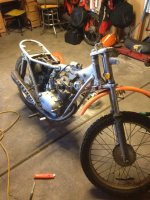
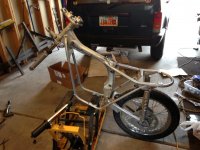
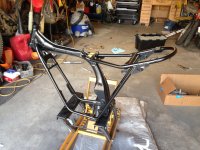
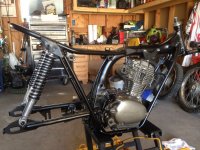
For the paint I wanted to use as few colors as possible. I chose satin black, cast iron, and brass. The frame got a light scuffing and was shot with the satin black.
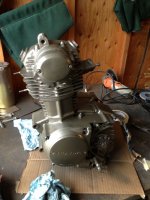
The engine was cleaned and painted with a high temp cast iron color. I was expecting a powdery charcoal grey but the color has a bit of green in it. Not what I expected but I like it.
The tank was going to be painted with a brass paint but after a thorough scotch bright cleaning I really liked the look of the brushed steel. I wasn't going to have any silver or chrome but the tank fit the look and it solved the problem of what color to paint the wheels and fork lowers. Instead I used 80 grit paper and some wd-40 and knocked down the shine of the chrome wheels. The spokes, hubs, and fork lowers were scuffed with a green scotch brite pad.
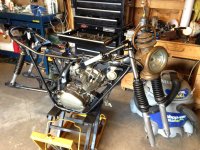
Time for reassembly.
The rear shocks were taken apart and cleaned and scuffed and the springs got a satin black finish.
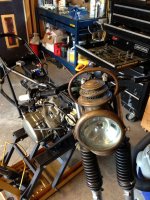
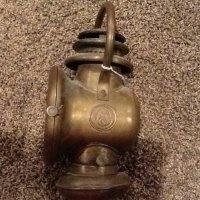
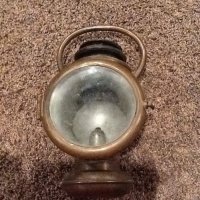
When I wasn't cleaning, scuffing, and painting I was on the computer getting ideas for a headlight. I knew I wanted something vintage and could easily be converted to electric. I was thinking an old miners lamp or a railroad light. I then started seeing vintage kerosene lamps that were used on buggies and even some first motorcycles and bicycles. I found this one on eBay and had to have it. I ended up getting for less than I planned and it works perfectly.
I was able to get the glass lens of my original light and the bulb and reflector fit perfectly behind the glass of the lantern. The original wick is still intact and behind the reflector.
I was able to fabricate mounts for the lantern using the upper and lower triple clamps.
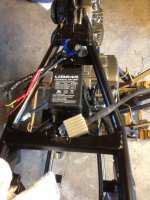
For the electrics I didn't want the clutter of the stock air box and battery holder so I got a 6 volt sealed lead acid battery and fabricated a mount to locate the battery under the seat. The stock rectifier worked but I wanted something smaller and cleaner. I was going to go with the radio shack rectifier mod but I had this one left over from when I upgraded the stator/rec on my crf 450 x. Three of the four wires matched in color so I figured what the hell. I'll give it a try.
Next on the build list was a taillight. I couldn't find anything off the shelf that fit the bill so it was back to the drawing board and laboratory.
For my job I'm a truck driver for UPS and while out on the road I love looking at all the rusty crap and junk that litters the freeways. I often drive past old sheep herder camps and see all the rusty old cans. That's what I wanted for a taillight housing, an old rusty can. But, not usually being able to stop on the side of the road and scavenge through abandoned camps I decided to make my own housing. I took a short piece of left over exhaust tubing from the tank and welded a end on and beat it up. For the actual lamps i rolled over a few ideas but decided to take advantage of the box of vacuum tubes i have. I made a mount for the tubes that slides into and bolts to the housing. I used 3volt red LEDs for the lights. The larger center RCA tube has two LEDs that i was able to hot glue into the bottom. This will work as the running light. The two smaller Zenith tubes are back lit with two LEDs each. Each pair was wired in series and those two pairs were wired in parallel and give a nice bright red glow for the brake.
I then took a piece of brass and made a visor for the taillight. Next was a patina. I came up with a solution that seems to work well. I use a spray bottle with a mixture of vinegar, salt, water, and little pieces of torched brass. I spray the metal and let it air dry. Once dry I would hit it with a propane torch and it would immediately start turning a rusty copper color. After a few spraying and heating's I got the desired look and clear coated the whole thing with a satin clear.
This site uses cookies to help personalise content, tailor your experience and to keep you logged in if you register.
By continuing to use this site, you are consenting to our use of cookies.