Starter problem / Related to turn signal?

sincerelyadam

Active Member
Hi everyone.
I'm a new member. Been reading a lot, but this is my first post. So, Hi!

I have a wiring question regarding the starter and right rear turn signal. I recently purchased a 1980 Yamaha SR250. Great bike! The electric start worked great, I made a few changes to the bike and now the electric start doesn't work, like totally dead. No sound at all. But it does dim the headlight when I press the button. Here's where I am to date...

Changed the handlebars from chrome to painted black. I learned online that the ground in the starter switch presses against the handlebar, so I filed the paint off the bar in the area where the ground contacts it. Still no start. Filed the paint from the handlebar where it contacts the riser. Still no start. So I've eliminated the ground in the starter switch as the problem.

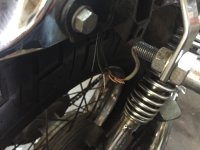
Which leaves me with the right rear turn signal. The only other piece of electrical that I've touched. I removed the sissy bar from the bike, which shared a mounting point with the signals, so I removed them as well. Something seems weird about the wiring here. Each signal has only one wire coming out of them, and from what I've seen online most have two. From the bike there is one wire going to the left rear signal, and two going to the right rear, plus a very tiny blue one. In the pic you can see I have two wires touching, dark green and signal wire. This causes the signal to blink as normal. And then there's a black wire hanging, and that tiny blue one, that I don't know what to do with. Both signals are working fine, but not the starter.

So is this "extra" wire that's hanging there somehow related to the starter? Like the circuit isn't closed or something. Or maybe it's not related at all and I'm missing something else entirely? My electrical knowledge is limited so laymen's terms are appreciated.

Thanks!
 

Attachments

  • IMG_8691.JPG
    IMG_8691.JPG
    1.1 MB · Views: 159
Another bit of info. When I disconnected the signals, the PO or his mechanic did a pretty terrible electric tape up job where all the wires we bundled under a mass of tape. When I unwrapped everything the wires just sort of fell apart and I didn't get to see what was connected to what in there. Hence my lostness.
 
Maybe there is supposed to be only one wire coming out of the signal. Found this photo online, which is not an identical signal to mine in looks, but very similar.

Very confused. I was planning on rewiring this bike over the winter to learn all about it, but I'm hoping that doesn't come now while the weather is still good. :'(
 

Attachments

  • signal.JPG
    signal.JPG
    235.2 KB · Views: 173
I do know how to use google and have already searched that exact phrase and have looked at that schematic. It shows two wires from the turn signals while mine only has one.
 
One wire is the +12V from the signal switch, the other wire in the schematic is the ground. Many signals are mounted in rubber, so they need a separate ground wire, the metal housing is not enough. The ground wire may go to the bulb housing near the mount, or in some case, go inside the signal mounting tube right to the bulb holder.

All circuits require a path for the voltage to get to the device, and a return path. 2 wires/ or 1 wire and a metallic mount to returnvare in every circuit.

Sometimes a ground wire travels from one side of the bike to the other. So you can have a signal that has one power wire, and what looks like 2 ground wires. The ground goes to one signal stalk, the other wire is the ground from the other side.....It can shorten the amount of wires necessary. A VOM meter can be used to verifie which wires are grounds and which are 12V
 
Let's tackle one thing at a time...

First up, the starter button.

The blue/white leading from the solenoid to the starter button is a ground wire that the button grounds out in order to activate the solenoid. This means that with the ignition switch turned on and the kill switch set to run, you should see about 12V on red/white wire that leads into the solenoid as well as 12V on the blue/white wire leading out of it. Additionally, with the ignition switch turned off and the starter button depressed, you should have pretty close to zero Ohms when measuring resistance betwee the blue/white wire and the negative terminal of the battery.

Can you please confirm?
 
Mydlyfkryzis and Sonreir thank you both for your help. Sonreir, I think my shopmate has a meter, so hopefully I can get in there and figure out how to test this tomorrow after work. My coworker recommended running a cable directly from the battery positive to the starter motor, to make sure the starter is working. So I'll probably try that too.
 
Make sure you use a very thick wire. The motor pulls a lot of current and a smaller gauge wire might actually melt.
 
Ok so I was able to get over after work to examine the bike like you suggested.

Sonreir said:
...with the ignition switch turned on and the kill switch set to run, you should see about 12V on red/white wire that leads into the solenoid as well as 12V on the blue/white wire leading out of it.

IMG_8704.jpg

I'm getting 10V from both wires. Could this be due to working on this issue a few nights in a row and the battery might be drained from having ignition on without engine running?? (Total newb at this so forgive me if some of my guesses are way off. Trying to learn. Not even sure if I'm using this meter right haha)

Sonreir said:
Additionally, with the ignition switch turned off and the starter button depressed, you should have pretty close to zero Ohms when measuring resistance between the blue/white wire and the negative terminal of the battery.

IMG_8708.jpg

I get a reading of 767, so holy cow! It's way off or I'm def not using this tester right. Tried it with the probes switched as well and got the same reading.

IMG_8706.jpg

The meter has this code on it when touching nothing, if that means anything to you. It's not mine so I don't know.

Also I was able to get the starter motor to kick by bridging the terminals on the solinoid with a heavy cable. So I can rule out a bad starter.
IMG_8703.jpg


I feel like I already have made a bit of headway because I was so lost before. So thank you for your help. Any further recommendations are greatly appreciated. :D
 
OK... so 10V is very low. You bike probably won't run at such a low voltage. Charge the battery and try again.

Also 767Ω is a VERY high reading. There might be an issue with the starter button not grounding properly. Do you get the 0L reading on the meter when you repeat the measurement without depressing the button?
 
I don't own a charger but I may be able to borrow one. Although I'd like to buy one for winter storage anyway, so do you have a recommendation?

I'm pretty sure I did get the 0L reading without pressing the starter button while the probes were in place. I will double check this evening. A couple nights ago I opened up the starter button to examine the guts and see if things look intact. I have a pretty good idea what's going on in there now, so maybe I can figure out if there's a ground issue. It could be that I mislocated the ground before and filed the paint off the bar in the wrong place.

Thanks again.
 
Battery tender jr. On amazon is about $24. Good deal, good charger
 
Amazing news! With the help of a friend last night we got the bike started via the starter button. It's a real booty solution. So I pulled open the starter button. There's a little brass colored plate which is connected to the ground contact in the button. There's a hex hole in the plate where I thought before that it looked like something belongs, but didn't think much more about it again til last night...

IMG_1924.jpg


With my jumper cable grounded to the engine and the other end on that plate, the starter kicked when depressing the button. So we figured there must be a part missing. Presumably it fell out when I swapped the bars. After crawling around on hands and knees for a few minutes we decided we could make a substitute part using a bolt. Ground down the head a bit to fit under the plate and ground the tip to match the bar radius and voila!

IMG_2916.jpg


So file a bit of paint off the bar where the bolt contacts, reattach the starter button to the bar and nothing. ::) My problems are compound. We open up the button again. Using the cable we ground it to the engine and the starter kicks. Ground it to a bolt on the fork, the starter kicks. Ground it to the bar riser and nothing happens. WTF. I have no idea what is different here. I didn't change them, adjust them, take them out, or look at them funny.

We rigged up this fancy wire here to bridge between the bar and the fork. The bike starts.

IMG_9129.jpg


I'll run this sweet setup til the weather gets too cold to ride and bring the bike into a garage for the winter. Then I'll get down to biz and really figure out the issue. My only theory at this point is the risers have some flex to them, so presumably they're mounted in rubber, and maybe there's some sort of contact point that got knocked loose when I was swapping the bars?? I feel like I'm grabbing at straws with that one, but it's all I can come up with.

Thanks for your help you guys. If you have any insight to this puzzle let me know.
 
Mydlyfkryzis said:
Battery tender jr. On amazon is about $24. Good deal, good charger

Great thanks for the tip! I think I read some good reviews on that charger so that's probably the one I'll go with.
 
Your bar risers are set in rubber grommets to help reduce vibrations through the bars, this means the bars (risers) aren't actually connected to the frame and so don't provide an earth.

an easy workaround is to get a piece of black wire about 8 inches long, 2 washers that are the same size as the riser washers under the top yoke, solder the washers to each end of the wire and attach one end to the riser, and the other to either of the indicator mounts. the wire will be hidden behind the headlamp. it'll do in the short term :)
 
Back
Top Bottom