
We noticed you are blocking ads. DO THE TON only works with community supporters. Most are active members of the site with small businesses. Please consider disabling your ad blocking tool and checking out the businesses that help keep our site up and free.
You are using an out of date browser. It may not display this or other websites correctly.
You should upgrade or use an alternative browser.
You should upgrade or use an alternative browser.
The Buy It Now CB750
- Thread starter RicerwannaB
- Start date
RicerwannaB
Active Member
Spleen, Talk to me buddy. Lets get these comstars sent your way. I got some new wheels already lined up.
DidThe, I am going to clean, high temp paint, then wrap the stock header and just attach a SuperTrapp to the end of the header and call it good. Should look nice, short and mean.
1sttimer. Heck yeah man, It was great meeting you too when you swung by. Next time your up try and get a free saturday to swing by again when you have some more time.
Verboten1, Thanks again!
RicerwannaB
Active Member
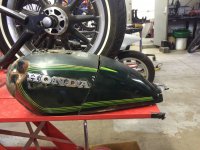
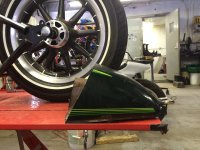
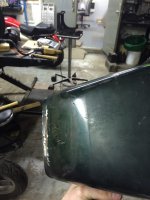
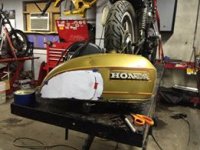
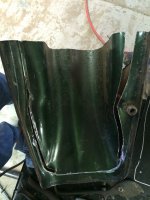
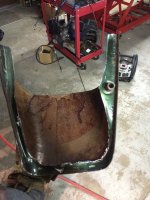
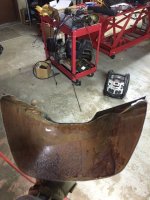
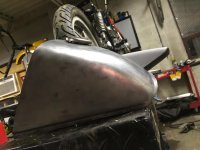
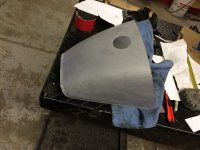
Well today I got a little bit of progress made on the oil tank / cowl. I seperated it at the shape I want from the rest of the gas tank, played around a little bit with it on the bike, with the tank back on(stock rear section still in place, so the cowl will be pushed back further when I make my rear hoop for it, and looking sloppy holding it and trying to take a picture.)
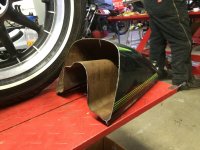
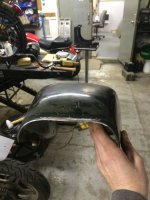
Then I rounded off the back end of the tank, where the excess metal and mounting point were.
Like asked earlier in the thread, if anyone has any tips (Do's/Don'ts) for assembling the internals of the tank, I am all ears.
Then I rounded off the back end of the tank, where the excess metal and mounting point were.
Like asked earlier in the thread, if anyone has any tips (Do's/Don'ts) for assembling the internals of the tank, I am all ears.
Attachments
-
 10974687_10155122824270405_1222999626061914572_o.jpg292.7 KB · Views: 252
 -
 10934011_10155122824850405_6611826125948074753_n.jpg93.9 KB · Views: 239
 -
 10610615_10155122826470405_7531757681017252627_n.jpg99.6 KB · Views: 245
 -
 10955709_10155122828480405_1721297586100905846_n.jpg106.9 KB · Views: 241
 -
 10868124_10155123537805405_3542297181309827679_n.jpg75 KB · Views: 950
 -
 10653532_10155123538015405_6937880859855412617_n.jpg79.8 KB · Views: 1,052
 -
 10011528_10155123538125405_7292671695126549275_n.jpg74.9 KB · Views: 1,090
")
RicerwannaB
Active Member
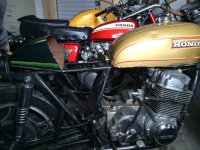
Thanks, It really is a beautiful bike. Unfortunately its a customers and not mine!
I am going to probably just tack things into place and then Braze them all water tight, lower heat, less deformation. Not that I cannot weld, but my brazing skills are nill, so I figured it would be a good time to try and learn, and should do the trick just fine.
I am going to probably just tack things into place and then Braze them all water tight, lower heat, less deformation. Not that I cannot weld, but my brazing skills are nill, so I figured it would be a good time to try and learn, and should do the trick just fine.
frogman
'74 CB360, '71 CB450, '75 CB550SS
GOOD thing to practice brazing on is the frame, weld up all the seams and pinch-spot weld areas. Helps to stiffen up the frame quite a bit. Brass can be a pain in the ass to get to seal if surfaces are not clean or it just feels like not doing what you want it to do. I like brazing, I've been doing it as my main fast weld for years used to stick many an odd part together with it back when I was working for my dad on the farm. I still have a small gas setup and I still grab the brass over the MIG, just more fun.
Keep your eyes open for a 450, I've not had as much fun on an MC as I have had on mine, close second was my CB500 I had back in high school.
Keep your eyes open for a 450, I've not had as much fun on an MC as I have had on mine, close second was my CB500 I had back in high school.
RicerwannaB
Active Member
Good idea Frogman, I had planned on stiffening the frame up by welding, but hadn't thought of brazing that as well. Was thinking either Mig or Tig.
I do want a 450 or 500, something 2 cylinder next. I was originally looking for one, but then this 750 came across ebay and was right down the road, so I couldn't resist.
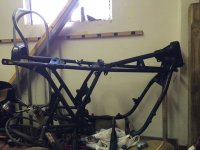
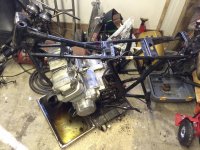
Minor updates: Got everything off the frame finally, and the engine out. Now I can start rebuilding it and replace the cases, due to the giant hole, and replace / upgrade anything thats worn or damaged. Thats why I took it apart as step one, seeing as I was told it is definitely NOT step one, I couldn't figure any other way to get it out without cutting, only way to get turd engine out was strip it down completely and dump it on it's side and wiggle the frame off of it like your dates dress at prom. (as per what the internet said in every search on removing a SOHC CB750 engine I could find.)
Started making a pattern for the knee dents. I want to find a JUNK tank to practice on first, however I cut the one a apart already I had access too for my rear cowl, finding another will be fun.
Minor Setback: Buddy who was selling me the front suspension, brakes, and rims off of a GSXR600 fell of the face of the earth as I was on my way to pick them up. (In North Carolona) Luckily I decided I wanted to pick them up and pay cash in person, because he was totally trying to rip me off, salvaged the trip and ended up in Memphis at Graceland instead. Oh well, On the hunt for new suspension and other goodies.
Hope those Comstars treat you well Spleen,
Next: Start preping frame, Start metal work on gas tank and Build oil tank / seat pan / cowl, make seat, find front suspension / wheels I want to use, ? ? ?.
I do want a 450 or 500, something 2 cylinder next. I was originally looking for one, but then this 750 came across ebay and was right down the road, so I couldn't resist.
Minor updates: Got everything off the frame finally, and the engine out. Now I can start rebuilding it and replace the cases, due to the giant hole, and replace / upgrade anything thats worn or damaged. Thats why I took it apart as step one, seeing as I was told it is definitely NOT step one, I couldn't figure any other way to get it out without cutting, only way to get turd engine out was strip it down completely and dump it on it's side and wiggle the frame off of it like your dates dress at prom. (as per what the internet said in every search on removing a SOHC CB750 engine I could find.)
Started making a pattern for the knee dents. I want to find a JUNK tank to practice on first, however I cut the one a apart already I had access too for my rear cowl, finding another will be fun.
Minor Setback: Buddy who was selling me the front suspension, brakes, and rims off of a GSXR600 fell of the face of the earth as I was on my way to pick them up. (In North Carolona) Luckily I decided I wanted to pick them up and pay cash in person, because he was totally trying to rip me off, salvaged the trip and ended up in Memphis at Graceland instead. Oh well, On the hunt for new suspension and other goodies.
Hope those Comstars treat you well Spleen,
Next: Start preping frame, Start metal work on gas tank and Build oil tank / seat pan / cowl, make seat, find front suspension / wheels I want to use, ? ? ?.
Attachments
RicerwannaB
Active Member
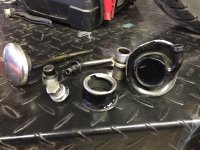
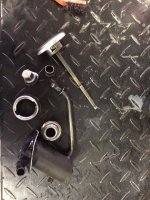
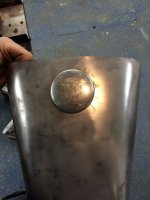
Started to do a little more work on the Oil Tank / Seat cowl, as far as shape it is where I want it, Still need to clean up the cut a bit and insides, will run it through the sand blaster, ran out of time on Valentines Day, had to take the old lady out. Cleaned up all of the stock bungs from the original oil tank prepping them. Also picked up my Oxyacetylene setup from my dad's to start brazing, now I'm no longer apartment living I have room for more of my tools.
Attachments
-
 10993095_10155161610310405_8772296147770539241_n.jpg99.2 KB · Views: 743
 -
 10423710_10155161610555405_4618871926168169930_n.jpg105.7 KB · Views: 740
 -
 10989139_10155161609855405_8122736817198531587_n.jpg108.5 KB · Views: 753
 -
 10155390_10155161610750405_8865510075346992152_n.jpg99.6 KB · Views: 247
 -
 10991408_10155161611070405_2019014648057191743_n.jpg141.9 KB · Views: 814
RicerwannaB
Active Member
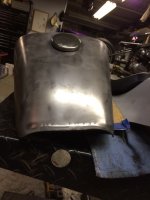
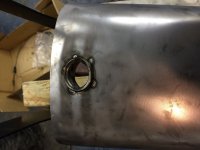
More slight forward progress, blasted the old tank, and tacked in the filler neck. Will continue on the rest of it shortly and making the seat pan just trying to figure out a few things and do some more research before I jump right into it, want to make sure its a one and done type deal.
Attachments
-
 10953366_10155172683120405_795709093866865727_n.jpg66.1 KB · Views: 1,195
 -
 10403374_10155172682335405_4271462830738542461_n.jpg73 KB · Views: 239
 -
 1904261_10155172677880405_7815487922509583435_n.jpg72.2 KB · Views: 1,196
 -
 1970611_10155172677510405_478565969099139154_n.jpg71 KB · Views: 247
 -
 936099_10155172200140405_834430287342613647_n.jpg84.3 KB · Views: 242
RicerwannaB
Active Member
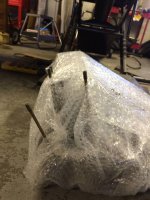
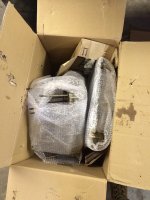
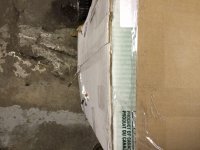
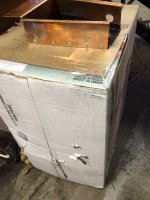
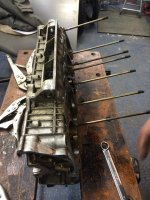
Well my cases finally arrived!!! Bought them off of a SOHC4 member! I was excited when I got the notification they were delivered, not so excited when I saw the package.... I feel like we have come up with a compromise for a partial refund on the cases, the damage was caused to to failure to pack them properly in the box. They were just bubble wrapped and tossed into two boxes taped together. One stud majorly bent, a few slightly bent, and some threads buggered up. We will see if he comes through or not with our agreement in a day or two though. I know removing the studs is risky business, but I am trying to make the best of it, and feel like with some patience, a steady hand, a friend, and following all of the tips from threads I've read about pulling them, with a few crossed fingers everything should be OK.
Any removal tips? Any recommendations on studs to use for replacements? Or where to get them? I cannot buy them individually from Honda apparently or any of our suppliers at the shop, and I don't want to put my trust in purchasing a used set off of eBay. I am thinking APE Heavy Duty Cylinder Studs? All input is greatly appreciated.
Any removal tips? Any recommendations on studs to use for replacements? Or where to get them? I cannot buy them individually from Honda apparently or any of our suppliers at the shop, and I don't want to put my trust in purchasing a used set off of eBay. I am thinking APE Heavy Duty Cylinder Studs? All input is greatly appreciated.
Attachments
-
 10404123_10155180181920405_2397438822213167734_n.jpg118.4 KB · Views: 1,107
 -
 10991387_10155180181695405_3247474547225931836_n.jpg82.7 KB · Views: 1,091
 -
 10993479_10155180181285405_2204951622297254794_n.jpg106 KB · Views: 1,103
 -
 18413_10155180180955405_40477425360755200_n.jpg101.4 KB · Views: 234
 -
 10994175_10155180180840405_3722002135368324516_n.jpg93.4 KB · Views: 241
 -
 10461729_10155180180635405_8993722259390472168_n.jpg90.2 KB · Views: 1,090
RicerwannaB
Active Member
Well the original plan was just to replace the cases since the previous owner threw his chain and knocked a huge hole im both case halfs. Just inspect everything, replace what was worn, and stock rebuild, but now im thinking of sinking some more cash into her and putting in larger Pistons, just not exactly sure what route I want to go yet, as I kind of want to boost it in the future... Version 2.0 lol but we'll see how my other motors internals look after tear down.
RicerwannaB
Active Member
Well I've thought about it, and I might as well do it right the first time. 836cc kit it is.
RicerwannaB
Active Member
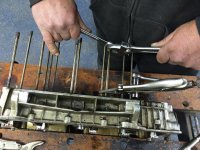
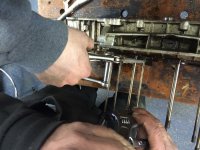
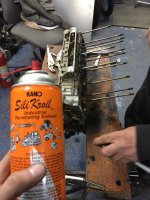
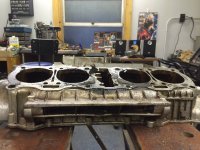
Got the cylinder studs out of the case. Was not nearly as bad as everyone made it sound. They really all came out without an issue, but we took some extra precautions and worked our way across the board very slowly. I soaked them in Sili Kroil(This shit is worth its weight in gold, seriously) multiple times and let them sit for a few days. Soaked them again. Having an extra set of hands helped tremendously. The table is some sort of jig / vice table, so it helped being able to secure it a vertical position, in my opinion. We first double nutted each stud, then applied a pair of vice grips as firmly as we could get them at the base. Then simultaneously we both applied pressure, one on the wrenched double nutted end and the Vice grips, all but two of the studs broke lose no problem. Then we tossed the ratchet on them and worked them out. The two studs that didn't want to break lose right away, I hit again with the Sili Kroil, and BAM the second attempts they broke free immediately. No damage was caused to the case at all, which is a total relief, now its time to pick up an APE stud kit. But first I will spend some time cleaning them next time I am at the shop!
Attachments
-
 10958204_10155198707150405_4867128228129778271_n.jpg121.8 KB · Views: 221
 -
 10924757_10155198707080405_679638002336611917_n.jpg109.7 KB · Views: 238
 -
 10999991_10155198707160405_6929008423761807398_n.jpg127.7 KB · Views: 771
 -
 10689508_10155198717460405_4637986631687628840_n.jpg105.2 KB · Views: 734
 -
 1509769_10155198717490405_7856425064039430517_n.jpg117.2 KB · Views: 759
 -
 11021168_10155198717480405_5831937701670396525_n.jpg98.5 KB · Views: 240
RicerwannaB
Active Member
It probably does, I haven't tore that motor apart yet but I'm sure they are fine. But from what I've read and been told reusing them isn't ideal due to possibly stretching some and weakening, and once removed they should be replaced. I plan on going to an 836cc kit and around 10.25-1 C/R anyways so I will spend the extra money for the extra insurance. I just want to build it once and be done and not have any issues with oil leaks or head gaskets. I would hate to get the motor back together and in just to find out I should have replaced them or have an issue down the road.


