BoneDaddy
Been Around the Block
I've been asked a few times about a build thread so here goes. Bear with me, this could take a (long) while.
I bought my '82 650GL in the spring and really haven't done a whole lot since except research, plan, haggle for and collect parts, hypothesize solutions and agonize over the sheer weight of my project.
You see, I got the bike in trade for an '89 Bronco with a blown rear-end. Going into the deal, I new I was walking into a project and was just happy to be set up with a running, riding bike that was in decent condition. I rode it 120 miles home without incident. As the weeks went by, and I tinkered with things like new spark plugs, fresh battery, adjusting the idle down to a reasonable rpm, yanking off the crash bars, and various other innocuous tasks, I began to realize that I wanted it to be my first 'nice' bike. Don't get me wrong, I've owned bikes that I absolutely loved and felt genuine remorse when they were gone, even rebuilding an RD from the wheels up, but I wanted this GS to be a reflection of me.
That's probably how most wrench-monkeys take that first bite that is just a little bit too big to chew.
I started by searching for the parts I wanted and collecting pictures of bikes that I admired, taking careful mental notes of the design cues that really stuck with me. Going in, I wasn't sure if I wanted a cafe racer, a stretched and raked bobber, a sinister-brat, or something in between. The stance and height of the bike, along with the Japanese interpretation of cruiser styling, just screamed 'chopper'. It simply made sense and would be the easiest so I did what I normally do: the exact opposite.
I decided to go with a cafe racer look with some handling and tuning to match and began to look for parts. I decided I didn't like the normal bubble seat and set out to make my own. I spent an entire day fabricating a new seat pan from sheet metal, primed it, set it on the bike, and promptly decided that I didn't like it. I later tracked down the tail section from an old KZ750 that was exactly what I was looking for and happened to be the perfect width and already had the perfect tail light. I also fabricated a set of clip-on bars from scratch, fitted them to the bike, and also decided I didn't like them (the same went for the drag bars). I finally found a set of clubmans that I really liked and ordered them. Not a fan of 4-2 exhaust systems, I sought a nice 4-1 setup but quickly realized that the only thing remotely in my budget was a MAC system. Not only did I find out that MAC makes a sub-par product (no offense to MAC owners, just what I've heard) but I also find all that chrome and the huge silencer to be an eye-sore. After lots of hunting, I finally found a 4-1 from a GS550 with a Yoshimura pipe already on it for the agreeable sum of $150.
My original plan was to collect all the parts I wanted before tearing into the bike but today was such a beautiful day and I was still motivated after work, I just had to rip things apart. Today, the seat came off and the reciprocating saw made quick work of the seat support. Off came the chrome rear fender and on went the clubmans and the mock-up of the seat pan/ tail section. As I put everything back together, I noticed just how much work I have ahead of me. There's paint chipped off of everything painted, an un-corroded bolt nowhere in sight, rust spots in every nook and cranny, and dirt on everything except the new clubmans (became dirty as I pawed them with my grubby hands). I still need to figure out a safe and secure way of fitting the seat, acquire a tank with better styling, strip, clean and/or paint everything, track down a tach, remove all the idiot lights and wiring from the demolished dash, shorten the various cables and wired from the controls, find some shocks that will raise the stance a few inches, remove the rear pegs and center stand, adapt and fit the new exhaust, prime and paint, and all the hundreds of gotchas that are bound to pop up. Still, I'm happy to have finally started.
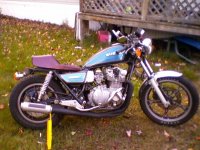
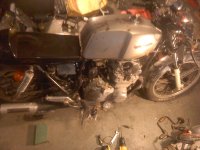
So here's a horrible cell pic of what the bike looked like when I brought it home:

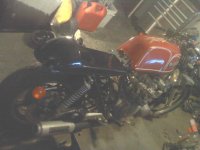
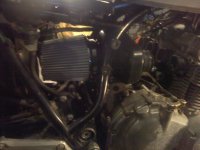
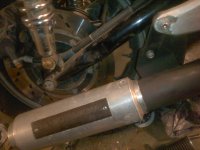
Here's the small progress made today. Please excuse the tools and debris strewn about, I was racing against the coming sunset:


Now that you've seen the pics, I'm sure you have a feel for how much work I have ahead of me. Once everything is all together, I'm going to tackle tuning. I'm pretty good at bringing bikes back to life but I don't know crap about precision tuning. The small engine guy at work is going to give me a hand with rebuilding the carbs or possibly switching to a slide setup. Once we get it jetted for what we feel is optimal for the 4-1 exhaust, the bike is going to HK powersports for a few dyno sessions and tuning by guys who know a lot more than we do about squeezing power. No pod filters or v-stacks are planned but I might fabricate a nice steel airbox if I can find someone with some fluid dynamics knowledge to lay on the idea. Part of me is hoping that the stock intake can't be improved!
So there it is, my monster. Sorry for the novel.
I bought my '82 650GL in the spring and really haven't done a whole lot since except research, plan, haggle for and collect parts, hypothesize solutions and agonize over the sheer weight of my project.
You see, I got the bike in trade for an '89 Bronco with a blown rear-end. Going into the deal, I new I was walking into a project and was just happy to be set up with a running, riding bike that was in decent condition. I rode it 120 miles home without incident. As the weeks went by, and I tinkered with things like new spark plugs, fresh battery, adjusting the idle down to a reasonable rpm, yanking off the crash bars, and various other innocuous tasks, I began to realize that I wanted it to be my first 'nice' bike. Don't get me wrong, I've owned bikes that I absolutely loved and felt genuine remorse when they were gone, even rebuilding an RD from the wheels up, but I wanted this GS to be a reflection of me.
That's probably how most wrench-monkeys take that first bite that is just a little bit too big to chew.
I started by searching for the parts I wanted and collecting pictures of bikes that I admired, taking careful mental notes of the design cues that really stuck with me. Going in, I wasn't sure if I wanted a cafe racer, a stretched and raked bobber, a sinister-brat, or something in between. The stance and height of the bike, along with the Japanese interpretation of cruiser styling, just screamed 'chopper'. It simply made sense and would be the easiest so I did what I normally do: the exact opposite.
I decided to go with a cafe racer look with some handling and tuning to match and began to look for parts. I decided I didn't like the normal bubble seat and set out to make my own. I spent an entire day fabricating a new seat pan from sheet metal, primed it, set it on the bike, and promptly decided that I didn't like it. I later tracked down the tail section from an old KZ750 that was exactly what I was looking for and happened to be the perfect width and already had the perfect tail light. I also fabricated a set of clip-on bars from scratch, fitted them to the bike, and also decided I didn't like them (the same went for the drag bars). I finally found a set of clubmans that I really liked and ordered them. Not a fan of 4-2 exhaust systems, I sought a nice 4-1 setup but quickly realized that the only thing remotely in my budget was a MAC system. Not only did I find out that MAC makes a sub-par product (no offense to MAC owners, just what I've heard) but I also find all that chrome and the huge silencer to be an eye-sore. After lots of hunting, I finally found a 4-1 from a GS550 with a Yoshimura pipe already on it for the agreeable sum of $150.
My original plan was to collect all the parts I wanted before tearing into the bike but today was such a beautiful day and I was still motivated after work, I just had to rip things apart. Today, the seat came off and the reciprocating saw made quick work of the seat support. Off came the chrome rear fender and on went the clubmans and the mock-up of the seat pan/ tail section. As I put everything back together, I noticed just how much work I have ahead of me. There's paint chipped off of everything painted, an un-corroded bolt nowhere in sight, rust spots in every nook and cranny, and dirt on everything except the new clubmans (became dirty as I pawed them with my grubby hands). I still need to figure out a safe and secure way of fitting the seat, acquire a tank with better styling, strip, clean and/or paint everything, track down a tach, remove all the idiot lights and wiring from the demolished dash, shorten the various cables and wired from the controls, find some shocks that will raise the stance a few inches, remove the rear pegs and center stand, adapt and fit the new exhaust, prime and paint, and all the hundreds of gotchas that are bound to pop up. Still, I'm happy to have finally started.
So here's a horrible cell pic of what the bike looked like when I brought it home:
Here's the small progress made today. Please excuse the tools and debris strewn about, I was racing against the coming sunset:
Now that you've seen the pics, I'm sure you have a feel for how much work I have ahead of me. Once everything is all together, I'm going to tackle tuning. I'm pretty good at bringing bikes back to life but I don't know crap about precision tuning. The small engine guy at work is going to give me a hand with rebuilding the carbs or possibly switching to a slide setup. Once we get it jetted for what we feel is optimal for the 4-1 exhaust, the bike is going to HK powersports for a few dyno sessions and tuning by guys who know a lot more than we do about squeezing power. No pod filters or v-stacks are planned but I might fabricate a nice steel airbox if I can find someone with some fluid dynamics knowledge to lay on the idea. Part of me is hoping that the stock intake can't be improved!
So there it is, my monster. Sorry for the novel.


")