
We noticed you are blocking ads. DO THE TON only works with community supporters. Most are active members of the site with small businesses. Please consider disabling your ad blocking tool and checking out the businesses that help keep our site up and free.
You are using an out of date browser. It may not display this or other websites correctly.
You should upgrade or use an alternative browser.
You should upgrade or use an alternative browser.
Time to Contribute! RD350 Cafe Build
- Thread starter andrewlk
- Start date
stroker crazy
crazy as a fox
With that sort of attitude you'll go far!
Crazy
Crazy
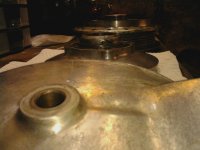
Hmmm. I'm a bit baffled, looks like the brake side to me. Looks like no mechanical problem either, that outside flange mainly is to keep water out of the brake. Notice how the backing plate overlaps this flange only at the bottom to make water drip off the plate instead of into the brake. Could easily be welded up and re-contoured if you are going to polish it. It will be pretty obscured with the brake plate on regardless. The hubs are VERY hard to polish well on the inside. I machine them to remove the four "bars" that cross the drum cooling fins or carve the fins off altogether to make polishing a reasonable prospect. The front hubs have 2 very large webs between the flanges that I mow down with a die grinder before putting them on the lathe to smooth them out for polishing. It's all quite a lot of work, so if you are not determined to do a major project, you might consider simply glass beading them and painting or powder coating them. They will look hugely improved for 5%-10% of the work. You could also do the repair with some epoxy (JB weld, etc) if you are simply going to paint. I have made repairs like this with MarineTex epoxy that survived the powder coating oven with no problem. If you are determined to polish, definitely repair by welding it up. It will really suck to do all that polishing work and then wish you had made the small repair!
andrewlk
Been Around the Block
You're right, definitely brake side. I've got the time and it's the perfect type of job for February. And I'm not in a position to buy parts to work on something else, so I'm setting up for the long haul. Is it unrealistic to to try and polish completely by hand? (Without a bench polisher)
Should I get the parts bead blasted before starting the process?
I'm not sure if I want to polish to mirror finish or just a shiny matte or brushed look.
Keep in mind, when I started, I never expected to be ready for spring - just planned on taking a season off, renting from a friend here or there, and getting my fix offroad.
You can polish by hand but it will take awhile. If you get them bead blasted first it will take longer since you will have to sand the texture from the blasting flat and even again. I'll be watching.andrewlk said:You're right, definitely brake side. I've got the time and it's the perfect type of job for February. And I'm not in a position to buy parts to work on something else, so I'm setting up for the long haul. Is it unrealistic to to try and polish completely by hand? (Without a bench polisher)
Should I get the parts bead blasted before starting the process?
I'm not sure if I want to polish to mirror finish or just a shiny matte or brushed look.
Keep in mind, when I started, I never expected to be ready for spring - just planned on taking a season off, renting from a friend here or there, and getting my fix offroad.
Whether it is realistic to polish by hand or not is, of course, subjective. If you just want to shine up what you have, I would say yes. If you wish to correct all the defects, that is parting lines, casting flaws, scratches (or worse!), the plot thickens. Clem is correct, with enough time and determination, ANYTHING can be done with files, sandpaper, and polishing all by hand. In fact, superb results are likely, as it is largely a lot harder to create ripples and out of flat/true shapes with hand tools. That said, you make a pretty rough surface by the time you smooth out any problems, and going all the way to the end by hand takes some serious dedication! There is all kinds of polishing info on the web, but I would suggest at least an electric drill and some polishing gear. that only gets you half way to what even a crappy bench grinder will do (surface speed is WAY to slow by comparison), but it will be a world better than just by hand.
Maybe this is a better explanation: I think it is SO much trouble to get an acceptable finish on intricate shapes, I put my hubs on a lathe JUST so I can remove the cross bars so I can more easily polish the fins on drum brakes (as mentioned in earlier post)(see pic).
If it was me, and I had minimal where-with-all, I think I would mask off the outsides, glass bead and paint the inside, and polish the outside. If you use silver, you will get a GREAT beautiful result with WAY less work! I've done it this way myself, and was really pleased with the result. (And I think I always tell myself THAT is how I am doing the next hub EVERY time I start polishing the inside of one!) (sorry , cant find a pic of one)
That way we all won't have to wait six months to see more progress!
Attachments

andrewlk
Been Around the Block
I have read a lot about rims lately, I plan to stay at or close to stock sizing, but lighten with aluminum. There seem to be three prevailing opinions about stock sizes:
1. Stock sizing for '73 was 1.60x18 front/1.85x18 rear
2. No, it is 1.85x18 front/2.15x18 rear
3. Nuh uh, it's 1.85x18 front and rear
Then there are some additional perspectives:
-Yes #1 but only in the UK, #3 for all US models
-Forget stock sizes! This is what you should do! [insert mix&match options] like a 19" front wheel and 18" rear etc.,.
Opinions?
Personally, I'd like to go skinny and light. MikesXS has nice options (minus a 1.6x18 size). Presently his 1.85x18 rims are $69/ea. I'm going to relace with stainless so there is some flexibility to choose something different.
@jp
I see what you mean on the cross bars...gonna see what I can do over President's Day weekend, then reevaluate.
Stock US rims for Rd 250's and 350's, 1973, 74, and 75's were WM-1 (1.60 x 18) front, and WM-2 (1.85 x 18) rear. You can go up one size on both ends (1.85 on the front, 2.15 on the back), though I think the improvement on the street is largely cosmetic. 90/90 18 front tire, 110/80 18 rear regardless of rims. Any bigger on the back, there are swing arm clearance problems, and though there is plenty of space up front, handling suffers with more tire, though no doubt it depends hugely on the make of tire, so others may have found good combos. I am fitting Avon Road Riders, and have had nothing but praise reported. I am going to try out a 2.50 rear rim with the same tire in the near future, which should fit and support the tire better, though I have not checked to see what Avon says about the rim widths. I have a 19" rim on one of the current builds and it looks much better with the stock fender clearance. I put the rake back to stock with longer shocks leaving just a hair more trail so handling should be great, but I'll have to wait and see.
The rims from Mikes XS are really nice. Excellent quality, and beautiful, but they ARE bare aluminum, not anodized. Obviously there are pros and cons to either, just FYI. Their stainless spokes are lovely also. They just this last week started offering front 18" spokes - not certain they fit the RD front hubs, but the rear ones do, though a hair short. I should be putting a front 18 together soon, and I'll let you know the result if I do.
Also, if you want to flip the forks 180 degrees to get that heavy caliper closer to the steering pivot (increases the harmonic frequency of the steering assembly and raises the speed of potential "speed wobble" onset), find a hub from a TX500. Those came with a dual disc option, and let you move your disc to the other side with out losing your speedometer drive. It is otherwise identical to the RD hub.
For the record, I absolutely recommend the 1.85 x 18 front and the 2.15 x 18 rear, and the tires I mentioned. I am CERTAIN you will be THRILLED with the result. Hopefully, others will chime in with some recommendations, but this combo drives beautifully.
Hope this helps.
andrewlk
Been Around the Block
Good to know, I will be getting the rims in black regardless, and Avon Road Riders also.
Here goes the polishing...Plan is to start with 80 grit and water, circular pattern, and once I get done with 600 I'll sand in a straight line pattern from there out. Gonna do it the hard way up to 1500 grit or so, then steel wool w/ wd40 (#00 & #0000).
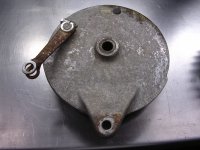
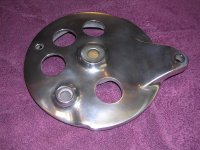
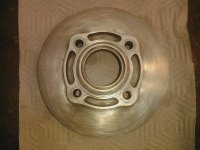
Here's the 3 parts of the rear hub, start with the sprocket side cover/mount. I do plan to get the chip in the brake side of the hub welded up.
Here are before pics after washing and scrubbing.
Here goes the polishing...Plan is to start with 80 grit and water, circular pattern, and once I get done with 600 I'll sand in a straight line pattern from there out. Gonna do it the hard way up to 1500 grit or so, then steel wool w/ wd40 (#00 & #0000).
Here's the 3 parts of the rear hub, start with the sprocket side cover/mount. I do plan to get the chip in the brake side of the hub welded up.
Here are before pics after washing and scrubbing.
Attachments
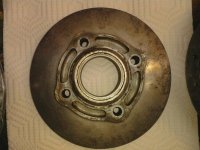
Sounds like a superb plan all round. Here are some inspiration pics. Same backing plate before and after. Yes, that IS corrosion on the otherwise somewhat degreased, cleaned and dried before pic. The result actually looks WAY better than the pic - shiny things totally defeat my hack photography skills. Perseverance is the ticket! The good news is that, once you get it perfected with 80 grit, each successive step gets easier and easier. Get it down to where 1500 has made the heaviest scratches, polishing from there will be a breeze!
Attachments
andrewlk
Been Around the Block
Here's 80 grit, that good enough? I didn't go circular, couldn't get enough pressure or maintain that motion - did a lot of it dry, but generally mixed it up.
On a side note...not too worried about water and dirt if drilling out drum covers I presume?
On a side note...not too worried about water and dirt if drilling out drum covers I presume?
Attachments
VonYinzer
Over 10,000 Posts
Do not drill holes in your backing plate unless you cover said holes with some sort of mesh to keep water and debris out. Its a bad idea. Getting water into your drum brake can render them near useless, as well as rust out the shoes and springs. Get a small rock or other piece or road grime in there and it can lock the drum or cause some real damage to the friction surfaces. While you're riding... Bad news. In general day to day riding, your brakes will never get hot enough to really degrade in performance. Drilling holes is for race bikes. It looks great and can be done safely but you need to think about the everyday aspect of riding the bike mkre than what looks kick ass sometimes. Safety is key, especially when it comes to your brakes and wheels.
Well said VonYinzer! Just trying to show that no matter HOW crusty - there is always hope for throw away parts! I think most folks have at least some experience with a big puddle and NO brakes for a bit (nearly useless my ass, how about TOTALLY useless!). And that with water PROTECTED brakes! That backing plate was for a customer's toy, not a daily driver. (and he has had a stern talking to about it being a bad idea - responded "I don't use the back brake . . .sigh) In fact, I have an almost identical backing plate on one of my "drivers" (which is in my living room (Leading by example. . . let's just say it is not my greatest strength)- not much of a driver actually - hasn't seen rain in a terrible long count of days) and it HAS seen rain at least once that I remember. Interestingly, not as awful as you would expect, but I would not consider such a thing for regular use.
I do however, absolutely challenge the rusting out concept. Water and moisture get in no matter what. Getting dry is the rescue. Holes don't hurt that! (not that they actually help either)
In any event, such things are all for show, not much of any respectable argument for utility. My "living room ornament" is really only good for pretending to be a hooligan, but is is grand fun for that no matter how impractical!
For the record . . do as I say! (not as I do!!!)
Andrewlk, looks GREAT so far. Lather, rinse, repeat . . . no that's not it. . . . well you get the idea! polishing is wearisome, but satisfying in the end! Stay strong!
Ive never came across a rd and said "nice bike but it could really stand to be polished for days and days on end" if you want to polish some thing make it your exh ports. dont get me wrong clean is a must shine is nice but you got a mult cylinder two stoke street bike for the 70's. it strengths are not seeing a reflection in the polished alum. thats what cbs are for rds are for making a fool of the guy with a shiniest bike. the first hundred miles you put on this bike are gonna be full of oil on the pipes, oil out the base gasket and fouled plugs. winter is slipping by, want to spend it rubbing little circles with millon grit sand paper or getting a weapon road worthy. ??? it called the giant killer for a reason.
andrewlk
Been Around the Block
I hear ya Brad, but I've had 2k miles on it unshiney ") I'm going all in, and despite an early (naive) post on this thread, it just ain't going to happen for me in one offseason. Financially or otherwise. It's a riding season off for me either way, polishing or not. Polishing is just something to keep me busy while I get things in order. This will be a main focus of mine during the summer, between school years.
I'm going all in, and despite an early (naive) post on this thread, it just ain't going to happen for me in one offseason. Financially or otherwise. It's a riding season off for me either way, polishing or not. Polishing is just something to keep me busy while I get things in order. This will be a main focus of mine during the summer, between school years.
andrewlk
I'm going all in, and despite an early (naive) post on this thread, it just ain't going to happen for me in one offseason. Financially or otherwise. It's a riding season off for me either way, polishing or not. Polishing is just something to keep me busy while I get things in order. This will be a main focus of mine during the summer, between school years.andrewlk
andrewlk
Been Around the Block
jpmobius said:The hubs are VERY hard to polish well on the inside. I machine them to remove the four "bars" that cross the drum cooling fins or carve the fins off altogether to make polishing a reasonable prospect. The front hubs have 2 very large webs between the flanges that I mow down with a die grinder before putting them on the lathe to smooth them out for polishing.
I am now to the point where I need to deal with the middle.
So far I've done the rear hub covers through 220 grit and the outer portions of the rear hub through 80. Time to deal with the middle or inside of the hub. Is it possible to use a 4 inch wire brush with a drill for the middle? I'm in about 11 hours by now and I think I can handle sanding this portion by hand...with the lighter grits, but for a coarse/80 grit my hands are saying no.
In other news I had the chip repaired and it looks really good now.


