Follow along with the video below to see how to install our site as a web app on your home screen.
Note: This feature currently requires accessing the site using the built-in Safari browser.
We noticed you are blocking ads. DO THE TON only works with community supporters. Most are active members of the site with small businesses. Please consider disabling your ad blocking tool and checking out the businesses that help keep our site up and free.
Thanks all! I had not considered the already excessive driveline lash. Very good point. That would make the force transfer even more harsh without the cush drive.
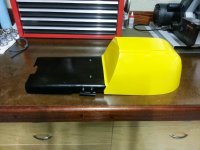
I forgot to mention that I wanted to have a little trunk under the solo seat so I built it with a hinge and the ability to use the stock latch.
I haven't built a pan yet for the trunk.
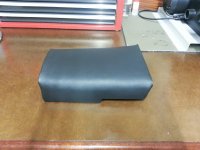
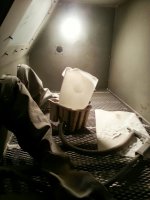
I received the firm seat foam so I thought I would permanently install the seat cover one afternoon this week. Turns out I didn't get the seat pan right when I made it so long ago. That meant extending the pan sides down to cover the solo base and forward to meet the tank, in 2 separate operations since I failed to notice both fitment issues at the same time.
The gaps can be seen in previos pics. I thought after I tidied up the vinyl under the pan it would sit better. Nope.
So after a couple afternoons of more fiberglass work I thought I could knock out the covering quick this morning. Well, no. The cover I had fitted was too small so I had to start from scratch on that. Then I ended up using screws to fasten the vinyl since staples wouldn't go into the fiberglass. It sucks to hold the vinyl tight, hold a screw and drill all at the same time!
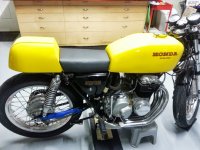
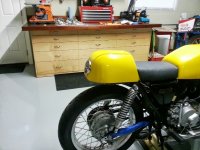
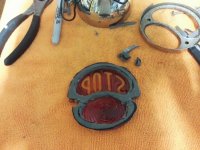
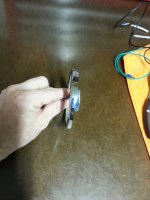
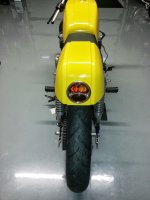
The bezel had to be trimmed and bent to span outside of the raised feature on the solo section. The the lens flopped around inside the bezel so an additional gasket had to be made to keep the glass lens in place and relatively unstressed.
If you zoom in on the last pic you can see how the bezel wraps around the raised feature.
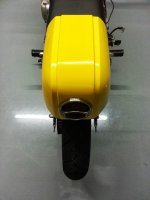
One of the things that worried me most while making the seat slightly squared off with lines running parallel with the bike and then further complicated by mounting a tail light in the middle of the flat spot was that none of these would be centered on the bike and the rear tire would highlight anything out of whack when viewed all together.
This concern doesn't seem to get mentioned often in seat construction but it had me worried from day one.
But I guess luck shown upon me on this attempt. Everything seemed to line up pretty well.
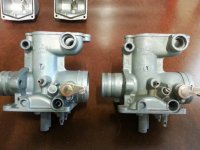
I disassembled the carbs during the past week too. Could they have made these things any more complicated? No wonder everybody complains about getting them to run right.
I give it a 50/50 chance I can get them back together!
I'm not a newbie to cleaning to carbs so I went through and cleaned everything from a functional standpoint. However, compared to the super spiffy looking cleaning jobs using soda blasting, hydroblasting, misc acid (or basic) soaking concoctions my carbs definitely didn't look that nice.
A while back I had picked up a used blast cabinet but had never gotten any media for it and fired it up. In fact, I had the cabinet for over a year before I finally got a compressor. Long term plannin' baby!
So off to harbor freight I went to pick up a 50lb bag of medium grit soda. I cut up a milk jug to use as a soda container and gave it a whirl.
This stuff is great! The carbs were not too bad but a quick blasting and they look nearly new, even showing a little bit of rainbow patina. the plating on the hardware shined up nice too as long as was careful about it.
Over the next week I'll be reassembling the carbs using new Honda float pin & seat sets along with Honda gasket kits. More O-rings than I can count! The jets, needles and emulsion tubes appear OK so I plan on reusing those.
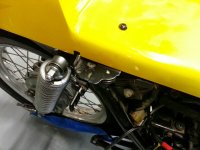
In the immediate future I also plan on using some SS exhaust tubing to put in a bend after the collector to give the muffler an upswept look. I may even pick up a new silencer from DCC.
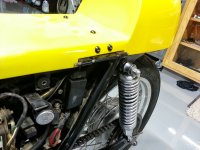
After that I hope to reuse the stock pegs and fab up some new mounts for relocating the pegs. The stock location is actually pretty good with the lower seat and my short legs but a little higher up will help with ground clearance. Using the stock pegs will let me keep the folding pegs and keep the mod stealthy.
I have decided I like the look of the current wheel/fork/swinger combo and won't go forward with the 17" SM wheels and FZR suspension. I'll concentrate on making what is there as good as (economically) possible and see how it all works.
I was finally able to get the carbs back together. I found Tim B.'s carb rebuild 101 article on the yahoo 400f group after reassembling the carbs the first time. Now that I was practiced up on my carb assembly skills, I disassembled them and reassembled following the recommended settings and adjustments. I also discovered I had lost the throttle return spring retaining pin that goes between the center two carbs. This development slowed the reassembled a bit while I made a new pin.
I did not even notice this pin during disassembly. It was not until I was trying to install the spring I knew I was missing anything. Then I had to figure out what I was missing!
Small word of advice - look out for this pin
And if you make a new pin, the recess on the left and right side of the carbs are different diameters. Seriously, WHY?
This site uses cookies to help personalise content, tailor your experience and to keep you logged in if you register.
By continuing to use this site, you are consenting to our use of cookies.

")