Valve-lapping for dummies

bikeboy

Over 1,000 Posts
Code:
I thought I should put a disclaimer on this thread since posting, because consensus seems to be lapping valves without associated valve seat cutting is not a recommended procedure. I've left this post in tact so that people can read through the conversations and draw their own conclusions, but it seems I've been a little hasty (and possibly heavy-handed) in my approach. There's been some good responses from some guys who know more about these things than me, so before anyone considers tackling this project, take onboard all the advice offered. If in the end you decide to give it a try, be gentle, go slow (and in both directions), and you should be fine.

Just came across a new (to me) way of lapping valves and thought I'd share. Some of you may be already using this method, so bear with me.

It all started when I was looking to find a lapping stick small enough to work with motorcycle valves, and having no luck. I got talking to one of the guys behind the counter, who also does his own bike motors. He suggested I attack it from the other end, and attach a cordless drill to the valve stem, and pull it back onto the seat from below (above??)

Anyway, sounded like a plan, and I was having no luck finding my suction-cup thingy. So I gave it a try. It works brilliantly!

This is the set-up:
valve02.jpg


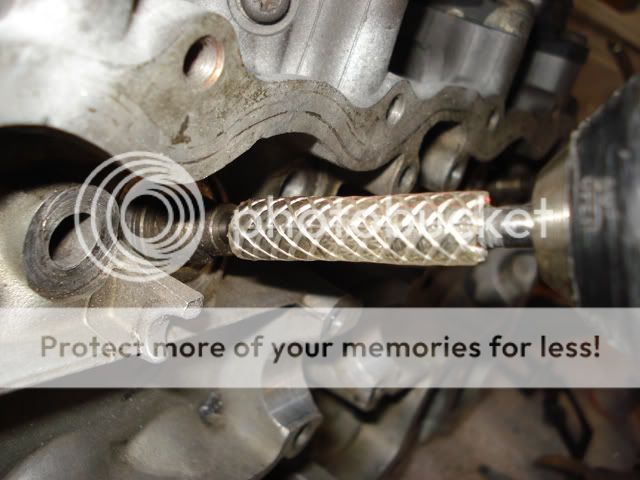
I used a bit of fuel hose so I could slip it on and off easily, and not risk damaging the stem with the drill chuck. Push it on, and pull it off.

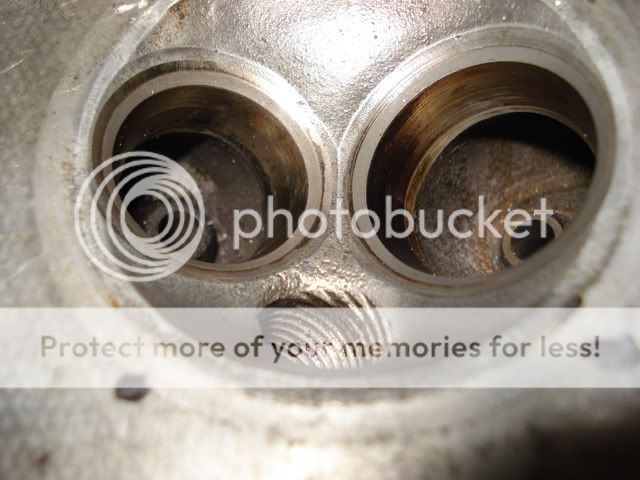
In no time, I had worked this:
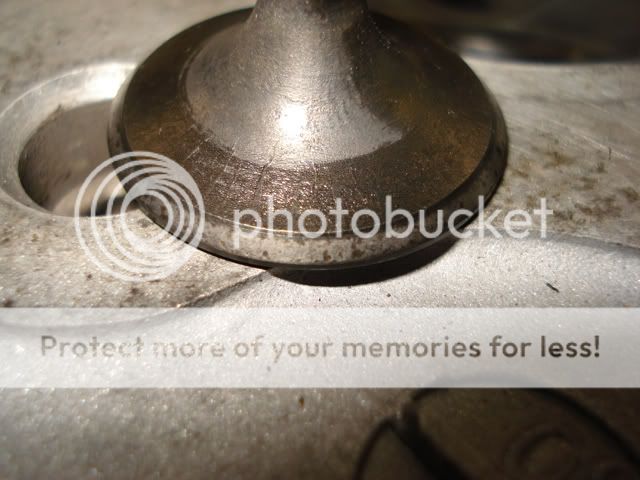
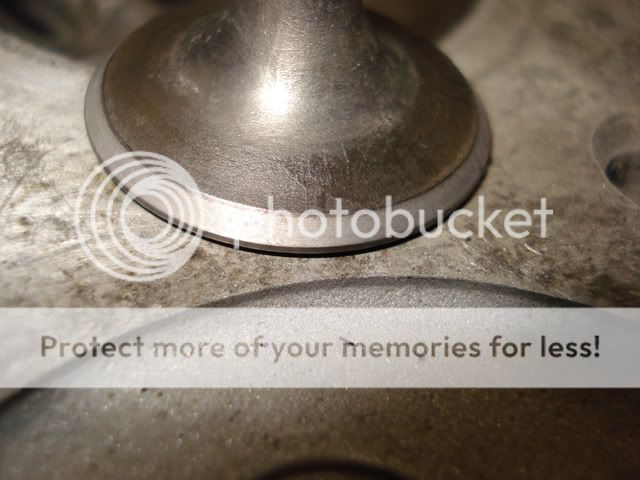
valve01.jpg


into this:

valve03.jpg


and the seats in the head are equally smooth.

The head was inverted on the bench with the valve hanging over the edge for access to the stem from below.

I guess the trick is to not go too fast, keep lifting the valve to spread the paste, and apply gentle pressure on the valve head. I only used the fine paste, because I wasn't too sure how aggressive this would be. Turned out OK I reckon.

Anyway, I hate to think about the time I've spent chasing that stupid suction-cup all over the place (and it never *really* stuck either!) Never again.

The bonus is all it cost me was a 40mm length of fuel hose I had any way!

Win.

Hope someone finds this helpful?

cheers
ian
 
Duuude!
That is waaaay too much contact area valve to seat. You need to have the valves reground, and the valve seats re-cut.

There is a reason why valve lapping is done with a suction cup on a stick. Doing it with a drill VERY quickly removes too much material.

Read up on 3-angle valve jobs. The contact area valve to seat should only be a mm or two wide.

Valve lapping is not a substitute for machining. It is the final step of a valve job, and needs to be done with a light touch and only just enough to achieve a band of valve to seat contact area that goes all the way around the valve and seat, NOT to mate the entire surface.
 
AlphaDogChoppers said:
Duuude!
That is waaaay too much contact area valve to seat. You need to have the valves reground, and the valve seats re-cut.

There is a reason why valve lapping is done with a suction cup on a stick. Doing it with a drill VERY quickly removes too much material.

Read up on 3-angle valve jobs. The contact area valve to seat should only be a mm or two wide.

Valve lapping is not a substitute for machining. It is the final step of a valve job, and needs to be done with a light touch and only just enough to achieve a band of valve to seat contact area that goes all the way around the valve and seat, NOT to mate the entire surface.

oh. Well that's disappointing :( I haven't actually increased the contact patch as you can see, but I guess if you're suggesting it was too wide in the first place, then it's time to have them looked at? I'll have to re-think my strategy.


thanks
ian
 
OK. I've done a bit of poking around the internet a bit, and I think I've got it sorted ::) These valves (CB400F) are straight cut as stock. I've just uploaded a pic of the corresponding seats, and I don't know if it's a scale thing or not, but the actual strip that's been lapped is 1.5mm:


valve04.jpg


While the valve facing is about 2mm, the contact patch *can't* be wider than the 1.5mm of the seat, which falls within the parameters you've mentioned?


Does this seem OK?


Thanks again for your input.
ian
 
I've done valves that way before with great results, just remember go slow and in BOTH directions.

For those of us that don't have the access or the funds to spend on valve grinding can always just make sure to RTFM and spec out our stuff. IF the seat falls in spec then run it. If not then start worrying about get them reground.
 
I can't speak to the specifics of your particular engine without the service manual in front of me.

That little bit of surface pitting that you had on the valve face is pretty normal, and it may have been seating just fine. The best test is to squirt some carb cleaner into the port with the valve installed, and see if any leaks past the valve.

Having a wide contact area between valve and seat can actually cause that pitting that you saw. The exhaust valve runs VERY hot, and the hot valve hits the seat and transfers heat when in contact with it. If the contact patch is too big, it can cause the seat to get hot enough to cause micro-welds to the valve, and that is what causes the pitting.

I sometimes forget that on this forum, we are not always talking about modern engines. <G>
Modern engine design has hardened valve seats, and they are ground to three angles. The multiangle valve job allows better flow through the port because it makes a more rounded path for the gasses to flow past.

Check out this link.

Some motorcycle heads and valves do not tolerate regrinding, because there ain't enough meat there. I am a little more used to Harley engines. They have automotive type valves that can be reground, and the seats can be reground or replaced. The 3-angle valve job is de rigueur.

Here is what the service manual for my '81 Suzuki GS450 says about reconditioning the valve seats.

Valve Seat Reconditioning
This job is best left to your dealer or local
machine shop. They have the special equip-
ment and knowledge for this exacting job. You
can still save considerable money by removing
the cylinder head and taking just the head to
the shop. The following procedure is provided
in the event that you are not near a dealer and
the local machine shop is not familiar with the
seat reconditioning specifications.

1. With a 15° valve seat cutter, remove just
enough metal to make bottom of seat concen-
tric. See Figure 77.

2. With a 75" valve seat cutter, remove just
enough metal from top of seat to make it
concentric.

3. With a 45° valve seat cutter, cut a seat that is
1.0-1.2 mm (0.039-0.047 in.) wide.
Now, a word about valve grinding compound.
The smallest traces of it in your engine is highly destructive. It doesn't just float around and eventually find its way to the oil filter or get drained out in an oil change. It embeds into engine parts and stays there to cause wear forever. After you are done lapping the valves, be totally anal/compulsive about cleaning them. Use hot water and detergent. Valve grinding compound is water borne, so don't try to clean it out with things like carb cleaner, use water and detergent. Get in there with soapy brushes and be VERY thorough.
 
I've seen valves done with a drill many times.
IT"S NOT A GOOD IDEA
The radial motion actually cuts micro groves into valve and seat (which is why you oscillate valves instead of rotate them)
They will seal, but, they 'bed in' real quick and need adjusting within 100 miles or so.
If you check contact, it gets much wider after engine has been run
It's something that's done by the lazy or the people who neither know or care about performance
To be totally honest, I don't remember the last time I lapped valves, you can't on modern bikes and on any vehicle, if the seats are cut properly, they don't need lapping
 
Opinions on whether to lap or not vary. My opinion is that if the valve need service, regrind the seats, and the valves too, if possible. (Some motorcycle valves you have to replace, not regrind.)

Then, lap very lightly. Like you say, it must be done with an oscillating motion, and the valve lifted off the seat frequently while doing it. Only a few seconds of lapping per valve will do the job.

But, you are totally correct that modern valve and seat grinding practices have nearly eliminated the need to lap valves. Part of the point that I am trying to make with the original poster is that lapping a worn valve and seat is no way to renew it. Lapping is a process to be used ONLY after grinding. To finish it off.
 
Many motorcycle valves have a hard "skin" ie surface treatment that is ground away if valves are lapped and that's one reason that some OEMs recommend replacing valves.

I have lapped in lots of valves over the years and will still do it if I need to but when rebuilding a head I take it to a shop with SERDI machine and get a 3 or 5 angle vale job on the seats and I have them grind the valves to match so that they come back with the appropriate width.

I have also tried the drill technique and found it to not work well for several reasons. If the valves or seats are pitted, lapping to get the pits out recesses the valves and leaves big fat seats that don't flow well.
 
OK guys, thanks for that. It seems I've gone a little too redneck this time around ::)

I'll keep an eye on it and see what happens.

cheers
ian
 
Back
Top Bottom