Follow along with the video below to see how to install our site as a web app on your home screen.
Note: This feature currently requires accessing the site using the built-in Safari browser.
We noticed you are blocking ads. DO THE TON only works with community supporters. Most are active members of the site with small businesses. Please consider disabling your ad blocking tool and checking out the businesses that help keep our site up and free.
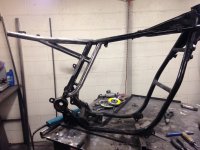
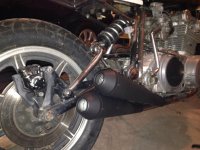
I think the shock linkage at the swingarm needs to be a little higher so the shock is not in such a straight line with the brace (when it's under compression, it will be under the line of the brace). That should be pretty easy to do seeing you have the brace bolted at the axle end - all you need to do is add a bit to the height of the vertical tube at the front of the brace.
I love the build. You will get significantly more strengthening if you tie the two parallel frame tubes together with plate steel or some type of triangulated latticework.
I think the shock linkage at the swingarm needs to be a little higher so the shock is not in such a straight line with the brace (when it's under compression, it will be under the line of the brace). That should be pretty easy to do seeing you have the brace bolted at the axle end - all you need to do is add a bit to the height of the vertical tube at the front of the brace.
ideally the shock travel vs wheel travel should be plotted on a graph
what you are looking for is shock travel to wheel travel ratio increasing nearer it gets to bump
or in other words the wheel LOSING leverage on the shock the further into travel it gets
linkage lashups are able to precisely control this
but with this type of lash you can still create a slightly rising rate if designed correctly
what you don't want is a falling rate
the early kawaski mx bikes had a falling rate with the then new unitrak and thus had to be very stiffly sprung which made them terrible on things like stutter or braking bumps
Fabrication is done until I pull the motor. Want to make sure it still comes out before tying the new frame supports together.
In the mean time I'm working on tidying up all of the odd's and ends.
- Mufflers are on their way (Once I'm done with exhaust I'll pull the motor and have Luke finish the frame so I can powder coat it)
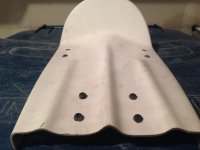
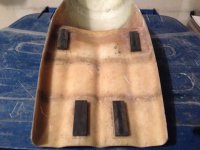
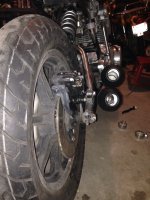
- Seat mounting in progress (pictures attached)
- Electrical mounting (under seat pan - in progress)
- Headlight mounting, gauge, controls, etc.
Lot's left. Still hoping to have her done by spring.
Minor update. Been working on small details and exhaust. Once the exhaust is all mounted up I'll be stripping the bike for paint and powder.
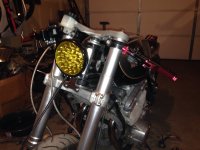
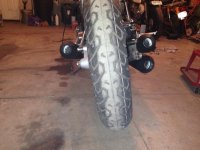
Headlight mounted. It's a 5" LED headlight.
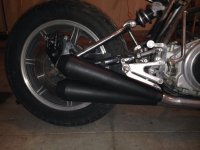
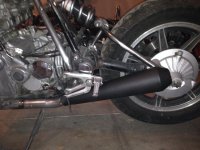
Exhaust mocked up. Quick look at the two mufflers stacked on the right side. The top one will be angled a little bit more and obviously not touching the one under it.
Round 2 of exhaust mockup. I had to move them back a bit due to my rear set placement. Had the upswept adapters made and they work just right. The bottom right one will be mounted a little higher when finished.
That exhaust setup is looking pretty awesome. Curious about that headlight -- is the yellow lens a film or did it come like that? If film, where'd you get it?
That exhaust setup is looking pretty awesome. Curious about that headlight -- is the yellow lens a film or did it come like that? If film, where'd you get it?
Headlight came yellow, not a film. Here is the eBay listing: http://www.ebay.com/itm/281436672857?_trksid=p2059210.m2749.l2649&ssPageName=STRK%3AMEBIDX%3AIT
You are right, the motor would not come out with the braces. That's why we waited to weld them in until after we tried to pull the motor.
We had to modify the brace on the right hand side to get the motor out. I'll try to post up some pictures soon, but the motor is out and frame is just about ready for powder.
I need to get out and take some more pictures, but here is a quick shot showing how we modified the frame tube to get the engine out. Th bend ties into the frame at the same place as the second tie in on the other side to keep a little consistency.
Engine is out, now just some small odds and ends before I get to powder and painting.
Having issues with batteries dying on my 1980 xs850 Special cafe. I rebuilt the stator. When I did, the regulator was fine. Today, on a ride, my brand new Shorai battery completely drained. Any ideas?
Having issues with batteries dying on my 1980 xs850 Special cafe. I rebuilt the stator. When I did, the regulator was fine. Today, on a ride, my brand new Shorai battery completely drained. Any ideas?
I installed the new regulator I purchased. Fits great. But, now, when I turn the key I immediately blow the main fuse. I tried 3 times. Went through 3 fuses. Frustrating. Perhaps there's a short in the new regulator? Any thoughts?
This site uses cookies to help personalise content, tailor your experience and to keep you logged in if you register.
By continuing to use this site, you are consenting to our use of cookies.

") . For a big job its easier to work on the motor with it off the bike anyways.
. For a big job its easier to work on the motor with it off the bike anyways.