
I think the biggest difference between your current bike look and the classics you posted are - wheels, fenders, and shiny black vs matte. Your fenders/wheels are black; on the classics they are chrome; all the black is shiny on the classics. But I am not suggesting chrome on yours. Maybe a chrome tail light, a chrome "tuning fork" emblem on the side covers, or silver/aluminum paint on the fenders might help add some visual interest (might make them look like alloy). I think I'd leave the wheels/forks/headlight mounts/handlebars as is. Maybe contemplate gloss black for the side panels/tank/headlight shell?
We noticed you are blocking ads. DO THE TON only works with community supporters. Most are active members of the site with small businesses. Please consider disabling your ad blocking tool and checking out the businesses that help keep our site up and free.
You are using an out of date browser. It may not display this or other websites correctly.
You should upgrade or use an alternative browser.
You should upgrade or use an alternative browser.
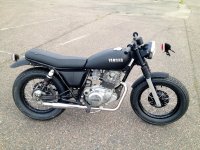
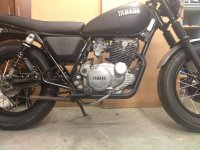
Yamaha SR250 - A clean standard build
- Thread starter JadusMotorcycleParts
- Start date
zap2504 said:I think the biggest difference between your current bike look and the classics you posted are - wheels, fenders, and shiny black vs matte. Your fenders/wheels are black; on the classics they are chrome; all the black is shiny on the classics. But I am not suggesting chrome on yours. Maybe a chrome tail light, a chrome "tuning fork" emblem on the side covers, or silver/aluminum paint on the fenders might help add some visual interest (might make them look like alloy). I think I'd leave the wheels/forks/headlight mounts/handlebars as is. Maybe contemplate gloss black for the side panels/tank/headlight shell?
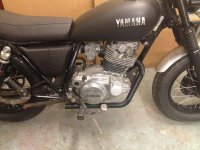
Good points zap. I actually went out and bought some silver and chrome paint today just for mock up/testing purposes. Will see how it works out. You're right, it would be silly to change the wheels at this point! I was actually going for a bit of the Harley 48/bobber look there - where they have fat tyres and black rims to make the whole look more beefy and dramatic. I think that is working well. I will try the forks in silver/aluminium again to see if that helps break thinks up.
Photoshop first?JadusMotorcycleParts said:Good points zap. I actually went out and bought some silver and chrome paint today just for mock up/testing purposes. Will see how it works out. You're right, it would be silly to change the wheels at this point! I was actually going for a bit of the Harley 48/bobber look there - where they have fat tyres and black rims to make the whole look more beefy and dramatic. I think that is working well. I will try the forks in silver/aluminium again to see if that helps break thinks up.
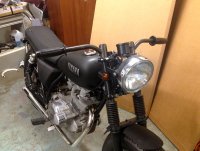
Photoshopped one option real quick anyway. I think it will achieve the lightness I am looking for. I also bought a bates style tail light with black body and chrome rim/trim. For me, this will really nicely tie the rear of the bike to the front - with the big black head light and chrome ring ")
Don't laugh at the 5min photohack job ;D
Don't laugh at the 5min photohack job ;D
Attachments
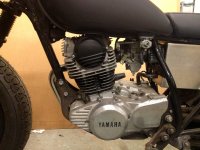
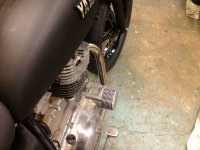
I also checked out what the finned engine covers might look like in context. Pretty pathetic 'aluminium colour' spray paint of you ask me. Oh well, conveys the intention anyway. I think they'll be cool even if they dont work. But it will be fun to do some testing ;D I really like the cam chain cover in black though. I'll run with that. Then I was checking out where I might mount the indicators too. I am sold on the rear, but not yet on the front.
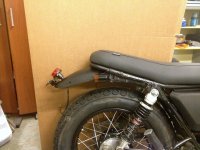
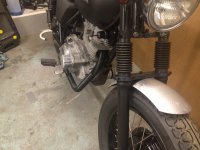
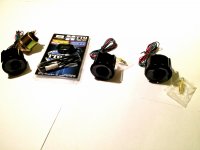
I really like these daytona blinkers. I have used them on 3 builds so far. I love the simple geometric but elegant design - I am not a fan of the conical or 'bullet' shape ones - too 'chopperish' for my tastes. I also think that with the amber lens, they almost look like they could be period correct - like in the 80s when they didn't have amber LEDs and they had to use amber lenses to get that colour light.
One more thing... I tried silver/'aluminium' guards as well. Not sold yet but I'll def ponder over it for a wee while longer.
Attachments

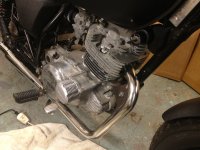

I like the handlebars more and more each day! However I think the exhaust would look even better if it followed the engines lines in the front. Also think your color issues with the bike is because you have a full "silver" engine. I painted mine and it looks way better with some contrasts.
Sent from my iPhone using Tapatalk
Sent from my iPhone using Tapatalk
I will definitely add something nice/cool on the side covers. Haven't decided if it will be in silver or chrome. I am starting to like the idea of silver/aluminium guards more and more.
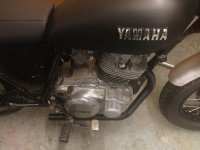
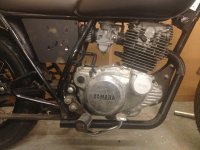
As for the engine, I really want it to have a classic look. I don't really like painted engines personally (each to his own). Not only for the looks, but for the fact that it hinders the engines ability to leak/dissipate the heat. Believe me, unless its the right paint, you're not helping your engine cool - Harley did a shit ton of research on this I read somewhere.
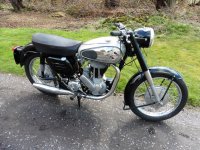
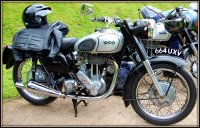
I do want to paint the barrel and the cam chain cover though and maybe a few other details. The idea is that the jug/barrel 'looks' like its cast iron with an aluminium head - like in the old days. Maybe a little try hard I know, but I like the look - as in the AJS and Norton attached.
I tried a 4th exhaust prototype today. One more change and I am done. I will print a final and then take that with me when I go visit my supplier - so he can copy the bends exactly. Then I will order 100 or something. Hope they sell! Gotta come into the Spanish market somehow - there's a shit ton of SR250s there but I don't speak a word of Spanish! Maybe its time to learn
As for the engine, I really want it to have a classic look. I don't really like painted engines personally (each to his own). Not only for the looks, but for the fact that it hinders the engines ability to leak/dissipate the heat. Believe me, unless its the right paint, you're not helping your engine cool - Harley did a shit ton of research on this I read somewhere.
I do want to paint the barrel and the cam chain cover though and maybe a few other details. The idea is that the jug/barrel 'looks' like its cast iron with an aluminium head - like in the old days. Maybe a little try hard I know, but I like the look - as in the AJS and Norton attached.
I tried a 4th exhaust prototype today. One more change and I am done. I will print a final and then take that with me when I go visit my supplier - so he can copy the bends exactly. Then I will order 100 or something. Hope they sell! Gotta come into the Spanish market somehow - there's a shit ton of SR250s there but I don't speak a word of Spanish! Maybe its time to learn
Attachments

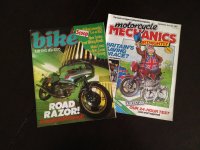
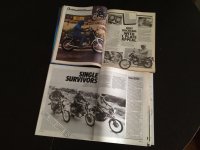
Been away for the weekend so not much time in the workshop/on the bike. But these two sweet magazines arrived on Friday - I ordered them from ebay. I have a couple more coming next week. I ordered all the ones I could find with tests/reviews of the SR250 back in the day when it first came out. They are really fun to read - not only has the technology and the motorcycle industry/community in general come a long way, journalism and writing in itself has also developed a lot too
I scanned in the whole articles and added them to my webpage at a pretty decent resolution - so if you are interested to see what the motorcycle journos were saying about the SR250 back then, I really recommend you have a read ;D
http://www.jadusmotorcycleparts.com/#!other/cqh1
I scanned in the whole articles and added them to my webpage at a pretty decent resolution - so if you are interested to see what the motorcycle journos were saying about the SR250 back then, I really recommend you have a read ;D
http://www.jadusmotorcycleparts.com/#!other/cqh1
Attachments
Another prototype believe it or not. Printed it yesterday and fitted it today to test. It's perfect, but then after 5 prototypes you would damn well hope so! I'll be ordering these real soon Then I will probably design two more - a high 'scrambler' pipe and a pipe more like the BSA Goldstar - with a few more curves that match the clutch cover and sweep upwards at the end 8)
Then I will probably design two more - a high 'scrambler' pipe and a pipe more like the BSA Goldstar - with a few more curves that match the clutch cover and sweep upwards at the end 8)Attachments
FerousBastard
Active Member
You can never have too many prototypes. Looks ace to me 8)
Think a BSA like pie would look really cool, havn't thought about it before but now you bring it up I think Suzuki stole a few pipe-ideas the the BSA for their LS650
Keep up the good work!
Think a BSA like pie would look really cool, havn't thought about it before but now you bring it up I think Suzuki stole a few pipe-ideas the the BSA for their LS650
Keep up the good work!
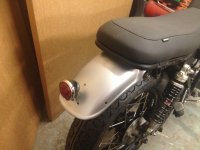
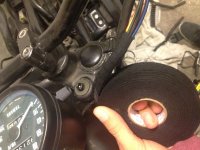
Got some cool stuff in the mail today - my posh tail light, some template stickers and some 'fabric' electrical tape. I don't know how well the tape hold up to abrasion but it sure looks cool. I will still wrap the wiring with high quality normal electrical tape first I think. I also might still yet look into some nice fabric/nylon cable sleeves that I have seen look nice (and might have more abrasion resistance).
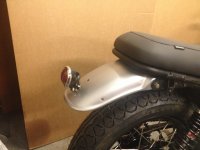
The quality and look of the tail light is next level. I don't know if I like it on the silver/aluminium guards though... might go back to black yet haha.
The quality and look of the tail light is next level. I don't know if I like it on the silver/aluminium guards though... might go back to black yet haha.
Attachments
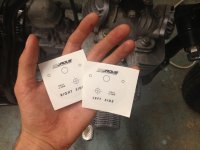
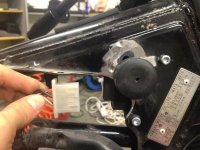
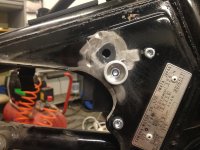
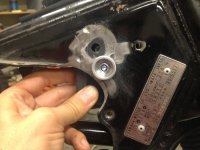
Here is the idea behind the template stickers... After years of designing products and making assembly/installation instructions, I learned that the best/easiest/coolest (and most expensive, doh!) way to make sure things are done right and as exact as possible, is to make transparent template stickers. It makes the whole exercise pretty painless. Now you guys on this forum and my future customers are probably the most capable people out there and definitely on the upper spectrum of being able to understand and read instructions and install stuff properly - which is a nice change for me to be able to design stuff for smart people rather than 'monkeys' as one of my old boss's would call most installation guys haha
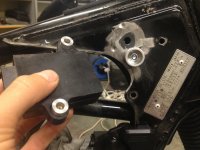
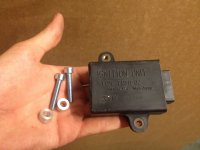
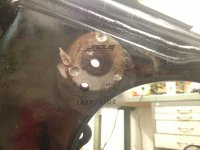
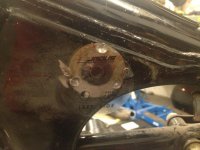
Anyway, the template fits and works perfectly. Following on from this I have taken some pictures of the easiest way to install the kit. The super glue for the CDI spacers is nothing permanent or load bearing, it is merely to make the installation easier. Once in place, the screws hold it all together. The spacers are just used to clear the bolt heads of the new front tank mounts.
I am working on a proper set of instructions with photos and everything as well.
hahaAnyway, the template fits and works perfectly. Following on from this I have taken some pictures of the easiest way to install the kit. The super glue for the CDI spacers is nothing permanent or load bearing, it is merely to make the installation easier. Once in place, the screws hold it all together. The spacers are just used to clear the bolt heads of the new front tank mounts.
I am working on a proper set of instructions with photos and everything as well.
Attachments

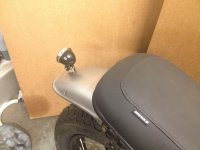
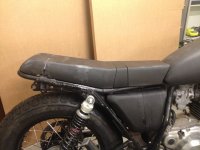
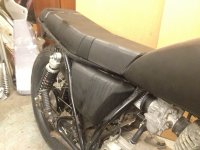
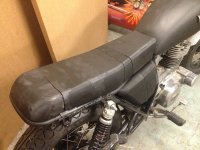
I managed to print the other half of the updated (3rd prototype) side cover and glue it together for a test fit. While I was at it I had a thorough look at the seat prototype.
I am pretty happy with the side cover. I will make a few minor tweaks then make a mould to make it in fiberglass.
The seat however needs a bit of work. I took a lot of notes and will update the 3D model tonight accordingly. This will be the most expensive tooling (for the seat base and the foam moulds) so I want it to be right. Hopefully, the seat pan can be slightly universal and I will be able to design one or two more shapes for the foam part to sit on top of it - maybe a more cafe racer style and then a flatter, thinner version too.
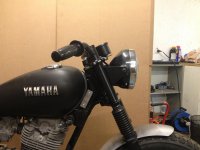
The last thing I checked was some prototype headlight brackets I am working on. Eventually I will make them from aluminium tube and sheet metal. I adjusted the angles slightly so they fit the lines of the bike better and will also accommodate the indicators in a tidier fashion.
I am pretty happy with the side cover. I will make a few minor tweaks then make a mould to make it in fiberglass.
The seat however needs a bit of work. I took a lot of notes and will update the 3D model tonight accordingly. This will be the most expensive tooling (for the seat base and the foam moulds) so I want it to be right. Hopefully, the seat pan can be slightly universal and I will be able to design one or two more shapes for the foam part to sit on top of it - maybe a more cafe racer style and then a flatter, thinner version too.
The last thing I checked was some prototype headlight brackets I am working on. Eventually I will make them from aluminium tube and sheet metal. I adjusted the angles slightly so they fit the lines of the bike better and will also accommodate the indicators in a tidier fashion.
Attachments
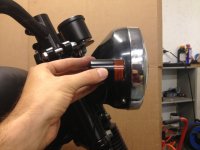
I put my cdi in the same spot. Fits pretty good in there. Your bike is looking great. Lots of good ideas. Consider changing the headlight maybe? The stock one is too big for the bike in my opinion. It makes everything else (mainly the forks and triples) look too small. I put a dt175 light on mine and the sizing seems much better. Just a thought.
For wiring, most just use pre-split plastic loom material (maybe with black zipties). Works well as long as the wiring harness bend is not severe.
I initially did not follow your "template" thing until I saw it was both a TCI relocation and front tank mount kit. I thought you were going to use a "swinging" mount with a slug going into the frame hole (left over from removing the OEM mount), a flat re-locating plate, and a "spool" going away from the frame to hold the rubber tank mount? This design would have been great to mount both the OEM tank (in a different location) and other brand tanks with similar rubber mounts and the ability to fit the frame (since OEM tanks in good condition are fairly hard to find - at least in the USA). The tank would have been "hanging" in the front, but the tail mount would have kept it from moving.
I initially did not follow your "template" thing until I saw it was both a TCI relocation and front tank mount kit. I thought you were going to use a "swinging" mount with a slug going into the frame hole (left over from removing the OEM mount), a flat re-locating plate, and a "spool" going away from the frame to hold the rubber tank mount? This design would have been great to mount both the OEM tank (in a different location) and other brand tanks with similar rubber mounts and the ability to fit the frame (since OEM tanks in good condition are fairly hard to find - at least in the USA). The tank would have been "hanging" in the front, but the tail mount would have kept it from moving.
Shawzie said:Consider changing the headlight maybe? The stock one is too big for the bike in my opinion. It makes everything else (mainly the forks and triples) look too small. I put a dt175 light on mine and the sizing seems much better. Just a thought.
I do think the headlight is a little large like you say. But the design and finish of it I like - I think it fits this build. The other thing is its so practical to be able to fit all of the wiring in there. The DT175 headlight is a cool idea. I have even seen a CB100 headlight used and that looked pretty cool.
Haha I know what you mean about the triples and the forks looking small - thats why I have tried to cover them with the gaiters and headlight ears to make them look a little beefier
Thing is, I am actually working on designing a new custom universal headlight, but it wont be ready for this build.
zap2504 said:For wiring, most just use pre-split plastic loom material (maybe with black zipties). Works well as long as the wiring harness bend is not severe.
I initially did not follow your "template" thing until I saw it was both a TCI relocation and front tank mount kit. I thought you were going to use a "swinging" mount with a slug going into the frame hole (left over from removing the OEM mount), a flat re-locating plate, and a "spool" going away from the frame to hold the rubber tank mount? This design would have been great to mount both the OEM tank (in a different location) and other brand tanks with similar rubber mounts and the ability to fit the frame (since OEM tanks in good condition are fairly hard to find - at least in the USA). The tank would have been "hanging" in the front, but the tail mount would have kept it from moving.
Aha, so thats what they use. I thought it would be too much hassle to practically re-do all the wire connections just to fit the sleeves. Now it makes sense with the pre-split stuff. Thanks for the tips.
The fist 3 prototypes I made for the tank kit were exactly how you describe/thought. The problem I kept having (even after 3 tries) was that the tank mounting flanges (inside the tunnel) kept interfering with the brackets, no matter how thin I made them and no matter what orientation I positioned them in. Thats why I had to go down this path with drilling a hole with a template and adding the mount that way. I really hope these parts will still allow people to mount other tanks - just by drilling a hole in the correct location. But i'll have to wait to see what people come up with.


