Follow along with the video below to see how to install our site as a web app on your home screen.
Note: This feature currently requires accessing the site using the built-in Safari browser.
We noticed you are blocking ads. DO THE TON only works with community supporters. Most are active members of the site with small businesses. Please consider disabling your ad blocking tool and checking out the businesses that help keep our site up and free.
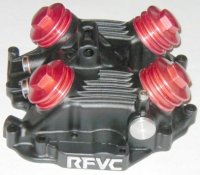
Maybe you could make some parts for the Honda 650 RFVC engine? Loads of guys are using those but I can't think of anything more than a new oil filter cover though..
Man I would love to! Maybe someday. But for now, I am struggling just to get parts for one bike to market! Its quite a massive undertaking to do all the design, prototyping, testing, finding trust worthy suppliers (god this is the biggest!), order samples, test fit and then strategically place production orders on the parts you believe in the most - requiring significant investment. Especially being one person I love it though and would like to have a catalogue of parts for around 10 different model bikes in 5 or so years time.
I did manage to find these sweet valve covers that might fit your engine? There are a few people selling them on Ebay and they look pretty rad! Dunno about red though?!
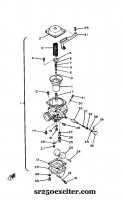
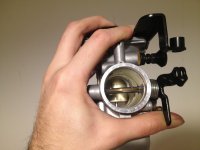
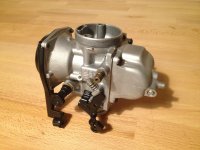
Putting the carb back together slowly. All the jets and the float valve were cleaned, the float bowl gasket replaced and diaphragm inspected. I replaced a few of the o-rings too, the ones I could find that fit. Unfortunately, not all of the parts are listed in the exploded diagram to be able to order, so if they're worn, you either have to improvise and find something that will work in its place, or try to revive what is there! I had that situation with the butterfly valve shaft seals that nest into the two bosses on the sides of the carb throat.
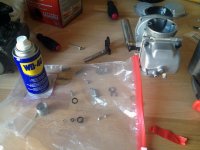
I had been told by an old car restorer dude I used to work with that you can soak old rubber parts in brake fluid to bring thew to life again - or at least soften them up a bit to be able to use them for a while again. I wasn't game enough to try it cos I read somewhere that if you leave them in the fluid too long, the corrosive additives to the brake fluid can break down the rubber too much and they can disintegrate! Then I read somewhere that you could do a similar thing with WD40. I felt a bit safer with WD40 so I gave that a crack. Just sprayed a bit into a ziplock bag then placed the seals inside and squeezed the air out. This is so the WD40 doesn't just evaporate right off and should soak into the rubber a bit.
I left them in overnight and it seemed to work a treat! For sure not like new, but soft enough to fit and form a seal again. See how long they last...
Yeah, most carbs have throttle shaft seals and most parts diagrams do not show them. I know that some did a lot of research on them (for some of the Yamaha XJ-series bikes with Hitachi carbs) and found that QR-011 seals from McMaster-Carr worked on those carbs, but they used a Quad Ring/double-seal Nitrile/Viton ring. If you do the measurements on shaft/bore diameter and recess depth you might find one on their site. You could also try Reid Tool Supply (www.rtsindustrial.com).
Yeah, most carbs have throttle shaft seals and most parts diagrams do not show them. I know that some did a lot of research on them (for some of the Yamaha XJ-series bikes with Hitachi carbs) and found that QR-011 seals from McMaster-Carr worked on those carbs, but they used a Quad Ring/double-seal Nitrile/Viton ring. If you do the measurements on shaft/bore diameter and recess depth you might find one on their site. You could also try Reid Tool Supply (www.rtsindustrial.com).
Thanks for the tips! Might have to take the route further down the track. Couldnt find Reid Tool Supply though, dead link. Then found/read that they are now: http://us.essentracomponents.com/
I used to order stuff from McMaster-Carr all the time when I lived in the US. I love their online catalogue. Its really hard to get an account if you're living outside the US though :-\
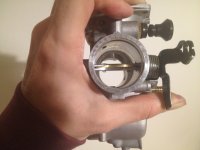
Finally got the whole carb back together with the newly powder coated parts.
I noticed when screwing in the butterfly valve screws that they stuck out quite a bit and I just read all about this interruption of airflow in Graham Bell's tuning book - he suggests trimming the screws machining out the shaft and thinning the plate! Wont be doing that. But I thought well why not just trim off 3mm from the screws anyway, nothing to loose. You can see the difference in the first and second photos.
In the other photos you can also see the carb bolts I replaced - some nice button head allen head jobbies with stainless spring washers on the float bowl ones. Thinking of making this a kit too maybe. Its just that these are the JIS screws and I am sure many a noob, like me, has stripped these when trying to get into the carb for the first time in probably 20 odd years to clean it up. So why not replace them with some nice ones...
I put some loctite on the screws, but should I take them out and put the permanent kind on instead or will that hold? Just wondering if the atomized fuel will eat the loctite?
Love how much development you've put in for a bike that previously had such minimal aftermarket options. A company near me has started stocking some of your parts (mostyn industries, in Australia), in future would it benefit you most if I buy from them or through you directly?
Love how much development you've put in for a bike that previously had such minimal aftermarket options. A company near me has started stocking some of your parts (mostyn industries, in Australia), in future would it benefit you most if I buy from them or through you directly?
Thanks man. I saw someone comment on on my instagram post of the SR wiring diagram I made that said 'Sr love'! Not far from the truth. Yeah, I couldn't understand that since I build my fist SR 6 years ago, there are still not any specific parts available for it, despite its popularity. Poor things been forgotten by the aftermarket!
Its great Mostyn wanted to stock my parts, it showed they have faith in what I was doing. That all happened very recently actually. I am going to visit them in a couple weeks when I head to Australia. They seem like rad folk. I definitely recommend buying from them in future - you will get good support and cheaper shipping (parts wont be coming all the way from Sweden!). I was surprised to see the (comparatively low) prices they put for my parts on their website, I couldn't understand them. Until I talked to my Dad and he informed me that Australias sales tax is a crazy low 10%! What!? We poor bastards in the EU have to pay anywhere between 18 and 27% - 25 here in Sweden and Denmark. Makes a big difference to the tax included price.
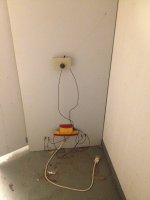
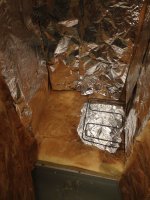
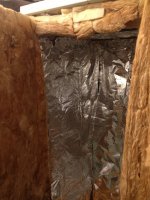
PC ovens finally finished and wired up. Not the tidiest but it works pretty well. I haven't used it yet but my mate has done a couple bike parts in it (very different tastes to me in the way of colour). There seems to be no heat leakage - you can touch your hand to the cabinet anywhere when its on and its just warm. We wired in the thermostat from the old oven and two of the elements and it trips at 200 without problem. The 3 phase plug wired in also makes it easy to plug in and out and be able to use the other standard oven I have for smaller parts.
Eventually, it would be nice to line the entire interior with thin aluminium sheet, but that's costly so will have to wait.
Nothing worth posting. Currently wrestling over ordering a tail loop through mostyn because I can't be bothered doing the hour drive to pick it up. Had an sr250 for a while that I got really cheap just to learn to ride on really and play around with something cheap but splitting minimal funds between the sr and a Harley project have left them both pretty stagnant. I just enjoy seeing other people playing with them, gives me a bit of motivation and I can learn from them before I spend money on the wrong stuff.
Easy and very common thing to do! At one point in Australia I had 3 projects on the go, then I only ended up finishing one of them. Its all fun in the beginning of the project - being all creative and seeing good, visual, results. Then it gets harder and harder towards the end when motivation starts running thin and your mind starts wandering to new more exciting projects that you dream up!
Good luck with the frame loop. That will be a nice tidy detail when you install it
Just got sent some final photos from the photo shoot of my first customer build and thought I would share one here. The cool thing was, the customer himself is a photographer, so we made a pretty sweet deal with trading skills as payment. Was also an added bonus we became good mates through the process
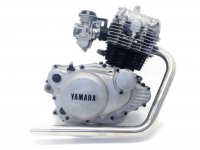
While I was working on tidying up the frame a bit more before blasting, I decided to mount the header and the newly rebuilt carb to the engine to see how the whole package looks. I love the look of this engine! Not this one in particular, the SR250 in general I mean ;D
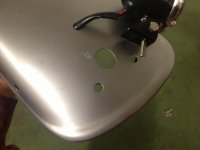
I am thinking of just making an aluminium bracket that adapts the tail light I chose to fit in the original tail light hole - then one of the bolt holes will become the electrical cable hole. The two remaining bolt holes will be used to bolt on the license plate.
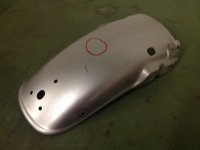
That leaves two holes on the side of the fender I would like to weld up and one dent on the top I would like to have a crack at banging out!
This site uses cookies to help personalise content, tailor your experience and to keep you logged in if you register.
By continuing to use this site, you are consenting to our use of cookies.

") Thanks for showing interest.
Thanks for showing interest.