Yamaha XS500 Build.

smz89

New Member
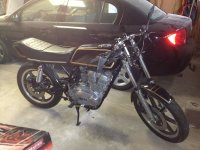
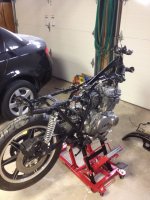
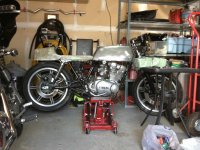
So i found myself a xs500 for a good price. Bike is in good shape, motor turns over with kick start with ease. All original parts. Turning it into a cafe racer, possibly a tracker style bike. I will post some pics one i upload them from the old phone.

If there is anything you can tell me about this bike it would be great. I dont hear about the xs500 very much.

This is my first build but will have lots of help.

My plans for the bike are as follows:
Front end:
- drop front by 1 1/2"
- new speedo and tack.
- new headlight and signals, didn't like the originals lol.
- clip on bars (which will be placed pretty low as i have arms like a gorilla.... aka can scratch my knee without bending over)
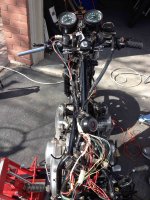
Electrical:
- hide all electrical!!!!! i like to have a clean looking bike, and to me the wiring is more important then colour of the bike.

Body of Bike:
- Mufflers replaced and shortened.
- rear linkages set back.

Rear:
- cats eye brake light
- new signals
- still no idea how i would like to mount the license plate
- THE REAR SEAT!!!!!! 2 options
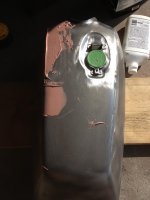
- option one. keep tank and seat lookin like raw metal, so use the old rear fender to make a seat
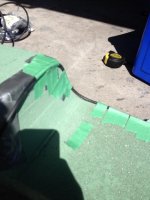
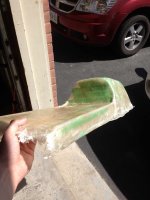
- option two. fiberglass a seat. (if i choose this method i will try to take boat loads of pictures and steps)

Colour scheme for bike (thats right, I'm Canadian... colour has a "u" eh)

frame will be black as it looks the best for keeping the bike clean and powder coated for strength.

green and beige is option one.

metallic green is option three

and going with the raw metal look is option three.

Your thoughts and suggestions are more than welcome on the thread and i will try to get back as much as possible.
list of parts that will be for sale will come as the bike progresses.
 
The XS/TX500 isn't a bad bike at all, and makes a great cafe racer, but they have gremlins. Make sure the valve clearances are adjusted properly, and look into an oil filter adaptor, as the original oil filters are no longer available except NOS on eBay or such. People say the head is prone to cracking, and I can't argue, since mine was cracked in four places, but the later (post-76) models seem to be better with the one-piece head.
Parts availability is mostly good as they share a lot of parts with other Yamaha models, but gaskets, some engine parts and the aforementioned oil filters are rare as dodo eggs, so if it needs motor work, be prepared to play the waiting game and pay a lot for parts.
All doom and gloom? Sorry.... Didn't mean to sound that way- I really love my TX, I just want to save you some of the aggravation I went through. Good bike, good find, post those pictures!
 
Just started a TX500 build myself. Good luck with yours. If you go to this site http://xs500.proboards.com/ and look for "Brads oil adapter" you wll be able to mount a more available filter. If you find some cam links for the chain for under $20....buy them becvause they are rare and you will need one if you have to tear your engine down.

Good luck with the build and get some pictures up as soon as you can.
 
So here she is from the start.
 

Attachments

  • bike1.jpg
    bike1.jpg
    479.6 KB · Views: 927
Sorry for the late reply but was having trouble uploading images. file sizes were to large so had to shrink them.

If you have the same problem, just go to save as and reduce the size and should upload here no problem.
 
Nice looking bike. Has the right shaped frame too.
Ill be interested to see how you tackle the rear of the seat. Ive toyed with the idea of using a part of the old fender on my cruiser/Cafe Racer conversion.What I dont like in my case is the flat sides. The curve is OK.
Good luck with it
 
This is after a quick little tear down. Took off the front end. Polished up the front forks, getting ready to paint them up. Also ordered some supplies from Dime City Cycle. They had the best prices (even with shipping to Canada) along with some discount coupons. Planning to paint it tonight and will post some pics as i go.

Also got to remove the pain on the tank and prep it as well. Hoping to get to the wiring within the next week or two. Still contemplating running a setup without a battery or not as i would like to have brake light, head light and turn signals. If anyone know where a good diagram is, or budget friendly parts supplier for a no battery setup, please pass along any info.
 

Attachments

  • bike2.jpg
    bike2.jpg
    882.8 KB · Views: 534
hybridfiat said:
Nice looking bike. Has the right shaped frame too.
Ill be interested to see how you tackle the rear of the seat. Ive toyed with the idea of using a part of the old fender on my cruiser/Cafe Racer conversion.What I dont like in my case is the flat sides. The curve is OK.
Good luck with it

ya still in the air with the rear end. if i run battery i will make it cafe. if i run batter free, then more of a tracker seat, or a very low profile rear bump. Thanks for the interest.
 
OMG.The first thing I was going to say was don't butcher anything you can't go backwards on.Especially the tank.Too late.
 
jimmer said:
OMG.The first thing I was going to say was don't butcher anything you can't go backwards on.Especially the tank.Too late.

I haven't stripped it yet. could get to it last night. But im not a fan of the gold and black. also the pin striping are stickers and peeling off.

In another not. Are any of these original parts worth selling? eg. headlight, turn signals, rear section/ seat, air filter, handle bars, fenders?

Thanks.
 
Stock paint side covers,tank,tail section/seat are always worth something.Headlight,signals,bars are cheap and abundant.Your bike looks really nice stock,I just hate to see it get "cafe'd".Now if you were starting out with a rat bike,the situation would be the opposite! Check out some of my junk @ xs500blogspot.com There is stuff buried deep in the older posts. And yes the proboards is pretty active too.Have fun with the build.I have been doing XS500's for 35 years now! :eek:
 
jimmer said:
Stock paint side covers,tank,tail section/seat are always worth something.Headlight,signals,bars are cheap and abundant.Your bike looks really nice stock,I just hate to see it get "cafe'd".Now if you were starting out with a rat bike,the situation would be the opposite! Check out some of my junk @ xs500blogspot.com There is stuff buried deep in the older posts. And yes the proboards is pretty active too.Have fun with the build.I have been doing XS500's for 35 years now! :eek:

Good to know about the parts, thanks jimmer. BTW, nice bike. i see you made some minor changes here and there but overall looks good man. I have no intension on putting mine on a track though. I'm eager to see where this build will take me.
 
It's a repost but in any case I hope it helps


Oh man I hope I can save some pain when it comes to the XS 500 8 valve ...

.... So running out of replacement heads from Yamaha we were instructed to remove the head and peen the combustion chamber and place a small drill start at the end of the crack on the outside then install the spark plug with an aluminum flat washer and red aviation Hi-tack at some small torque value .
I went looking for the procedure in Yamaha documentation and found none but to this day I find Yamaha service techs from that era that remember something like those instructions .
By the way the crack almost always radiates from the spark plug hole to the exhaust valve seat . If I were to find even a clean enough late model head I'd warm it up and shot peen it to relieve stresses just in case .
There are a few things I'll have to refresh my memory about when it comes to R&R the flywheel and adjust/time the balance chain . It was install a few degrees ahead/behind the keyway and twist into place . I'm sure you get the idea . Basically it sux the first time .

The stock carbs are their own deal . Unlike much of anything you'll see in classic rice .
On most you can dual disc the front but the order of installation is specific and escapes me as it was too many years ago but not long enough to forget how many times I had to back up and start over .
For you and others that resurrect the cast iron single pot caliper the O-ring from one of the 240Z Datsun calipers ( can't be specific here I'm gonna claim senility) is a direct fit . I have no idea what to do about the piston other than have someone carve one from SS .

CHAIN (DK219H-82L)
14410-235-003 (replaces 14410-216-003)

JOINT, CAM CHAIN
14411-216-000

http://hondapeninsula.com/fiche_section_detail.asp?section=120034&category=MOTORCYCLES&make=HONDA&year=1965&fveh=2876

chain just happens to come from a CB160 (cam chain)

Now the balance chain is a Kawasaki part
Kawasaki 92057-1415 (CHAIN,CAM,BF05-104L)or at last check Tsubaki still makes the BF05 in bulk , you just have to find someone that carries it .
Seems a shame to cut 62 links out of 104 and use the rest for a bracelet ...

The later tensioner for the balancer has a thicker slipper for the starter chain and is a better adjuster for the balance chain . Take a good look while the flywheel is off . I have a fair copy of the parts fiche if needed .

If you find a better way of installing the flywheel/starter clutch/chain gears without dropping the key into the ... than I have please share . :D

Is that enough blathering for now ?

~kop
 
So i finally had some time to work on the bike this weekend....

with testing and gf's mothers b-day and all its been impossible to work on the bike. so if anyone is still following this thread, here are some updates.

took the wiring harness off and went through the entire harness. thankfully everything had good connectivity. Unfortunately the ignition coils are shot. went around town trying to find replacements with no luck so i placed an order with dime city cycle for new ones. great price for them too. Also noticed some rust holes in the exhaust so i ordered some new 12" shorties as well.
 

Attachments

  • IMG_0097.jpg
    IMG_0097.jpg
    536.2 KB · Views: 252
So since the bike couldn't start and i have to wait for parts to get in i went ahead with making the cafe seat. I opt'ed for the square style seat as i went well with the tank. Didn't seem right to force a shape onto the bike. would have messed up the streamline lines of the bike. I have some experience with fiberglass and i know how difficult it is to do, so i took as many pics as possible (hard to do because fiberglass is time sensitive and i was the only one around). So i got some foam from Michael's which cost me about 20 bucks. stray adhesive it together and let it set. DO NOT CHEAP OUT ON THE SRAP ADHESIVE!!!!! you dont want it falling apart while your sanding and cutting it.

So here are some pics.
 

Attachments

  • IMG_0101.jpg
    IMG_0101.jpg
    667.3 KB · Views: 251
  • IMG_0104.jpg
    IMG_0104.jpg
    619.4 KB · Views: 205
So once i got the shape, i got some sprinkler water hose and taped it around the edge of the foam to act as a lip for the seat once it is made. Then i covered it all in tape and then waxed the outer to act as a release agent. Now for the glassing i used a mat fiberglass and cloth fiber glass. the mat was cut into shapes to fit areas of the seat. The cloth was left whole.

So when you mix your first batch of epoxy, get the second one ready so all you have to do its add hardener to it and your ready to go. The first batch will be painted onto the seat. DO NOT PUT A TON OF HARDENER IN THE FIRST MIX!!! this gives you time to place each mat piece you have cut and wont harden on you in 5 minutes. place all the mat pieces, then place the cloth overtop and add the second batch of epoxy with a lot of hardener. This will react with the first batch and harden everything evenly.

TIP: keep a razor blade handy for while doing this. If the cloth overlaps just cut it and force it down. that way you wont have to sand off a chunk later. Another tip, when applying epoxy around a curved section, run over it slowly with the brush. This will allow the epoxy to soak through and put the cloth and mat up against the mold. For some reason it acts like a section cup.
 

Attachments

  • IMG_0109.jpg
    IMG_0109.jpg
    615.5 KB · Views: 237
  • IMG_0107.jpg
    IMG_0107.jpg
    592.5 KB · Views: 220
  • IMG_0106.jpg
    IMG_0106.jpg
    572.3 KB · Views: 229
  • IMG_0105.jpg
    IMG_0105.jpg
    552.3 KB · Views: 250
SO once it is hardened, take it out of the mold. You will notice some spots that are flexible. Just use mat fiberglass and epoxy it from the inside. This will reduce your bondo needs and overall sanding, while still getting the add strength needed from the glassing. BTW, if you have any questions about this just ask. I'm not an expert by any means but if I can help someone with their project, thats good by me. I then lined it up on the bike to see the shape and how the lines look to keep the symmetry of the tank. I always fiberglass over the edged cause its easier to cut stuff away then to fiberglass more on.... trust me!

I am going to tape the seat from the bottom up, to give it that painted end as opposed the the box style. Sort of like an old school ducati. Next is the tank. Got to bondo out some dents, but i'm warning you guys, This is going to be a very intricate paint job. Again i will try to post pics as often as i can.

I also came up with a name for the bike.... "Country Cafe" ... you will see why as the build slowly progresses
 

Attachments

  • IMG_0111.jpg
    IMG_0111.jpg
    447.4 KB · Views: 227
  • IMG_0110.jpg
    IMG_0110.jpg
    467 KB · Views: 222
  • IMG_0113.jpg
    IMG_0113.jpg
    678.3 KB · Views: 227
So I finally got the tail section and tank all cleaned up. Just finished the last clear coat and wet sanding this morning so here is a picture of the tank. let me know what you think. If you have any suggestions I'm open to it. I was trying to figure out a way to put the yamaha logo on'er but couldn't find a white sticker or template anywhere. Getting started on the tail section now and will post pics when its done.

I do have a question though if anyone can answer. I want to run 2 12" shorty mufflers tight under the frame of the bike and put a piece of bent pipe to redirect the exhaust away from the back tire. Possible? Yes? No? Good? Bad?... just wondering really. I think it would make for a nice clean line on the bike, since everything else on the XS is so boxie.
 

Attachments

  • IMG_0116.jpg
    IMG_0116.jpg
    675.7 KB · Views: 232
  • IMG_0117.jpg
    IMG_0117.jpg
    576.5 KB · Views: 230
Back
Top Bottom