Yes, another CB360 Project - BRGT

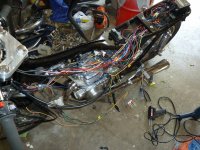
It's always the small details that take up so much time when trying to finish something. But, I'm thoroughly enjoying this project. Wiring is 98% completed. I must be an "idiot" because I really like idiot lights. I had to solder in 2 rectifier diodes to get my LED turn signals to play nice with my DCC turn signal idiot light. But, for $1.49 pack of 2 diodes they work great.

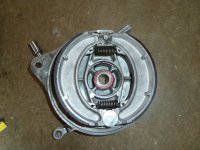
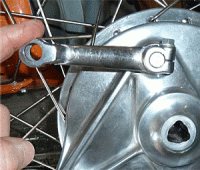
One issue that's got me bugged is my new rear brake shoes. I knew I'd have to deal with this but kept putting it off. My problem is the lack of movement in the rear brake lever. In other words, the rear wheel spins freely, and it only takes a small, infinitesimal movement of the brake lever to brink the wheel to a stop.

I'm not sure if all brake shoes create this issue, or if these a thicker than they should be. The rear lever only moves less than 1/4" before the shoes contact the drum. It makes it difficult to adjust my rearset linkage, and the rear brake switch. Anyone else run into this problem? The shoes are FS-114, same number I've seen on a couple of websites for rear brake shoes. I though maybe the "FS" might stand for "Front Shoe", but I'm thinking the shoes are identical for front or rear.

I guess I could shave off some of the new brake shoe material to give it some room, but that seems to defeat the purpose of new shoes.

The crude animated gif at the bottom shows what little movement there is with these new shoes.
 

Attachments

  • 001 (1024x768).jpg
    001 (1024x768).jpg
    797.7 KB · Views: 288
  • 007 (1024x768).jpg
    007 (1024x768).jpg
    539.3 KB · Views: 281
  • 012 (1024x768).jpg
    012 (1024x768).jpg
    762.2 KB · Views: 264
  • Rear brake.gif
    Rear brake.gif
    137.4 KB · Views: 987
You did spin the wheel and stomp on brake before tightening axle to center shoes in drum?
How is the rearset linkage set up?

OK, went back multiple pages.
Did you ever set the linkage so arms are parallel?
You could remove operating arm on brake plate and move it forward one spline (yake the bolt all the way out)
 
crazypj said:
You did spin the wheel and stomp on brake before tightening axle to center shoes in drum?
Yes I did, but not sure what this really accomplishes.

How is the rearset linkage set up?
Before I took it off, it was Kirk's Old School Speed linkage with the actuating lever and bar on top. I've switched them like 3dognate to the bottom. Either side up or down, it's tight.

OK, went back multiple pages.
Did you ever set the linkage so arms are parallel?
Yes, the shift side is parallel, and it seems to be working well. Now working on brake side, I need to get more movement on brake lever before I can set the linkage.

You could remove operating arm on brake plate and move it forward one spline (yake the bolt all the way out)
I could move it 1 deg all around 360 degrees and it would be tight at each location.

Thanks for the inquiry Peter. I think the shoes must be too thick. Unfortunately I tossed the old shoes. The wheel spins free as a bird, but the minute you apply just the slightest pressure the shoes lock on. The brake lever only has to move 5mm to actuate braking. I guess I can setup the brake linkage and try to adjust the brake switch accordingly. I just think there should be more free play than there is.
 
Shorten the link and set the operating levers parallel first.
Stomping on brake with axle nut loose allows shoes to center in drum, you have to keep the pressure on while tightening axle
Moving operating arm on brake plate will give you more adjustment, you can set it up with inch or so travel
You'll probably find shoes will bed in fairly quick, around 30~50 milers will make a lot of difference
It may be a good idea to check the edges of the new shoes and maybe run a file over them, I've seen them where there is a slight 'lip' which is enough to make brake feel real tight
 
I was initially excited to install a Pamco EI when I first heard about it last year, so I patiently waited for Pete to come up with a unit for the 360. Giving up I tried Viet's EI, and just couldn't make it work. He's a fantastic guy and I fully support his efforts. Excitement arose again when Pete came out with not only a CB360 unit, but one with electronic advance! Fantastic! But, now that Pete has temporarily pulled this unit I have given up and purchased a Bore-Tech.

The BT unit appears to be a well designed piece of electronics. But, and there's always a "but", having installed the unit I'm wondering if my 39 year old coil pack is having issues. Here are my results on the primary and secondary windings:

The primary is the puzzling reading. My ohm multimeter reads out with the settings: 200 - 2K - 200K & 20M. Setting the meter to 200 I get 9.7. I'm expecting a reading of 3 - 5 ohms. Weird.


The secondary readings are set on 200K and I get 15.0 on the left cylinder - 14.3 on the right.


With a 9.7 ohm reading on the primary I'm wondering if I'm getting too much resistance? Either way it sounds like it's time to change out the coil.

The bike is timed out perfectly, but instead of a nice fat blue spark I'm getting kind of a weak almost yellow color spark.

As always, I'm interested in others thoughts as they are extremely appreciated.
 
I fought with old worn out stock coils for 4 months when I first got my 360, crappy spark, fouled plugs all the time, wouldn't start for shit. Finally one just died, melted down during a ride around the block. I'm glad it was just around the corner I was about the kick the bike to the curb at that point.

I spent about 30 bucks on new aluminum canned emgos, wires, caps, and plugs and I have had ZERO issues since with the spark. NICE fat blue spark, starts right up, no fouling. I didn't even try the coils that came with my 450s, they went right to the trash save for the mounts.

I vote TOSS them. ;D
 
frogman said:
I vote TOSS them. ;D

Thanks Frogman. After I posted this I went ahead and ordered a new set of coils and plug wires from Mike XS. Gotta be better than what I have now. ::)
 
Well that sucks..sorry to hear bout the EI. Also, Fresh coils made a difference in my 360.
 
When you measured secondary resistance, did you remove plug caps?
That would be about right with 10K caps
9.7 is still way high for primary side though
 
Being a greenhorn Peter, not sure if I understand the question. When measuring the secondary the plug caps were connected to the plug wires. These caps are NGK spark plug resistor variety to aid in protecting the Bore-Tech EI circuitry. Testing circuit was one lead on the coil yellow (or blue) and the other lead shoved up into the spark cap.

New coils will be here tomorrow. ;D
 
Should go plug cap to ground for secondaries and yellow or blue (disconnected from condenser/points) to ground for primaries
Check the plug caps and see if they are in spec and not high resistance
 
Well, I've abandoned EI and gone back to points. The bike starts easily and I've run her around the neighborhood. All wiring is complete. She's in the shop getting a final once over by trusted local Honda mechanic. Once she's back I'll finish the seat and post pix & video.
 
Well, bad news. Tim the Honda guru (great mechanic) has checked out my amateur rebuild. Timing was spot on, valves needed slight adjusting, compression is strong, but he found 2 serious issues. There is a carb issue. Only running on 1 cylinder. I know these were mucked up pretty bad when I bought the bike. CPJ said he had a tough time when he went through them for me. They might be a lost cause. I'm tempted to start fresh with some Mikuni's

The other problem, Tim says there's a noise in the engine, down low. Can't put his finger on it.

So, I'll tear it down and have him eyeball it as I go. He's been doing this for 41 years.

The "winter project" goes on, and on, and . . .
 
Bottom end noise is real unusual, check starter clutch bolts to rotor, when they come loose sounds like big end bearing
 
Thanks Trek and Peter. It may be an issue with the transmission. The bike shifts, but I could tell it was not as smooth as it should be. Perhaps a bent fork. This is just good experience for my next project. ;D
 
More likely a bent shift shaft, that's pretty common.
Also, they bind in the outer cover, could be a bit of corrosion?
 
Back
Top Bottom