
We noticed you are blocking ads. DO THE TON only works with community supporters. Most are active members of the site with small businesses. Please consider disabling your ad blocking tool and checking out the businesses that help keep our site up and free.
You are using an out of date browser. It may not display this or other websites correctly.
You should upgrade or use an alternative browser.
You should upgrade or use an alternative browser.
Yumi... another xs650
- Thread starter urbandork
- Start date
AdrianVall
Active Member
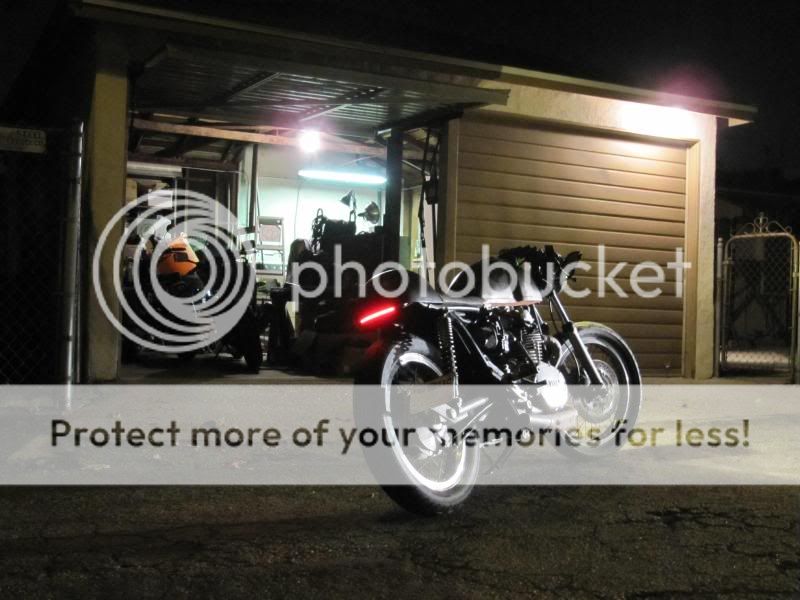
Would be nice if I could actually see the bike! But, from what I CAN see, NICE! ")
donald branscom
Active Member
Yes it is very aggravating to have to keep dragging the page left then right then left to see it all. The web page person needs to understand that almost all screens have a 640 X 480 pixel useable space.
Even on my large monitor I have to keep dragging the page right,left,right to see it all and have access to the scroll buttons.
On the other hand the subscribers need to get their photos sized to 500 pixels wide max. That will help the web page design .
Even on my large monitor I have to keep dragging the page right,left,right to see it all and have access to the scroll buttons.
On the other hand the subscribers need to get their photos sized to 500 pixels wide max. That will help the web page design .
ctrl and the - or + key at the same time is what I do... although i will include a link so that way a person can have a clickable thumbnail of the pic.donald branscom said:Yes it is very aggravating to have to keep dragging the page left then right then left to see it all. The web page person needs to understand that almost all screens have a 640 X 480 pixel useable space.
Even on my large monitor I have to keep dragging the page right,left,right to see it all and have access to the scroll buttons.
On the other hand the subscribers need to get their photos sized to 500 pixels wide max. That will help the web page design .
AdrianVall said:Would be nice if I could actually see the bike! But, from what I CAN see, NICE!
Yeah I agree. Ill take more when the sun is out.
donald branscom said:Yes it is very aggravating to have to keep dragging the page left then right then left to see it all. The web page person needs to understand that almost all screens have a 640 X 480 pixel useable space.
Even on my large monitor I have to keep dragging the page right,left,right to see it all and have access to the scroll buttons.
On the other hand the subscribers need to get their photos sized to 500 pixels wide max. That will help the web page design .
640 x 480 usable space?
I've designed the site to work well on a small laptop screen with 1280 x 800 resolution. The pictures fit with no side scrolling etc. It's what I'm using now.
At 1024 wide the site becomes cramped and you need to side-scroll on pics.
The site automatically scales all embedded photos to 700 pix wide, a value I chose to fit the 1280 wide screen layout.
Sorry to hijack the thread, but I've spent quite a bit of time working this stuff out and want to make sure it's good for as many people as possible.
I get tech data on the browsers etc. that access the site (Google Analytics). 70% of the visits to the site are from screens with widths >=1280 pixels.
17% of all visits come from 1280x800 screens, the largest chunk.
6% of visits come from screens 640 x 480 or smaller, the vast majority being 320 x 480 smartphone screens.
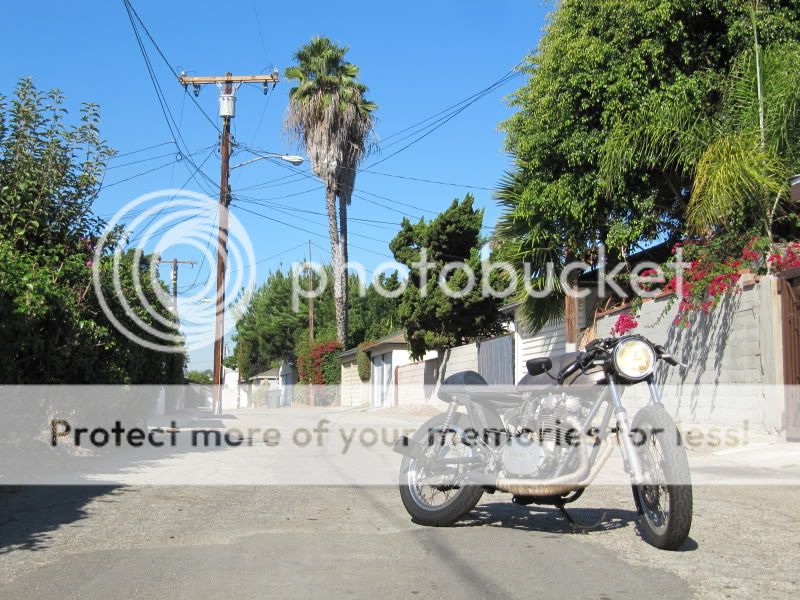


ProSimex said:Pics or its just a random photo you pulled from google search to impress the rest of us. A description on your build and some ride videos tearing up the asphalt and not just puttering past your buddy with the camera would also be appreciated
lol
Really? Note that the photobucket source for the photos are from a photobucket account with the user name urbandork... which is also my user name here. Either way heres a list of mods:
(All work done by yours truly)
Dellorto phf36 carbs
750cc big bore kit (mikes xs)
Performance cams (mixes xs)
Halco high primary gear set (20% higher)
Tarrozzi rearsets
Woodcraft clip on's
Progressive Suspension springs/shocks rear, fronts yet to be installed
Flexible LED array tail light with turns
LED front turns
Shaved down frame
Flipped oem head light brackets
Yellow H4 bulb (had an HID but didnt like it)
Fiberglass seat/hump
Bennelli 360 tank outer tank and new custom tunnel area
Banshee perm Mag Alt.
Simplified wiring and cigaret box size battery
Lots of other things here and there.
Tim said:ProSimex was joking
Looks awesome, even on my tiny Dell Streak screen.
cool cool. I had an idea that it was leaning toward that way. since there was a request off me "puttering" around on it.
Different forums different strokes... Im also in to toyotas, small block chevys, and firearms... and ive noticed there are different type of ppl on different type of forums.
By far this one and the chevy forums happen to be more my style... some times other forums can be way to ... well you know DRAMAAAAA.
BTW my homie has as Dell streak and that screen is huge compared to an Iphone... im on a 10" netbook and I feel like his dell streak is comparable to mine.
ProSimex
RUN SCREAMING!!!
Of course I was joking, I'm not actually a complete asshole. Except about the video part. If I see one more ride by video with the riders friend going whoohoo as its ridden past and up the block I'm gonna scream.
Build looks tight though, how are ya feeling about the bigbore kit? I was going to go the mikes cam or get a shell 1 regrind but I realised it wouldnt gimme any more power in the lower rev range where I usually am. Whats your take on that?
Again tight looking little scoot!
Build looks tight though, how are ya feeling about the bigbore kit? I was going to go the mikes cam or get a shell 1 regrind but I realised it wouldnt gimme any more power in the lower rev range where I usually am. Whats your take on that?
Again tight looking little scoot!
Having ridden the bike with and with out the big bore kit, I have to say it made a world of difference. Although keep in mind I did all the mods together so it isnt just one mod but all of others in conjunction with each other. I also did a bunch of calculations on speed vs rpm vs hp and tq from dyno charts in order to find a sprocket set up which would complement all of the mods all together.ProSimex said:Of course I was joking, I'm not actually a complete asshole. Except about the video part. If I see one more ride by video with the riders friend going whoohoo as its ridden past and up the block I'm gonna scream.
Build looks tight though, how are ya feeling about the bigbore kit? I was going to go the mikes cam or get a shell 1 regrind but I realised it wouldnt gimme any more power in the lower rev range where I usually am. Whats your take on that?
Again tight looking little scoot!
as per the shell vs mikes question... ive heard the shell one is better.... i went mikes xs cus i was already getting the big bore kit from him and his dyno charts where with those cams.
PS and videos with music. The music should be the motor.
ProSimex said:Also the del torro, high ratio gear, and banshee swap, all worth your while and $$$$ Did you do the Banshee swap yourself or get a kit. How was tuning them fancy carbs?
Is there any baffling in that pipe? Might be missing out on some low end torque if not.
Yeah i have some sort of baffle... I played around with straight pipe, cheap ebay one, Krome werks HP plus one, and finally a Gpop one in order to get the sound and performance that i was looking for.... needless to say with each different baffle came playing around with carbs both on the accelerator pump side as well as the height of the jet needle. It took a lil while but I got the hang of it after a while.
I did the Banshee swap on my own. The kit looked cool but I had no problem making my own bracket out of a banshee timing plate.
All in all everything was worth the money. The higher primary ratio gears, which cost a good deal also got mated to new clutch components as well as heavier weight springs. These while being the most expensive part of the build have been the best investment. The torque i lost with these were made up and then some by the cam and the extra 100cc but give me a good rpm while and higher top speed while cruising on the highway.
joeybaggadonuts
comin in hot, hit em wit it
nice ride! what kind of battery are your running? I'm going to guess it's in the tail? I'm working on simplified wiring on my cb400, so i'm curious what you did with yours
joeybaggadonuts said:nice ride! what kind of battery are your running? I'm going to guess it's in the tail? I'm working on simplified wiring on my cb400, so i'm curious what you did with yours
Its actually strapped to the under side of the seat, right next to the solid state voltage regulator and rectifier. The battery I'm running is about the size of a cigaret box. They are like 7 bucks and can be found on ebay.
http://www.ebay.com/itm/12Volt-0-8ah-Sealed-Lead-Acid-SLA-Battery-/300613096535?pt=PCA_UPS&hash=item45fdefd457
and here
http://www.factoriesonline.com/ProductInfo.aspx?id=7134397
With this battery having so little capacity I have to kick start the bike with only the LED neutral light on. I had used a capacitor but with the battery being so small i went back to it because it gave better starts over the capacitor.
As for the wiring it was rather simple as im use to dealing with wiring on imports. I basically went down to the bare minimum.
Head light
Tail/brake light
Turns
Neutral
Ignition system
Perm Mag
I had always planed on running key-less. I was going to use a toggle switch but then simplified it even more by just using the Kill Switch as my primary switch. I figured since I had to turn it on with only the LED neutral light pulling amps it wouldn't be that heavy of a load on that switch. (so I dont have to worry about it burning out or fusing together.)
Thanks to modified stock mounts the head light bucket also pivots up and down at my will and stays where I put it... even when riding. This meant i could drive with the high beam on all the time, which i did anyway. Thus the lo beam side of the switch allows me to keep head light off while kick starting it. All other lights are hooked in to the power off the Hi switch. (tail/brake and the turns)
I found the best way to make a wiring diagram is to actually draw it out. I use MS paint some times, Simple yet affective and I can color code the wires versus having to use crayons or markers. (yes i have used crayons)
Hope this helps. good luck
joeybaggadonuts
comin in hot, hit em wit it
urbandork said:Its actually strapped to the under side of the seat, right next to the solid state voltage regulator and rectifier. The battery I'm running is about the size of a cigaret box. They are like 7 bucks and can be found on ebay.
http://www.ebay.com/itm/12Volt-0-8ah-Sealed-Lead-Acid-SLA-Battery-/300613096535?pt=PCA_UPS&hash=item45fdefd457
and here
http://www.factoriesonline.com/ProductInfo.aspx?id=7134397
With this battery having so little capacity I have to kick start the bike with only the LED neutral light on. I had used a capacitor but with the battery being so small i went back to it because it gave better starts over the capacitor.
As for the wiring it was rather simple as im use to dealing with wiring on imports. I basically went down to the bare minimum.
Head light
Tail/brake light
Turns
Neutral
Ignition system
Perm Mag
I had always planed on running key-less. I was going to use a toggle switch but then simplified it even more by just using the Kill Switch as my primary switch. I figured since I had to turn it on with only the LED neutral light pulling amps it wouldn't be that heavy of a load on that switch. (so I dont have to worry about it burning out or fusing together.)
Thanks to modified stock mounts the head light bucket also pivots up and down at my will and stays where I put it... even when riding. This meant i could drive with the high beam on all the time, which i did anyway. Thus the lo beam side of the switch allows me to keep head light off while kick starting it. All other lights are hooked in to the power off the Hi switch. (tail/brake and the turns)
I found the best way to make a wiring diagram is to actually draw it out. I use MS paint some times, Simple yet affective and I can color code the wires versus having to use crayons or markers. (yes i have used crayons)
Hope this helps. good luck
Thanks a lot! You just gave me tons of ideas. and I think I might go make my own wiring diagrams so I'll be less confused.
Do you know if that battery is good for any bike really?
joeybaggadonuts
comin in hot, hit em wit it
yeah, minimal was what I was going for.
sorry for slightly hijacking your thread! awesome bike!
thanks for the info
sorry for slightly hijacking your thread! awesome bike!
thanks for the info
no problem. we are all here to help each other outjoeybaggadonuts said:yeah, minimal was what I was going for.
sorry for slightly hijacking your thread! awesome bike!
thanks for the info
Thanks. It is a blast to ride. I went with the ratty look cus the last two bikes i did were all shiny and for the most part stock looking.1976cb356 said:That thing is wicked looking, love the rugded look. Looks super fun
I think Im going to have to get a video up or something.


