New Project, 1978 Honda xl175

Koestum

Coast to Coast
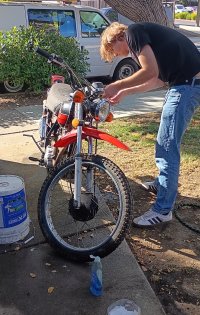
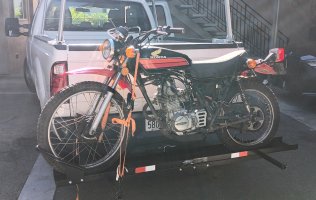
I picked up this xl175 this morning . It needs a lot of love but it's nearly complete & what is there is original... PLUS it has the title and non-op which is suuuuper important in California.

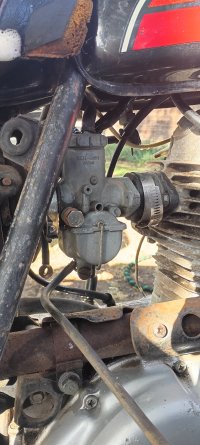
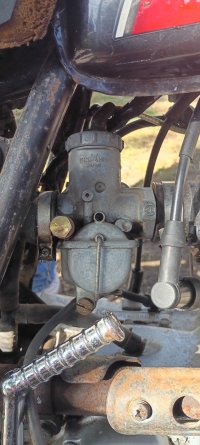
So what's ths deal with the carburetor? When i saw the hanging mounting flange at the manifold i thought it must not be original but after looking online I eee that it actually seems to be the factory carb.

Did Honda have leftover carbs from another model that they just used for the xl175??
 

Attachments

  • IMG_20260822_165412041_HDR.jpg
    IMG_20260822_165412041_HDR.jpg
    1.2 MB · Views: 26
  • IMG_20260822_165247049_HDR.jpg
    IMG_20260822_165247049_HDR.jpg
    1.1 MB · Views: 25
  • IMG_20260822_165528005_HDR~2.jpg
    IMG_20260822_165528005_HDR~2.jpg
    1.5 MB · Views: 20
  • IMG_20260822_094832294_HDR~2.jpg
    IMG_20260822_094832294_HDR~2.jpg
    1 MB · Views: 20
I picked up this xl175 this morning . It needs a lot of love but it's nearly complete & what is there is original... PLUS it has the title and non-op which is suuuuper important in California.

So what's ths deal with the carburetor? When i saw the hanging mounting flange at the manifold i thought it must not be original but after looking online I eee that it actually seems to be the factory carb.

Did Honda have leftover carbs from another model that they just used for the xl175??
That’s a nice project. The bike looks pretty straight and clean.
Yes that is the original factory set up for the carb. The rubberised piece is used as an “insulator” so that the carb doesn’t get too hot from being bolted straight on to the inlet side of the engine. Many of the Hondas around the same time used different versions of a rubberised insulator.
I have been working on a 73 XL 175 and thought exactly what you thought as well but it is authentic.
It looks to me like someone has replaced the pipe clamp with a longer one so it’s a bit messy looking. You can find the original / correctly sized clamp on line if you feel like tidying that up.
Good luck with your rebuild.
 
Might look into the clamp, thanks man.

A little load of parts coming including tires, headlight, shop manual, buts & pieces.

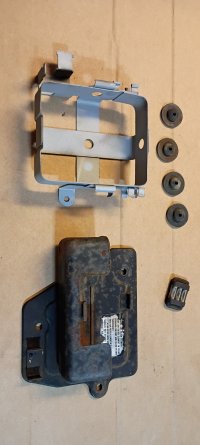
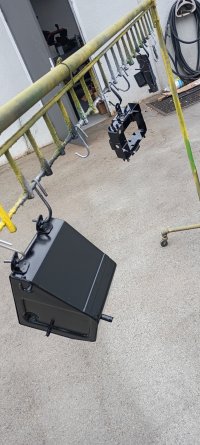
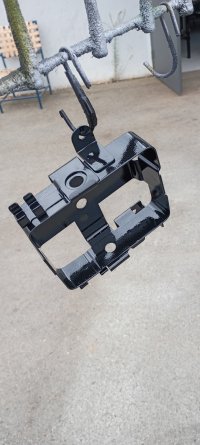
Sandblasted & painted the airbox, cover, & battery cage today while my son chases cut wires.

Pieces came out really nice.
 

Attachments

  • IMG_20260826_121559496~2.jpg
    IMG_20260826_121559496~2.jpg
    1.1 MB · Views: 11
  • IMG_20260827_113024658_HDR.jpg
    IMG_20260827_113024658_HDR.jpg
    957.8 KB · Views: 11
  • IMG_20260827_130411719_HDR.jpg
    IMG_20260827_130411719_HDR.jpg
    1.7 MB · Views: 11
  • IMG_20260827_130425599_HDR.jpg
    IMG_20260827_130425599_HDR.jpg
    944 KB · Views: 11
  • IMG_20260827_130444694_HDR.jpg
    IMG_20260827_130444694_HDR.jpg
    987.2 KB · Views: 11
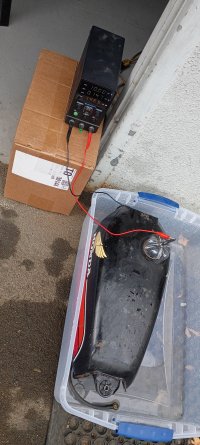
The tank looks pretty good inside but does have some rust/residue and i was gonna use vinegar til i saw a guy use sodium carbonate electrolysis on a pretty nasty tank with great results.

So here's my setup with the cheapy amazon power supply and a 30min photo plus a 6 hour progress video.
 

Attachments

  • IMG_20260831_105011588_HDR.jpg
    IMG_20260831_105011588_HDR.jpg
    1.6 MB · Views: 4
  • IMG_20260831_110516~2.jpg
    IMG_20260831_110516~2.jpg
    1 MB · Views: 4
  • VID_20260831_143539928~3.mp4
    7.7 MB
Last edited:
Back
Top Bottom