We noticed you are blocking ads. DO THE TON only works with community supporters. Most are active members of the site with small businesses. Please consider disabling your ad blocking tool and checking out the businesses that help keep our site up and free.
You are using an out of date browser. It may not display this or other websites correctly.
You should upgrade or use an alternative browser.
You should upgrade or use an alternative browser.
CB 550 Cafe
- Thread starter hunterrupp33
- Start date


CarbsAndCylinders
Careful With That Axe Eugene
That is a great pumpkin!
hunterrupp33
New Member
Alright update since its been a while:
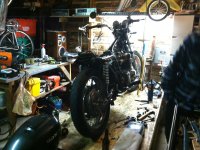
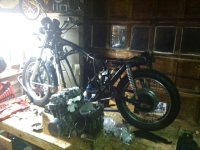
Built a bike stand for the bike. I used some plywood and few 2x4s to build the bike stand. I saw a few guys do it in the master under $50 mod thread so i figure id try it. It ended up working really well. Sturdy as hell. Ask me if you wanna know how i did it and ill send a list of materials and some pictures.
After then I got the bike up on the stand and started tear down immediately, got most of the guts of the bike out except for the engine itself. Everything is practically detached from the motor except for the stator wires (i got tired as shit and called it a night). Next thing is the motor.
The Plan:
Take motor out, top end rebuild that includes replacing any old or worn out fasteners, clean the cylinder heads, cylinders, replace pistons, all new gaskets, sooo on....(yatta yatta yatta), put motor back in. make sure everything is running as it should, take motor out and do frame up rebuild (this has its own list). But I wanna make sure that the engine is at 100% before I even think about doing anything else.
I have a few people that are gonna help along the way. My buddy actually owns a vintage motorcycle shop, so hes pretty much gonna be my consultant the whole way through. OH and of course this website. Anyone got some good top end rebuild threads????
But anyways i just thought i would give you guys an update since i have been kinda out and not really updating this post.
Attachments
hunterrupp33
New Member
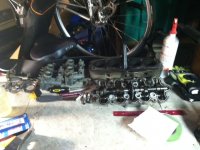
UPDATE:
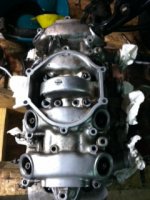
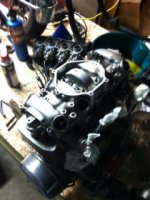
Alright ladies and gents, got the motor out tonight. It was a hell of a struggle to get that bad boy out though, because I couldnt take off the oil filter due to that bolt being completely stripped. I ended up removing the breather cover, drop the oil pan and remove the swing arm because it freaking kept on gettin in the way! BUT ANYWAYS
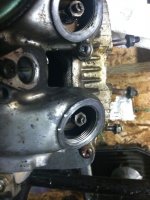
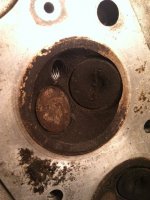
Now that its out, Ill have to address a more serious issue, the screws that hold on the cylinder head cover are stripped now. They have to be rusted in or something because there is just no way in hell they are normally tightened on like that. I tried using a corded drill with an extension and a #3 phillips head bit and nothing. Would not budge, so i think i may be drilling them out. Ill have to go back and reference some of the schematics i found online so that im making sure im using the right size bit.
After that though, the tear down begins. PICS BELOW. oh and the motor is actually sitting on a homemade motor that me and my brother built the other night by using two 2x4s and two pieces of 9/16 plywood. ended working pretty nice.
Alright ladies and gents, got the motor out tonight. It was a hell of a struggle to get that bad boy out though, because I couldnt take off the oil filter due to that bolt being completely stripped. I ended up removing the breather cover, drop the oil pan and remove the swing arm because it freaking kept on gettin in the way!
BUT ANYWAYSNow that its out, Ill have to address a more serious issue, the screws that hold on the cylinder head cover are stripped now. They have to be rusted in or something because there is just no way in hell they are normally tightened on like that. I tried using a corded drill with an extension and a #3 phillips head bit and nothing. Would not budge, so i think i may be drilling them out. Ill have to go back and reference some of the schematics i found online so that im making sure im using the right size bit.
After that though, the tear down begins. PICS BELOW. oh and the motor is actually sitting on a homemade motor that me and my brother built the other night by using two 2x4s and two pieces of 9/16 plywood. ended working pretty nice.
Attachments
Powderfinger
Been Around the Block
You need an impact screwdriver to get those out. It's a screwdriver that you hit with a hammer and it turns slightly. It will also help to heat up the aluminum where the screws thread into with a propane torch. The aluminum will expand slightly and have less friction on the threads.
like what previous poster said - get a impact driver. those things are absolutely essential. that screw doesnt look too bad, its probably still possible to remove but dont strip it any further.
my steps to success:
1. get PB Blaster.. douse it down real good. leave it a hour. douse it down again, leave it overnight.
2. fit the proper size bit in the impact driver and place it in the screw head.
3. push down on the impact driver so it turns all the way (the driver itself, not the screw), and use your hammer to tap it firmly a few times, this will help the bit "seat" more tightly in whatever is left of the screw head, and make it less likely to slip out.
4. release pressure from the driver and give it a good, solid whack with your hammer, it should break loose. if it slips, go back to #3 and seat it down even more firmly.
hunterrupp33
New Member
To Both,
I tried both of them, well i didnt necessarily let the PB blaster sit for a night, only a few hours, but i may have to resort to that. I did heat the screws up with my torch and still nothing. Maybe ill go back and let the PB Blaster sit and the use the impact driver i have.
the thing is im not sure if im using it right. I got it from harbor frieght and its weird and I dont like it at all so i try and avoid using. When i go back to it though i gurantee ill probably try everything i can before having to rely on drilling it out. I am replacing these damn screws with socket heads so i dont have to ever deal with this ever again.
Powderfinger
Been Around the Block
I would question the quality of the tips if it's from HF. Look for any signs of them rounding off and get some better tips or a better driver if they are. If they seem okay then give it another try, they can be set to turn right or left so make sure it's set to loosen. Maybe put some screws into a piece of wood and familiarize yourself with it.
Once your ready to try it again get it set up how you want it and then hit it like you mean it, a mini sledge (2 to 4 pounds) will work better than a ballpeen type hammer. The combination of downward force and turning to the left at the same instant is what makes it work.
Once your ready to try it again get it set up how you want it and then hit it like you mean it, a mini sledge (2 to 4 pounds) will work better than a ballpeen type hammer. The combination of downward force and turning to the left at the same instant is what makes it work.
hunterrupp33
New Member
Powderfinger said:I would question the quality of the tips if it's from HF. Look for any signs of them rounding off and get some better tips or a better driver if they are. If they seem okay then give it another try, they can be set to turn right or left so make sure it's set to loosen. Maybe put some screws into a piece of wood and familiarize yourself with it.
Once your ready to try it again get it set up how you want it and then hit it like you mean it, a mini sledge (2 to 4 pounds) will work better than a ballpeen type hammer. The combination of downward force and turning to the left at the same instant is what makes it work.
Yea finger im going to home depot sometime this week to get some better tips. And ill take that advice on familiarizing myself with a piece of wood. never really thought of it that way. Should be doing it soon. If not this week its gonna have to wait til after finals week (WOO HOO COLLEGE!!!). Ill keep you guys posted it.
hunterrupp33
New Member
DTT Community,
Okay, I haven't been really posting as of recently because I have been getting close to the end of the semester, so finals have consumed my life and I havent been able to do anything bike wise, but I do have something interesting.
One of my best friends, who just so happens to be an amazing photographer/filmer/editor is going to a documentary type thing on my bike build. I dont know how many people have already done this but I figure it would be cool to have something like that.
I plan it to show everything, from shop visits, to some interviews and explanations, to salvage yard visits, to just straight wrenching. I think it would be really cool to make something like this so when people see the vid, they really get an idea of what an independent, at home, scraping for money and parts-build is really like it. I think most of us can connect with that.
hunterrupp33
New Member
Okay so i tried to get some work done on the motor now that its out and i was just about to pull the cylinder head cover and then realized that it was not going to move.
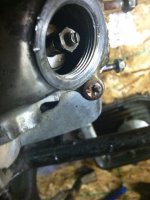
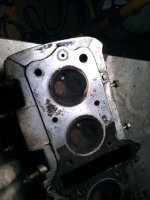
What happened was i was able to get off all those stripped screws with a couple E-Z outs from the depot. After i got those off, i tried just pulling the cover straight off, which worked but only for the front half of the cover. The back half was stuck on there still so i figured ehh maybe i can just pry it off, and even after working around the edge it still looks like its not coming off and im not gonna push it and break the cover, so i deferred back to here.
So any thoughts? I put some pictures below so you guys can see where im at. Where it looks like its getting caught is the back half of the cover. It seems like whats causing the cover to stay on is the two little notch type things in between the tappet cover holes but the problem is that they arent any type of fastener, so idk. Ive already cross referenced with all the diagrams online as well and i have already gotten all of those fasteners off.
Attachments

hunterrupp33
New Member
Bump
hunterrupp33
New Member
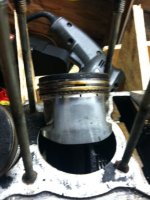
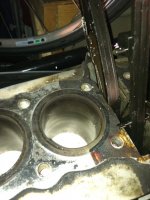
Okay since I haven't posted in a while, figured id probably should post an update.
You can see that I got off all the top end stuff. My next move is to clean everything up, lap the valves, hone, and install the new rings and get her back together. Meanwhile, I will be removing everything off the frame so that I get a bare frame and then do the chassis mods (welding rear sets brackets, battery mount, electric panel mount), and painting everything.
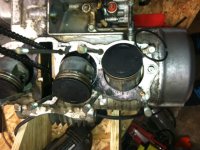
I currently have the carbs torn apart as well and im going to clean them, jet them, and paint them as well. And as far as painting, does anyone got tips on how I should paint the engine. Im thinking painting the top half seperately since they are currently apart and then mask off the crankcase and paint that seperately. Thoughts?
You can see that I got off all the top end stuff. My next move is to clean everything up, lap the valves, hone, and install the new rings and get her back together. Meanwhile, I will be removing everything off the frame so that I get a bare frame and then do the chassis mods (welding rear sets brackets, battery mount, electric panel mount), and painting everything.
I currently have the carbs torn apart as well and im going to clean them, jet them, and paint them as well. And as far as painting, does anyone got tips on how I should paint the engine. Im thinking painting the top half seperately since they are currently apart and then mask off the crankcase and paint that seperately. Thoughts?
Attachments
hunterrupp33
New Member

03rangerxlt
Been Around the Block
Glad I logged in today and saw this thread! It kinda reminds me of how I started on my bike. I bought an engine in frame 72 CB500 and instead of getting it going before I finished blowing all apart, I just took it to pieces. Most of the bike was in boxes or just zip tied to the frame. I had absolutely no clue what I was doing. Between this website and the Honda service manual I picked up off EBay, I got it done. It was a lot of fun and it was frustrating. But riding her is the reward! Can't wait to see how this one progresses.
I'm onboard. I've been ever so slowly rebuilding a 550 myself. I started with a full teardown - no fear. In my case I'm glad I did because I've found some issues in the valve train.
Keep at it.
Keep at it.
hunterrupp33
New Member
canyoncarver said:I'm onboard. I've been ever so slowly rebuilding a 550 myself. I started with a full teardown - no fear. In my case I'm glad I did because I've found some issues in the valve train.
Keep at it.
I just went to your build to check some things out, and i found the parts list manual.......WAHHHHHHHHH!!!!! so much easier with buying new fasteners.


