Follow along with the video below to see how to install our site as a web app on your home screen.
Note: This feature may not be available in some browsers.
We noticed you are blocking ads. DO THE TON only works with community supporters. Most are active members of the site with small businesses. Please consider disabling your ad blocking tool and checking out the businesses that help keep our site up and free.
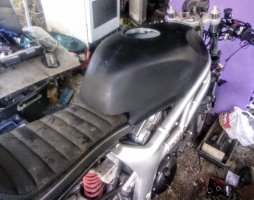
I have been working on this too long but this year has not been good.
Been working on my DIY tank today with much going on this year I'm only just getting back into it.
Still need finish the underside, fuel cap, level sender, oem petcock and mountings.
The front part is going to be the air box, maybe with cold air induction if I can work it into the build.
My goal is to get it all done buy the end of September.
Never quick enough. Working on the hinge at the back of the tank, once done I will fit the filler bung and fittings for the petcock and sender.
Finish panel beating because last change with access before sealing up the rear part of the tank shaped for the seat.
Then I will leak test ad weld up leaks, then braze over all welds to destress welds and add material.
Then sort out the air box end (I don't even know how I'm doing that yet)
Then just because I want to be sure of no leak I will use a tank sealer.
then strip it back bog and paint fit the cap petcock and sender and it's done.
Still going, ran the welds all the way, some need attention but I will get there.
Made up a hinge bracket for the back of the tank out of 2mm plate strong enough to check it works but thin enough to bend to get it sitting correctly and check the opening.
Now that the tank hinge is holding the tank in the correct place, opens and closes, and gaps to the seat and frame are good, I can go ahead and add bracing to
Just been cleaning up welds and cutting up the bits to weld in and make it a fuel tight vessel.
But as usual my mind wanders and I am thinking about the air box end.
Despite appearances of having ample volume and room for a better air filter no matter how I envisage the layout the Ram Air filter I am using is the perfect size to fit.
I wanted to run a sealed air box with a filter at the intake with the possibility of cold ram air induction.
One method and the easier, have the tank seal on the air filter flange of the fish carburettor and mount the air cleaner vertical facing forward at the front of this chamber.
Basically making a hat (not big volume maybe a liter) a bit like what's used on blow though turbo setups.
Another way would be encase the whole carb in a box that would be fitted to the manifold and then the carb holds it in place the tank would have a seal and create the lid of the box when the tank is down. The filter would be at the front facing forward as above.
Down side is keeping this sealed the throttle cable and fuel line will pass through the box not to mention the potential for leaks between the tank and the box.
A third option is leave under the tank open, leave the air filter where it is. Then to reduce the air temp fit a baffle from the radiator directing hot air past the intake manifold and try to duct cool air around the intake.
I am leaning towards no.3 KISS keep it simple stupid.
After Ideas so please tell me what comes to mind.
It is working great the only downer is with no cold star enrichment (It does start great) It sometimes will do a pop back up through the air cleaner on startup and being a foam filter over time has burnt though.
So thinking a mounting for the filter not bang on top, and if I am doing that I still want it efficient and protected from radiator and engine heat.
This is what I am thinking.
Enclosing the top 2 3/4" of the tank, this will go 1/2 way down the intake flange and seal on a rubber ring.
I can then mount the air filter drawing air from the underside of the tank.
There is room to use my current air cleaner or I could use a modern style flat filter of a matching size.
I am not sure which would work better.
This is a rough drawing any thoughts are welcome.
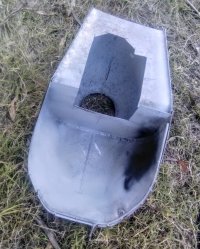
Tank sealed enough to check volume now.
Cut out the shape around the old filler and welded in a plate.
I have left the seat recess in the tank open still for panel beating access, but before I fit the new fuel filler bung I can put it on its end and fill it check volume and check for leaks.
I silver soldered the new filler bung into the tank I am making.
The bung is stainless steel and the tank is mild steel.
I am using 2% silver rod from the plumbing supplies.
I used a propane torch to tin around the tank opening and I planned to sweat the stainless part on after adding flux.
But my propane torch was not heating the stainless quick enough.
So after some experimenting I used the Tig torch set to AC 35amps with flux and gas, and it worked.
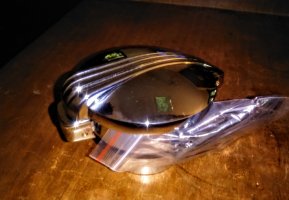
I did create a lot of distortion fitting the gas cap and at the time I was less than 100% with covid but that didn't stop me from trying to beat it straight while sick, and making it worse.
So I have bought a pin welder from ebay and have already improved it greatly. I have it now so there should be no more than 1/8" filler but I will keep at it pulling lows and taping highs.
I wouldn't do it the same if I did it again but I am learning a lot.
Believe it or not pictures above are before I made it worse. But it is on its way to being sorted.
I bought a Harbor Freight dent puller/spot welder rig. Ok to an extent, but you have to be very careful to not pop holes when you use the slide hammer.
I bought a Harbor Freight dent puller/spot welder rig. Ok to an extent, but you have to be very careful to not pop holes when you use the slide hammer.
I have resorted the shape to within 2mm. I know it still looks very rough but when I run straight edges on it I am not game to go closer or even smooth it for fear of creating highs that will become a problem when finishing it off.
The plan is once the petcock and fuel level sender fittings are are done, I will do a final leak test.
Then
1. strip it and epoxy prime it.
2. cover the whole thing with fiber glass re-enforced filler.
3. then finishing filler and 2k primer sand 400 finish and paint..
4. add a tank sealer.
This site uses cookies to help personalise content, tailor your experience and to keep you logged in if you register.
By continuing to use this site, you are consenting to our use of cookies.