1973 1/2 BMW R60/5 restoration.

Re: Re: 1973 1/2 BMW R60/5 restoration.

VonYinzer said:
This bike is a real hum dinger there fella.

Thanks ninja!

Took a few pics today. Brakes are sorted front and rear, final drive installed and filled with fluid, transmission flushed and filled, driveline filled. Used Lucas 90wt full synthetic all around. Brake shoes installed and happy. Don't mind the Ohlins, they're just for mockup. Ordered a set of Hagon nitrogen classics for the rear. Striping in the accent lines on the tank is done.Exhaust is also on order along with plug wires, and coils. All that's left to buy is the electronic ignition and the battery. Got a few eBay items up to build the final funds. I'm hoping for her being on the road in a month or less. Super stoked!


Sent from my DROID RAZR using Tapatalk 4 Beta
 

Attachments

  • uploadfromtaptalk1370040033301.jpg
    uploadfromtaptalk1370040033301.jpg
    50.4 KB · Views: 925
Looking fantastic! Make sure that pinch bolt on the rear axle is snugged down with a wave washer and/or nyloc nut and/or loctite. My buddy Dave's vibrated out, and then the axle nut backed off just enough for the wheel bearings to be ruined. Had to truck the bikes home on the last day of our 10 day ride because of that. I think he ruined his final drive as well as a result.
 
BTW - PM me the exhaust you sourced - I might have to clean my R75 up a bit if she's going to stand proud beside your restoration ;)
 
Good tips Tim. I'll definitely double check that bolt. There are some random newer BMW parts floating around the shop now...wonder whose those could be?!

Justin, you're an ass for even mentioning that...if it weren't this bike I'd probably do it.


Sent from my DROID RAZR using Tapatalk 4 Beta
 
Looking real good man!

I didn't put more than a mile or two on my GS before mounting the Hagon's. Even than, I'm glad I have them.
 
Thanks brother, i don't think I've ever heard a bad review.

Thought I'd throw up a comparative shot. Shows how bad the bike was when I started.

bara4ama.jpg
 
Wow, Looking great Kiley. I know I need to upgrade my rear shocks. Jill told me so after our last all day ride. The bike looks like you just bought it off the show room floor, then added a whole bunch of period correct upgrades and bling.
 
Hmmmm, somebody said something about the shocks should be black and chrome... I wonder who that was... :P

Looking good Kiley. Can't wait to drool on it in October ;)
 
Yep, you called it Chris, and you were right for once!

Been tinkering today. Put a stator from a /6 in her to make a jump up in voltage output. Also hooked up the points (will also be running a crank mounted ignition as well, so I'll have two ignitions in case of failure), coils, and diode board. Added a new front crank seal and built a new 3 phase cable since the stock one was toast. Exhaust is due for shipment tomorrow, and I have Thursday thru Tuesday off. Remainder of parts is on order...I smell ignition coming soon. I plan to video the first tick over in 30 years to be documented on DTT!

nunu5yse.jpg


umygaze8.jpg


9usa3are.jpg


Roasted three phase pigtail:

6y8age8e.jpg


New pigtail buttoned up:

2epusuhe.jpg


Sent from my DROID RAZR using Tapatalk 4 Beta
 
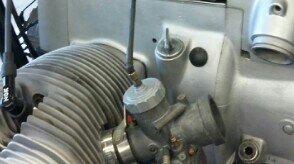
Here are the refurbished coil brackets, coils, new silicone plug wires and caps, and the under the dress goodies. Also the timing chest is buttoned up and I have the idiot lights labeled and tagged for gauge install. Eventually I'm gonna send the gauge off for overhaul to make it minty, but everything works for now. I built a small inconspicuous bracket to relocate the horn as well because it gets old removing it every time you need to remove the timing chest cover. The stator is pumping juice. Carburetors are buttoned up. Ordered a set of r75 intake tubes since the r60 ones are tapered and will not work with the Mikunis. Also ordered two Karcoma petcock rebuild kits to overhaul my new to me petcocks. The original Everbest units leaked when new, so no thank you. All parts are shipped, just waiting on them to get here. With any luck I'm going to fire her off before next week. Cross your fingers boys and girls.

u8e9a8ad.jpg


e8asanez.jpg


Overall progress shot.

dety7aza.jpg
 
Are those the VM carbs? What throttle cable are you using?

BTW - I blocked off my choke mount hole with a short bolt, just to keep it clean and prevent any unwanted moisture in the airbox. Reminds me I need to change my air filter.

She's looking incredible - can't wait to see the exhaust on it and hear it fire!
 
Tim said:
Are those the VM carbs? What throttle cable are you using?

Thanks Tim! They are indeed VM32s. I ordered a set of Rocky Point cables to put on it. These are stock R60/5 cables that work temporarily. They were the original round slide Bings. The problem is, VMs are straight on the top cap where the cable goes in, where the Bings had a curved output. I don't like the kink in the cable, so I ordered the right ones. I was wondering what to do with that hole. I thought about hitting the hardware store and seeing if they had some sort of rubber plug. I also need to source a 5" long bolt to hold the two airbox halves together. Mine is missing. I work tomorrow, but you had better believe the exhaust is going on Thursday. Gotta buy a battery too. It's gonna take a monster. It struggles to turn that motor on 40A with my home charger!
 
I have the Rocky Point cables myself, but mine (both sets) have curved entries to the carb tops. They can't be removed either - the carb end of the cables can't pass through the curved metal sleeves built onto the cables.

I was wishing they were 'normal' so I could run the straight Mikuni cable adjusters in the tops of the carbs. Unscrewing the tops of the carbs is a pain with the curved cable ends. Didn't think to ask about different options when I ordered my spare set. Would love to see yours at some point.

Get it running, then it's time to load up!
 

Attachments

  • G0030073 - Copy (Medium).JPG
    G0030073 - Copy (Medium).JPG
    620.6 KB · Views: 318
Oh, and do you hate the rubber 'grommet' around the tach cable yet? I find mine difficult to keep from binding when I put my front cover on.
 
Oh man, it's a nightmare. That and lining up the little grommet that goes around the points wire to get it to match up with the front cover. Ridiculous. I need the curved top for mine unless the cables are overly long from Rocky Point. The problem with the stock R60 cables is that when they come out of the normal top cap adjuster, the cables turn toward the frame and there's a pretty significant kink there. I know the cable is rubbing on the inside of the sheath when it is that severe of a bend and is only a matter of time before it fails. And I will be loading up soon man! I cut corners due to some funds like not going immediately with the Enduralast alternator ($500) and instead doing a /6 conversion for 240W ($55). I sourced the /6 diode board and the stator for that shipped. Good deal for me. Both tested good. I did grab a thunderchild regulator (being shipped). I didn't replace the coils. Apparently the Bosch units are indestructable and mine give a huge fat spark. I also held off for now on the ignition ($200+) because I focused on what I needed to get her on the road. Shocks and exhaust took a big enough bite! Here is an R60/5 carb...

FUR59265.jpg


See the curved outlet? It needs that. I'll see if I can dig up the binding picture. I'm actually relieved the RP cables come with the bend...

Edit: see the kink? I don't like it.

eqa4a4ej.jpg
 
Back
Top Bottom