
1977 Honda CB750F Build Log

Noobtastic14

New Member
I’m starting this thread as a repository for my CB750F cafe/brat bike build.

If you’re a CB purist and you think the stock SOHC is the sexiest thing in existence, please just keep scrolling. I know not everyone appreciates a chop job but this is my thread and my bike.

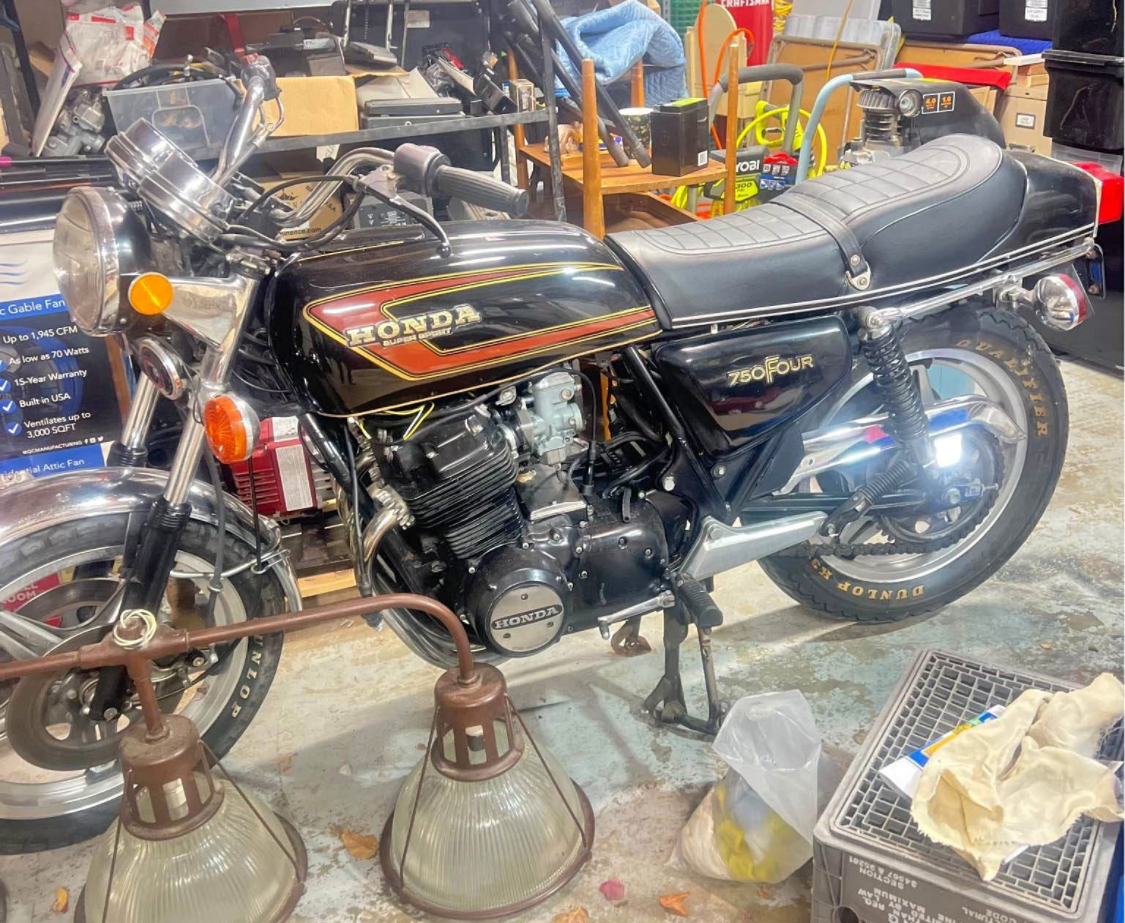
The bike was found on marketplace for $1000 with no title or registration. It was last registered as non-op in the early 90s, and the tires are late 80s. The owner passed away, so I paid cash to keep it out of the scrap pile.
IMG_1466.jpeg
 
  • Like
Reactions: Tim
No judgement here; build it your way, ride it your way, have fun your way. Good luck!
 
99.9% of people here will tell you to chop it up as much as you like. Keep it safe and function > form and you won't alienate anybody.

The first bike I owned was a 1978 CB750K. I never got it on the road but passed it along to a friend who did, and then another friend took it off his hands. I think it's still out there on the road somewhere some 30 years later. I moved on to a 1973 CB500K which was my first riding motorcycle. Then a CB550F.

Had a CB750F briefly which I bought sight unseen as it had a turbo kit on it. It got parted out.
 
Like most people, my initial inspiration was the V1 Mile Zero Racer popular on instagram. I liked that my bike had the same tank, and felt confident I could make a “poor man’s version” using mostly Amazon and Facebook marketplace.
IMG_1468.jpg

IMG_1485.jpg

IMG_1502.jpg

The initial assessment was pretty solid. The motor had fresh oil, fresh plugs, and the carbs looked pretty good (just like the dude said over messenger) the engine turned over just fine and the tank had some corrosion but it obviously sat empty for 35 years which is fine with me.
IMG_1507.jpg

A tough decision off the bat was to use an M Unit or go with a new wiring harness. For budget reasons I ended up going with the new harness, but looking back I wish I had splurged on the MUnit. I’m sure I have one in my future lol
IMG_1658.jpg


Sent from my iPhone using Tapatalk
 
At this stage I thought the wiring was pretty therapeutic. It’s like a sudoku puzzle, every time I make a work connect that’s one less wire to get wrong in the future haha this was a bit tedious but self explanatory. I went with a lithium compatible R/R.
IMG_1668.jpg

For the seat I kinda worked backwards. I found a great looking seat from hippofighter on Etsy for a reasonable amount and pulled the trigger. I ended up sculpting the subframe around the seat. Most people learn to weld then start projects, I chopped the frame and then taught myself to weld on a crappy harbor freight gas-less welder.
IMG_1707.jpg


IMG_1758.jpg

IMG_1759.jpg

At this point too I was trying to figure out how I wanted to work in the clip-on bars and LED headlight.

Keep in mind, as of the photos it still wasn’t road worthy or registered. I just needed a project to keep me distracted from some stressful things in my life.

Sent from my iPhone using Tapatalk
 

Attachments

  • IMG_1738.jpg
    IMG_1738.jpg
    2.5 MB · Views: 0
This is rolling out of the garage in all its glory- flat tires, LED headlight, banana seat, and too-short Amazon rear shocks. Also still missing all the brake calipers which makes it a beast on a sloped driveway.
IMG_1762.jpg

I wanted to minimize the buttons on the bars and I had four great bolts to use where the old bars mount. I started fabricating a dash for all my indicator lights and switches I didn’t want on the dash. V1 is in birch.
IMG_1774.jpg

IMG_1778.jpg

IMG_1780.jpg

This is the version I used for about a year. It’s not real carbon, it’s faux carbon acrylic cut on a 100w CO2 laser. You can also see the new brake, switches, and bar end LEDs. The hoop is used to hold the voltage meter/USB charger up and to the right.
IMG_1796.jpg


Sent from my iPhone using Tapatalk
 
This was a tough time- a move across the country. At this point I had a solid roller. Still not fully running, but registered/insured with fresh tires. Still missing brakes and oil tank amount about a thousand small items.
IMG_1913.jpg

There are a few parts that I splurged on, the first is a cognito moto oil tank. I just don’t think you get very far with these without a slick oil solution. I also chose to lose the fender but keep the cross bar for a minor bit of support for these tiny little noodle forks.
IMG_0989.jpg

Shortly thereafter I started working on the exhaust. I liked the megaphone muffler but hated the tri-chamber design. The one I bought to replace it came in black not chrome, so instead I removed the center pipe and fiberglass and welded it into the 70s can.
IMG_1148.jpg

Now it has all the appeal of a 70s bike with the modern sound and feel of a glass pack system.
IMG_1151.jpg


Sent from my iPhone using Tapatalk
 
Somehow I missed a photo for this one. The OEM peg brackets bend up to the peg mount. I’m 6’3” and found the leg space to be incredibly cramped. I need up chopping, flipping, and rewelding them 180* from stock for comfort. I also notched the brack pedal and shaped it with a more acute angle to correctly align with the new geometry. Yes, they drag on the ground sometimes. No, I’m not going to change it.
IMG_1154.jpg

Here’s my boy getting a photo of the extra, aux, bonus? Brake lights. As much as I like the minimalist look, my license plate bolts doubled as brake lights.
IMG_1529.jpg

At this point I was close to road worthy. I started on the carbs to see what was up with the jetting.
IMG_2464.jpg


Spoiler alert- I did bad planning. Turns out taking a non-running bike of 35 years and ripping off the airbox is a bad plan for getting the jetting right. I eventually got frustrated and tossed them.(sold them)

IMG_2489.jpg

For power I wanted absolute minimalist. I knew i didnt have a bump to hide an 8 cell, so a 4 cell would have to do.
IMG_2500.jpg


Sent from my iPhone using Tapatalk
 
In comes the mikuni 34s. I’m very happy with these carbs and this decision. They’re very easy to tune and the customer support is awesome. Murray tunes this on a pristine motor with ethanol free fuel- my motor is tired and running on the ghost of days past. Ultimately, I went +1 size on the idle jet and moved the clip to the top to lean it out. Mpg still sucks (25mpg) but when you twist the throttle she gooooeeeesss. On yeah, at this point it still wasn’t running haha
IMG_2510.jpg

IMG_2512.jpg

IMG_2513.jpg

I decided to just air out all my dirty laundry here. Hopefully another builder can see this and go “see, it isn’t just me!” My wiring is a mess and I know it. The R/R is on the bottom for cooling and the battery is tucked in-line with the frame rail in the back.
IMG_2525.jpg

I wanted the heat to stay out of my birds next of an “electronics tray”
IMG_2526.jpg


Sent from my iPhone using Tapatalk
 
At this point I’m feeling pretty damn good. Tires are new, oil tank is in and not leaking, I nabbed oversize front calipers from a CB900F on marketplace, and to save cash I just reinstalled the OEM gauges but recessed them down towards the headlight by about two inches.
IMG_2527.jpg

IMG_2530.jpg

IMG_2529.jpg

IMG_2532.jpg


Sent from my iPhone using Tapatalk
 
This was SUPPOSED to be my first trip outside the neighborhood, and technically it was BUT I had a problem.

The entire time I was testing and tuning in the garage I was on a battery tender. As soon and I left the house and went 1/4 mile down the road- voltage shit the bed and it died.
IMG_2546.jpg

After an afternoon of troubleshooting, I found a disconnected wire causing the no-charge condition and snapped that bad boy back together.
IMG_2606.jpg

IMG_2610.jpg

This photo is the first time in 35 years this motorcycle rode to a gas station under its own power and filled up. Of course the muffler is still bouncing unsupported and there is no back brake- BUT I had a shit eating grin on my face for about 48 hours.
IMG_2624.jpg


Sent from my iPhone using Tapatalk
 
I hadn’t lived here very long and wanted to show off my project so I signed up for the distinguished gentleman ride. It was an hour commute each way SCREAMING at 7,000rpm so I did the dad move and added a screen.
IMG_2806.jpg

IMG_2815.jpg

IMG_2834.jpg

Couple small notes: back brake caliper is rebuilt and reinstalled, and I have an actual metal hanger holding the muffler now. It’s the little things.
IMG_2837.jpg


Sent from my iPhone using Tapatalk
 
This is where I start to get a little greedy. I convinced this guy to sell me the entire front end for $200. The donor is a 2002 GSXR1000
IMG_2896.jpg

IMG_2902.jpg

IMG_2960.jpg


Sent from my iPhone using Tapatalk
 
I consider this a smashing success. The improvement is crazy- with some reduced steering angle due to the 30mm offset versus the 65(ish)mm offset of the original triples. I did make one mistake here that you’ll notice later- I sized the front tire at 120/90-17 to closely match the 130 rear tire. It’s smaller both in width and diameter but the 17” rim makes it look monstrous.
IMG_2998.jpg

51C66289-4B12-4F45-BFC4-331CAC2D397B.jpg

IMG_3012.jpg

I lost my OG triples and dash so now I’ve transitioned to mostly my phones GPS speed with a mechanical tachometer and lots of buttons.

Left side top left working clockwise:
Horn (intermittent)
Aux lighting/usb
High beams
Low beams
Headlight ring to amber (intermittent)
Left turn signal

Right top: start (intermittent)
Right bottom: right turn signal.

The LED cluster around the key is pretty self explanatory- left turn signal/oil pressure/neutral/brights/right my turn signal.
IMG_0600.jpg


Sent from my iPhone using Tapatalk
 
The little dot LEDs got replaced with an actual LED bar that works as both a tail and brake light.
IMG_3159.jpg

The boy and I out being awesome together.
IMG_3192.jpg

IMG_3191.jpg

This night I learned that my low idle of 1200 wasn’t enough to keep the lights on. I had to bump it up to get better charging.
IMG_3194.jpg

If you look close at the back wall- she’s weighing in at 500lbs with almost a full tank of gas. I think OEM was 570? Pretty decent gains I think.
IMG_3210.jpg


Sent from my iPhone using Tapatalk
 
This is me “can’t leave good enough alone”

It turns out the Gen 2 Suzuki sv650 has the same 20mm diameter rear axle and the rim matches my gsxr front rim.

The Gen 1 sv650 has a 17mm axle mounted rear brake caliper and bracket- but that’s just one pass with a 20mm bit on the drill press to fix.
IMG_3227.jpg

IMG_3229.jpg

IMG_3253.jpg

First moch up to see how it fits.
IMG_3296.jpg


Sent from my iPhone using Tapatalk
 
Rear end upgrade:
Gs500f sprocket carrier with 525 pitch sprocket
(Interchangeable with SV650 sprocket)
SV1000 rear rim
240mm GSXR 750 rear rotor
Gen 1 sv650 rear caliper bored from 17mm to 20mm
160 rear tire
20mm axle spacers cut to size
**swap axle bearing from 20mm gen 2 sprocket carrier into gs500 sprocket carrier
Final drive train is 17t front 530 sprocket cut down to 525 width on a 525 chain and a 43t rear 525 sv650 sprocket for a -500rpm highway final gear change


**to clarify, I thought I was getting an SV650 rim and rotor (240mm) but accidentally ended up with an SV1000 setup with a 220mm rotor. I tried a bunch of half ass solutions that didn’t work until I took a long shot and just ordered a 240mm gsxr 750 rotor and assumed it would like up correctly- and it does!
IMG_3318.jpg

**Some booger welds required to move the caliper brace arm to the lower side.
IMG_3331.jpg

The trickiest part is that there are no 525 pitch sprockets available for the cb750. All the sprockets for the sv650/gs500 hubs are 525 pitch. My “this isn’t a mile zero I can do what I wants solution was to chuck my new 530 front sprocket into the drill press, turn it into a lathe, and grind the width down to fit inside a 525 chain. Is it pretty? No. Will anyone ever see it? No. Does it work? Yes.

I already intend to do more frequent inspections and will probably do annual chain and sprocket swaps.
IMG_3333.jpg

IMG_3334.jpg


Sent from my iPhone using Tapatalk
 
Done.
IMG_3335.jpg

IMG_3336.jpg

IMG_3338.jpg

YOU CAN SEE HERE MY GRAVE MISTAKE!!

This upcoming week I’m swapping the 120/90-17 for a 120/70-17 which will be 4% smaller than the rear in diameter and ~24% narrower.
IMG_3339.jpg


Sent from my iPhone using Tapatalk
 
This is the most recent version. New front tire coming soon, also swapping for a dedicated GPS speedometer and dropping the little windscreen and RAM mount.

Thanks for looking, let me know if you have any questions.

Parting shots:
1) YES I KNOW MY AMAZON SHOCKS ARE TRASH. It’s not a track bike and they’ve been perfectly average for my use.
2) YES THE ELECTRONICS ARE TRASH. I’ll fix it when I get an M.Unit
3) THE BIKE HANDLED LIKE CRAP WHEN I GOT IT AND ONLY GOT BETTER WITH THE 17” SPORT RIMS AND TIRES. No, the amazing handling bike you remember from the 70s was just the best at the time. The Japanese didn’t know they could use bigger tires.
IMG_3354.jpg

IMG_3355.jpg


Sent from my iPhone using Tapatalk
 
Back
Top Bottom