'81 CB750C "Rock-It" (X-Basket Case)

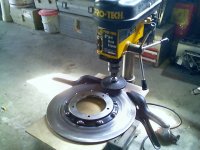
I have felt like ass for the last week or so but finally got the front done yesterday.
Frontpolished1.jpg


Nice warm spell today so hopefully I'll get the tires mounted, then I will start the strip-n-polish of the rear brake cover and sprocket carrier. After that and some minor parts cleaning, with a little reassembly time I should have me a roller.
;D
 
Nope, matched the rear fine on the second attempt.
You're right though it looks f-ed up. Poor light and cell phone pic, maybe even the angle, but for some reason you cant see the reflection in the outter rim section. just looks silver in the pic not polished. Took several pics and it was either this or a nasty glare.
 
Hoosier Daddy said:
Nope, matched the rear fine on the second attempt.
You're right though it looks f-ed up. Poor light and cell phone pic, maybe even the angle, but for some reason you cant see the reflection in the outter rim section. just looks silver in the pic not polished. Took several pics and it was either this or a nasty glare.


Well I'm glad to hear it. Those are some of the best looking comstars I've seen
 
Hoosier. Stop It!

Those things are bad ass, I wanna see it all together. Besides if you keep detailing every part i just feel bad about every bit i still have to touch, polish, clean, or paint before mine is even close to the same quality.

Future BOTM material my friend.

GK
 
Ha ha... just gettin started my friend. Winter is settin in and I gotta stay busy to keep my sanity.
Or what's left of it! ::)
 
Again HD those are amazing! 8)

That takes the Corn star to a whole new level. Wow. If you get bored with all that detailing on yours you free to come and polish and clean away on my GS. ;)

Great work
 
Spent the weekend getting the rear sprocket carrier, brake plate stripped and all the rear wheel hardware cleaned up. Time consuming details.
Then last night lubed everything that needed grease, put it all together and got the rear wheel mounted. Once I decide what I am going to do with the front rotors and pick out my handle bars I can install the front and have me a roller. :D
 
Awe shucks guys...
This morning I woke up before the butt crack of dawn again so I laid out the rotor drilling pattern with a piece of cardboard, compass, protractor, and a ruler.

template_zpsd527fb89.jpg


Then I used my auto-punch and transfered the pattern to the rotors, flipping the template between the right and left to revese the pattern so both sweep back.

rotortemplate_zps5db1437d.jpg


Then a cobalt bit pilot drilling and a TIN bit drilled them to the final 15/64ths hole size. 80 holes twice, nice-n-easy, and the drill bits cut as easy on the last hole as it did the first.

rotors1_zpsf92f421c.jpg
 
I did mine the lazy man's way. I took an existing drilled rotor and placed it face down on the rotor to be drilled and transferred the pattern. Anyway, it is a fun but messy project. I was amazed at the amount of shavings that came off just one rotor. Clogged up my shop vac hose!
 
That WOULD be easy!
I thought about taking them into work and having one of my tooling guys lay it out on the CNC and cut shallow grooves instead of round holes... but then something about going in on a Saturday I was actually off went against my better judgement. ;)
Maybe tomorrow I can get the front wheel mounted...
 
HD you never cease to impress me (and give me ideas to steal). Looking at your pattern, it's so genius it's evil! I think that may be something I could do myself as well, maybe not the drilling, but coming up with the pattern. If not, I can always ask you to mail me yours LOL. Since we're on the subject of brakes. I'm sure you checked wear specs on those by now because you're meticulous and they are well about spec because you're safe. Do this things get honed or resurfaced too? I haven't seen much of anyone posting about what they actually do with the disc before considering it road worthy.
 
Silkey, you are too kind, thanks for the props. If you use a sharp (new) cobalt bit, cutting fluid and go easy they cut like butter.
These are in good shape, on rotors the min thickness is stamped right on the spokes and these are well above. :D
Although this set won't need it, I have resurfaced rotors here at home before. An 80g sanding disc on a 4" roloc pad mounted in my bench-top drill press. If you give the right pressure on the handle the rotor slowly spins on the plywood giving a nice swirl pattern.
 

Attachments

  • Rotor.jpg
    Rotor.jpg
    101.4 KB · Views: 918
Silkey, you are too kind, thanks for the props. If you use a sharp (new) cobalt bit, cutting fluid and go easy they cut like butter.
These are in good shape, on rotors the min thickness is stamped right on the spokes and these are well above. :D
Although this set won't need it, I have resurfaced rotors here at home before. An 80g sanding disc on a 4" roloc pad mounted in my bench-top drill press. If you give the right pressure on the handle the rotor slowly spins on the plywood giving a nice swirl pattern.

Killer Idea, I will be remembering that one.
 
last nights progress...
Roller4small_zps8797ec06.jpg


Roller3small_zps4ae773d1.jpg


Now I need to work on either the kickstand or the centerstand so I can get her on the new lift. Still undecided on the handlebars. now that the front end is together I don't know how well the stance would lend itself to clubmans, thinking of picking up a set of Daytona or superbars for the "Bomber!" 'oldWing and swapping the dragbars over to this bike. Or a set of w-i-d-e clubmans, or.....?
 
Back
Top Bottom