Im an IDIOT!! GL1000 Wiring woes

xReVOx

New Member
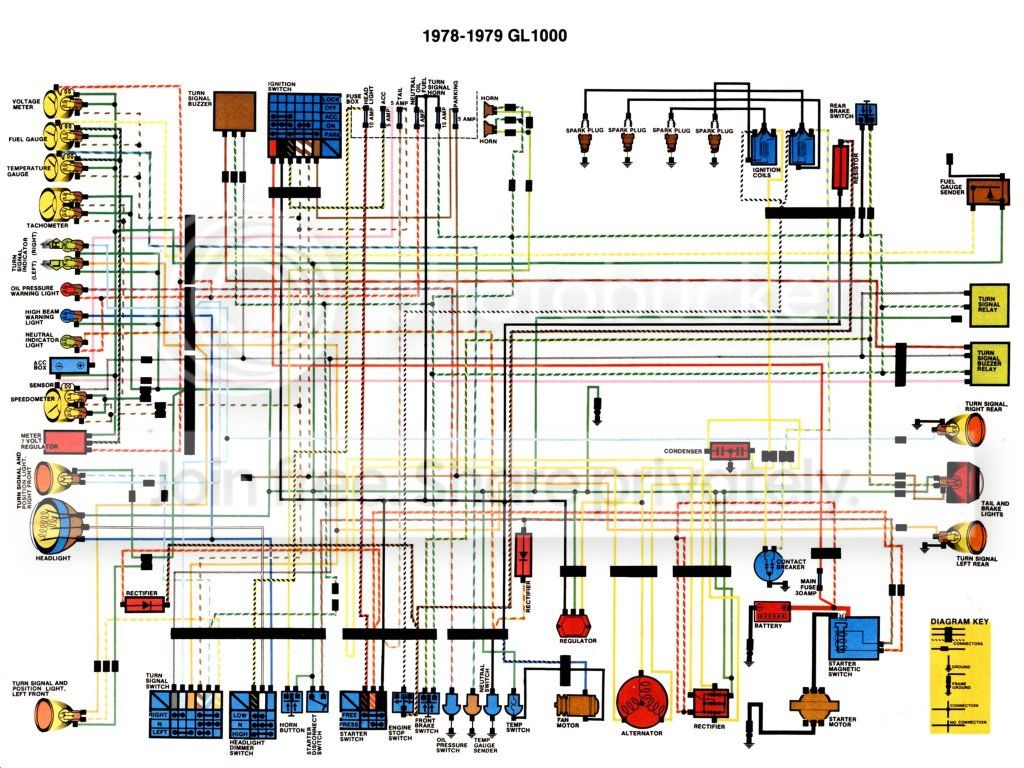
Im trying to wire my 79 GL1000 from scratch but the diagram is brutal and I am new to this. I want it to be a bare bones bike. The only wiring I need is Headlight, Brake lights, Start, Run, and Charge. I really need help omitting the unecessary wiring because I made a mess with what I started with and tore it back apart. Any help would be greatly appreciated!
Heres the diagram:
fullschematic.jpg
 
i recommend staring at that and studying it for a month ... then ask the questions again.

wiring diagrams look whacky but if you study and just look and follow every wire sooner or later you will have an "ah-ha" moment with it all.

pretty easy to eliminate things ... you have to get a piece of thick cardboard big enough for the harness and start remove wrap/tape and just lay everything out in an easy to follow method. use thumb tacks to keep it organized ... you can remove all remnants of winkers by just removing wires from the switch end all the way to lights,relays, etc.

thats how i started in the past ... just be sure to test everything for shorts and that wires are feeding the proper electricity ... the old wires can really become awful and need replacements.
 
Let me start by saying I've never striped a 1000 but I did strip my cm400. The idea is the same. To git rid of everything not needed. I started with my turn signals. I just followed the wires from the signal switch and took them out. Flasher, fuse block and a ton of wire went. I then went to the ignition switch. All I needed were two wires at the switch to make it run so I now have a toggle for that. all engine warning lights, gauges, neutral, clutch switches now gone. The headlight, taillight come on with the toggle, my brake light just needs 3 wires, hot to tail light, wire from both front and back brake light switches and a ground which I grounded at the light to get rid of that wire. remember that power must go to the switches to give the brake light itself power when you hit your brakes. My headlight works the same way almost. If you think about it, the headlight is really 2 lights, you have a low beam which should come on with the ignition switch and the high beam which should come on as well when you hit the high beam switch, a toggle will work there also or you can use a switch on the handle bar that has high beams and starter switch which is what I did. All you have to do is bring power to the switch and then to the high beam side of the light.You do not need a kill switch for the bike to run. mines gone. I also got rid of the relay that came from my starter selenoid to my neutral switch. I connected that wire from the selenoid to the starter wire on the selenoid and the other wire still goes to the starter switch on the bars. I will also throw this little tip in, on your wiring connectors you should see a little tab that holds the wires in. I sharpened the point of a nail to press that tab down so I could pull wire out of the connectors so if for some reason I needed to put them back I could. I didn't just start cutting, I saved them all. Just remember your charging and ignition systems and lighting are really 3 different systems. All you need to do is not remove anything but lighting really and leave the rest alone until that is done, then you can start replacing other wires with new ones if you want to. There are bare bones wiring diagrams on line you can use if you need to. I had one that I didn't need to use but now I lost that site, I found it here though. This really isn't that big a deal, just be careful and test everything each time you remove something your not sure of. What I've just told you worked on mine. I don't know if everything here will work on yours but I believe it should. Let us know how it works out.
Roy
 
As you study your diagram, remember that crossing lines do not necessarily mean a connection.


Only lines that cross with a black dot in the middle are an actual connection.


Make sure your voltage supply lines are fused, so you don't damage anything with a mistake.


Electrics are intimidating to look at, but they really are all logic. Once you figure out the logic, it will suddenly make a lot of sense...


Take your time, and enjoy the learning curve. In the future, you will already have the knowledge you gain today!
 
Quit looking at the diagram if you're going to wire it up from scratch - the current diagram isn't much use.

The only important stock bits from that diagram is the charging system, and the ignition system. But even those are basically generic.

You can I think boil a wiring system down to a few basic sub-systems.

Charging
Ignition
Lights
Starter

That's it. Nothing else is needed.

The Charging system involves the stator/rotor, regulator, rectifier and battery

The Ignition system goes from the Battery, through an ignition switch, to the points or electronic pickups to the coils

The Lighting system goes from the Ignition switch to the headlight, brake light and turn signal switches, to their respective light bulbs.

The Starter system is dead simple - heavy lead from battery to solenoid, from solenoid to starter motor. Regular 18ga wires from solenoid to starter button.

Not sure I've missed anything. If you want dummy lights, they just connect to the appropriate points in each subsystem. But if you need a flashing lightbulb on your dash to tell you 2 other lightbulbs are flashing on your signals, then maybe it's time to quit modifying bikes ;) I can somewhat appreciate a neutral light, on some bikes, but I've lived without one on my XS for the last few years.

So copy the basic charging wiring diagram from the stock one, but it's a cluster of wires coming off your alternator going to a plug which connects to the regulator / rectifier and battery. I used the stock wiring connected to my XS stator and the stock harness plug and custom wired from the regulator/rectifier unit I used and my battery to the other end of the stock plug.

 
First of all thanks for all the replies. I guess because it was 4 in the morning I wasnt specific enough but the PO had already butchered the stock harness to where it is almost unrecognizeable. The coils he installed are from a mitsubishi eclipse so the wire colors dont match (I just picked up some stock coils from ebay). He had already started trimming the harness so there are components that dont have connectors such as the stator and the rectifier so i cant tell the order the connections go in.
So here are some specific questions:
1) Do the stator wires have to go in a specific order? All 3 are yellow and the same size. There isnt a connector anymore so I dont want to guess wrong.
2) What size fuse should I use for the starter? I have a 30A fuseable link. Too much?
3) Are radio shack toggle switches stout enough for motorcycle application?
4) Would a rectifier/regulator combo work from a later model bike?

Thanks for all the help. This site has some gnarly bikes. Look forward to seeing what else you guys come up with.
 
And remember, most if not all things need a ground. That ground can come from a wire, OR through the frame or other metal bits. Stare at it a bit more, I'd help more but I sold my GL1000 a few months back.
 
1) Do the stator wires have to go in a specific order? All 3 are yellow and the same size. There isnt a connector anymore so I dont want to guess wrong.
The 3 yellow wires have no specific order. just make sure they never touch each other.
2) What size fuse should I use for the starter? I have a 30A fuseable link. Too much?
Which side of the starter, the high amp that actually turns the motor or the low amp that actuates the solenoid?
3) Are radio shack toggle switches stout enough for motorcycle application?
Questionable. Marine grade switches are probably a better option. YRMV
4) Would a rectifier/regulator combo work from a later model bike?
Yes and be a significant improvement. Search DTT for Reg/Rec upgrades. R1 units seem popular...
 
I see that the ground in the diagram is one wire with everything tied in. Im going to ground everything to frame as needed. Easier for troubleshooting in the future. Not so distant future since I am rewiring it! ;D
I guess I need to fuse each side of the starter. I have a 30A I could use for the high side and a 10A I could use for the low side. Are these values sufficient?
Thanks for the quick response Bozz. Wish I didnt have to work today or I would knock this out right now.
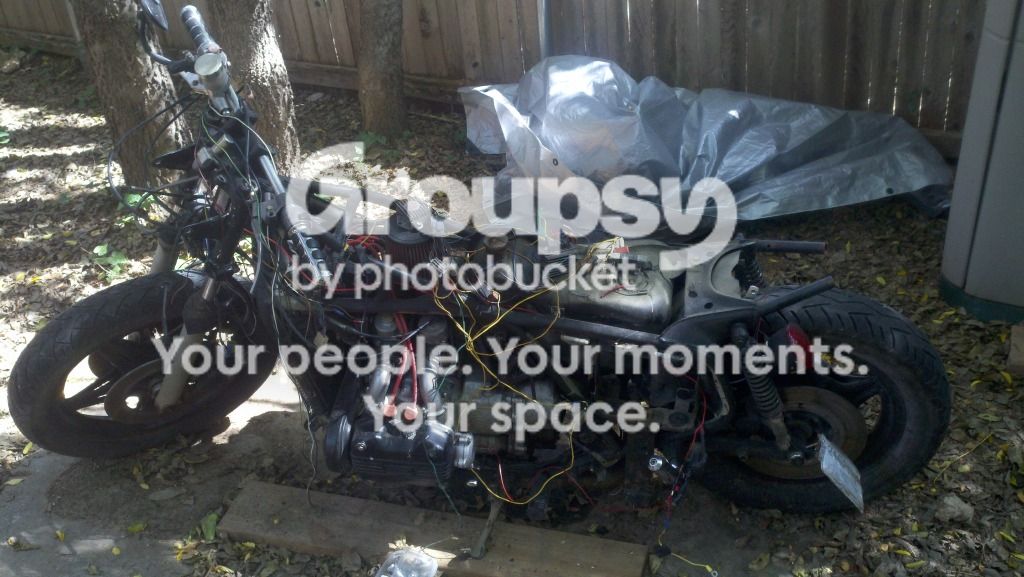
Heres a pic of the bike as it sits right now:
2012-10-24_13-38-18_474.jpg


The back frame has already been bobbed but I need to clean up the welds. It came with a ducati monster seat that actually looks great on this bike. I need some handlebars, probably going to go with some low rise clubmans or something. I will start a build thread when I get time to actually work on it.
Thanks again for the info
 
Back
Top Bottom