New GS 550 build:

Cjhall91

New Member
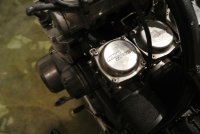
Hello!! So I lucked out and paid basically nothing for a clean title 1980 gs550. Mileage is 30k but it starts and runs, rides fine, just needed some tuning up and styling, and a major cleaning. My current question is how can I relocate a 4 cell battery and will it cause anything to short? I have stripped the bike down and am planning to do some small custom styling things to my liking. So that meant removing the stock air box and relocating all those wires (that I still need to ground) So, was thinking the evo2 battery, I have a maintainer and plan to use that as well since the battery is tiny. Anyone done this? I saw a few people that had but they didn't explain much

Thanks for the help!
 

Attachments

  • ImageUploadedByTapatalk1408688044.949155.jpg
    ImageUploadedByTapatalk1408688044.949155.jpg
    299.4 KB · Views: 432
Well, the airbox was shot so it needed to go, and now that it's all out it's not going back. I ordered the pods, and I also have ordered the corrected jets so I can turn the carb to run just fine with the pods.
 
- update -

I ended up ordering a ballistic 4cell battery but the size up for over 600cc bikes. Since I'm a 550 I feel like I will be okay with a regular plug into the maintainer...?
 
Good bike to start with. There's a ton of technical info available on the GSResources too.

Hillsy is right about the carbs. It's not impossible to run pods, but be prepared to really struggle with jetting. I can't help you with your battery, but check into the rest of your electrical system before putting the battery to a test. The R/R on older GS bikes is prone to failure, which can cook the stator and battery.
 
Big Rich said:
Good bike to start with. There's a ton of technical info available on the GSResources too.

Hillsy is right about the carbs. It's not impossible to run pods, but be prepared to really struggle with jetting. I can't help you with your battery, but check into the rest of your electrical system before putting the battery to a test. The R/R on older GS bikes is prone to failure, which can cook the stator and battery.


As for the battery. When I bought the bike it only ran when jump started but the battery was old so it wouldn't hold charge. So I purchased a new battery to test the system with a voltmeter. The bike easily started, ran, and rode. When I tested the voltage it was charging at 12.8v or so. Off the voltage was 12.2

I had taken the stator cover off and the stator seems to be in good condition. It's not all black and burnt, mostly the copper is showing, and a little oil residue on just parts, so I left it. And the magnet seems to be just fine as well, but not really sure how I test it. So I put it all back together and again started instantly and ran fine.

I had to take off the carbs to remove varnish and check the float bowls and just a general cleaning. When doing so the manifold intake boots were cracked (what did I expect from a 1980) so those and the flanges came off ass well. The plan for the bike was and is to go a little towards brat style, so for purely AESTHETIC only (and the fact the air box was disgusting and had rust spots here and there) the whole piece got removed. I have relocated all fuses, R/R, ignition parts etc. and tied them off to the frame hidden under where the seat will go when I get to that part.

I am in the process now of deciding on a seat style as the pan from the current seat is very fat and the pan itself has little "speed holes" so it needs to go. Too bad, the seats in good condition. No tears or anything!!

I plan to put the carbs back in with 110 main jets, and the pod filters. The problem will still be the airflow so I will restrict it little by little first with gorilla tape on the hidden side if the filters to get it to sit right, however it is possible it runs fine as is, no idea yet.

I am in need of some info for dropping the front fork so I can get rid if the hideous brown retro gauges and get some clip ons, and lower the headlight bucket.

Pics coming soon...
 
The bike now
And the plan (closest I can find to my style, I have specific tastes)
 

Attachments

  • ImageUploadedByTapatalk1408731515.376052.jpg
    ImageUploadedByTapatalk1408731515.376052.jpg
    290.8 KB · Views: 388
  • ImageUploadedByTapatalk1408731552.274438.jpg
    ImageUploadedByTapatalk1408731552.274438.jpg
    97.7 KB · Views: 892
Bikes on it's way to losing more weight and taking some serious cleaning. Got a new speedo cable in so that's fixed, Yes I used engine enamel in gun metal grey but it looks great. I ordered a 3m special "Kelly green" vinyl wrap for the tank, fender (if I keep it) and tail. May end up loosing the tail soon too.

- There's a battery on the way
- new boots,
- new emblem for rh side,
-new gasket for the lh crankcase cover (since I pulled it to check the stator) ,
-pod filters (yes I'm still attempting this, should be fine with 110 jets and restricting the air)
- 3m vinyl in Kelly green on the way

I think I'm forgetting something but oh well.
Bike should be rideable by Friday next week easy if it all arrives on time. After that i will be grinding tabs and rattle can the spots for now. This winter I will have the frame coated all really dark grey but for now black will do.

Next to order:

- clip ons
- new gauges (suggestions?)
- new front tire
- figure out the seat/tail
- maybe a new headlight but I haven't decided

The before and afters if today's work
 

Attachments

  • ImageUploadedByTapatalk1408764244.204362.jpg
    ImageUploadedByTapatalk1408764244.204362.jpg
    277.9 KB · Views: 916
  • ImageUploadedByTapatalk1408764273.336569.jpg
    ImageUploadedByTapatalk1408764273.336569.jpg
    258.1 KB · Views: 909
  • ImageUploadedByTapatalk1408764288.253502.jpg
    ImageUploadedByTapatalk1408764288.253502.jpg
    334.2 KB · Views: 450
  • ImageUploadedByTapatalk1408764309.553265.jpg
    ImageUploadedByTapatalk1408764309.553265.jpg
    295.6 KB · Views: 374
Cjhall91 said:
Well, the airbox was shot so it needed to go, and now that it's all out it's not going back. I ordered the pods, and I also have ordered the corrected jets so I can turn the carb to run just fine with the pods.

This statement tells me that you have never tuned motorcycle carburetors. They are not plug and play...one size fixes all bikes (even of the same model).

Cjhall91 said:
.....I plan to put the carbs back in with 110 main jets, and the pod filters. The problem will still be the airflow so I will restrict it little by little first with gorilla tape on the hidden side if the filters to get it to sit right, however it is possible it runs fine as is, no idea yet......

And, that is not the issue. Read this thread (from another site, where I explain the primary issues with cheapo pods). This thread is primarily about VM carbs with a manual slide needle, not the CV carbs that you have, which are WORSE to tune without an airbox:

http://www.caferacer.net/forum/technical/19639-pod-filter-thread-geeto.html

This thread was linked in a sticky on this site, as well:
http://www.dotheton.com/forum/index.php?topic=45863.0

.. and there is a ton of information in the resulting discussion, particularly this statement from, Kopsicle, a guy who obviously has LOADS of experience tuning and attempting to tune CV carbs, like yours:
kopcicle said:
That's got CV's? Take a #2 phillips screwdriver, heat the tip with a torch until cherry red and plunge it into your eye. It will hurt less. Really. Bikes with CVs have airboxes. Bikes with slide needle carbs have pods. Even Mark Dobeck, former owner of Dynajet, cops to a loss of midrange using his kits.

And for the other eye heat a 3/4" drill bit chucked up in an air drill ...

I can get BS34's to almost work on the 998-1100 with one serious caveat . They will pull hard with the throttle arbitrarily pinned OR they will mix fuel cleanly at part throttle cruise . Pick one I don't know how to give you both . Mark Dobeck and I went back and forth for most of a summer getting several of my customers bikes and my 998 urban terror two wheeler running right . The customers are probably still ****ed even though I neither recommended nor supplied this serious impediment to performance . In the end I knew neither was right (thanx for the flash runs Ron !) But the one that was the best and closest to right got me the most grief . That guy thinks I'm an idiot and in ten years hasn't wasted an opportunity to say so . Funny that the last two guys to touch it asked how I was able to get it so close . The one that isn't so good , that guy thinks I'm magic .

just a partial list

various attempts at
springs
needles
needle jets with and without discharge shields
pilots
mains
main air bleed
air horns within the air filters
closer to or further away from the head
adjustable cam sprockets
different headers ....

All because in one case the owner wanted to look like all the other cool kids
and the other thought it was a pain to get the carbs in and out with the stock aribox

coincidently both of these mental midgets went from 35-36 mpg to 30-31mpg and might have gained a couple of hp on top at the expense of having me spend untold hours filling a huge hole around 4k .

So I was asked recently if I would jet another 998 for "pods" ( is it that hard to say individual air filters ? really?) good thing I kept my notes .

Sure I would . With an eddy current dyno and by the hour ...

now for some straight info about BS34's and a Z750 . if you want more look up BS and more BS in my earlier posts

Only after valve adjust ...
The pilot needs to show lean misfire within 1 1/4 from seat and rich misfire before 3 3/4 turns out from seat . Anything else outside this and inaccurate metering will most likely cover up all your hard work .
Then , Check the sync again ...
The stock needles are fine for all but full on racing . Why people insist on a "jet kit" is beyond me . I had many conversations over a period of several years with Mark Dobeck about individual filters on constant velocity , diaphragm carbs . Here are the high an low points of that discussion .
Great full throttle response , great part throttle cruise , pick one . You just don't get both .
The larger the volume within the individual filter the better your result .
Finding a velocity stack that will fit over the carb and inside the filter is never a bad thing until its opening is shrouded or interfered with by the filter .
Most (even dynojet's long running offering for cv34's ) needles supplied with jet kits are aluminum for ease of production and not steel for durability .
You really need to find out what the stock needle was and then look for it in the SUDCO catalog .
Find the main air bleed/jet on the inlet to the carb . This will be a fixed brass jet that unmistakably leads to the main down well that the emulsion tube , main jet , and main discharge to the throttle bore reside in . Remember this is a fixed jet and difficult (not impossible) to change . Small diameter changes in this jet can cover the usual giant hole between idle/transfer and the beginning of the midrange .
Likewise for the holes in the bottom of the main slide . remember small adjustments and accurate adjustments . A slide can be easily ruined . ( yes enlarge the hole slightly )
Paul was right I do have some experience with individual filters on CV carbs . None of it good .
but as a baseline for stock internals and 1000cc "j" engine
http://www.sudco.com/CatalogJPG/126.jpg and a call to sudco about the next richer mikuni needle up from your 4cb6 ( look it up at kawasaki I could be senile) 4cb7 Canada (has multiple circlip grooves ) The as stock Y-8 (again look it up) should be sufficient needle jet for all but "why arn't you using flat slides"
sooo
40 pilot
127.5 main
open main air bleed .025 to .035"
open the hole in the bottom of the slide a like amount
start with the needle all the way down and use .015" washers as needed to lift or get the Canadian part . (you did junk the no name needles , didn't you ? )
If at all possible find the larger volume tapered oval filters .
If it won't clean out at all it's obvious , down jet
If it just won't pull redline use this simple trick . Cover the filters with cotton gym socks . No change ? it's probably something else , starts to pull on top ? you're probably lean .
Make damn sure that the fuel/float level and the needle valve/seat are near perfect as possible .
Get rid of that abortifact of a vacuum petcock and spend a dollar on pingle .
You don't need the emissions crap either . Block off the valve cover and remove the air valve .
keep in mind that the 127.5 main I used was because of a free flowing head and a Basanni that had little if no restriction . Honestly if you find yourself much over 120 you're doing it wrong
Now go adjust your valves before you do anything

A bit dated but the process is the same even if the carb and displacement are different . PM me if you have specific questions . I'll be more than willing to run up your phone bill or run minutes of your plan if you get stuck stoned or stupid . Just don't consider taking up my time with carb questions unless the valves are adjusted correctly and the timing is spot on (applies to points mostly but there are cases where the timing/coils of a electronic ignition can be crap).

I won't even talk carbs with you until the above is done and verified it's just a waste of your time and mine.

I go back to my 70's race PrOn collection a continue to be a grumpy old man

~kop


...but carry on, because, you obviously have a better handle on it. ;)
 
8ball said:
This statement tells me that you have never tuned motorcycle carburetors. They are not plug and play...one size fixes all bikes (even of the same model).

And, that is not the issue. Read this thread (from another site, where I explain the primary issues with cheapo pods). This thread is primarily about VM carbs with a manual slide needle, not the CV carbs that you have, which are WORSE to tune without an airbox:

http://www.caferacer.net/forum/technical/19639-pod-filter-thread-geeto.html

This thread was linked in a sticky on this site, as well:
http://www.dotheton.com/forum/index.php?topic=45863.0

.. and there is a ton of information in the resulting discussion, particularly this statement from, Kopsicle, a guy who obviously has LOADS of experience tuning and attempting to tune CV carbs, like yours:

...but carry on, because, you obviously have a better handle on it. ;)


"8Ball"

As I appreciate the input, I don't need the nonsense.

You are correct I have little experience with motorcycle carbs specifically but I am not an idiot. I have been building engines (carb and fi) for a very long time, with more training than you could probably ever fathom, including builds i have engineered and designed from the ground up, so I prefer people that are helpful for the topics I post about, not Info just to make a point because you are bored. Please don't reply to my forum topics with your sarcasm. However some of the info was okay, so thanks.


Okay:

No updates yet. Few more days on the parts. I am looking for a cafe seat pan similar to the picture I posted above ( I will repost)
and the hoop for the frame, suggestions?

I am going to attempt lowering the forks through the bracket today and lowering the light and gauges best I can until I buy new ones...

Thanks all!!
 

Attachments

  • ImageUploadedByTapatalk1408821903.426105.jpg
    ImageUploadedByTapatalk1408821903.426105.jpg
    97.7 KB · Views: 944
Alright,

So far I have started to grind off a few tabs, shaved the seat I had (not one I plan on keeping ) just to see if it was worth my effort.... It isn't but it'll work for a few weeks. I also shortened the frame to the rear hoop, and started to ground some previously floating cables. As always, anxiously awaiting parts.

Starting to thing I got the wrong color for the tank... Oh well. Vinyls an easy fix

Anyone have a seat suggestion? Is anyone even reading this?
 

Attachments

  • ImageUploadedByTapatalk1408922662.787976.jpg
    ImageUploadedByTapatalk1408922662.787976.jpg
    312.6 KB · Views: 402
  • ImageUploadedByTapatalk1408922671.786409.jpg
    ImageUploadedByTapatalk1408922671.786409.jpg
    313.5 KB · Views: 384
I plan on doing basically the same thing with my 78. I found a guy on here that makes rear hoop and seats exactly like the one on the bike you pictured.. I couldn't find the link to his post but found a post by someone else with a link to his eBay
http://www.dotheton.com/forum/index.php?topic=59277.0

In the post I saw (but can't find) he was selling the seat and hoop for $225 shipped
 
Also saw on your other post you're selling side covers, wanted to get the left side if its still available
 
Okay, So about a month or ore down the road here is where I am with this thing.. and let me tell you, I learned A LOT during this build so let me shed some light on a few things as we go:

Whats new since the last post?

I took the entire bike apart, cleaned, stripped/sanded and wire brushed the frame to get off all the rust and cover up all my great grinding work (ya, great). I then started the final build:

New Frame Paint
New Swig Arm Paint
New Sing Arm washers and cleaned dust Caps
New Rear Tire
New Rear brakes
Cleaned and polished rear shocks (OE)
Painted brake calipers
New Oil Pan Gasket
New Stator Cover Gasket
New Crankcase Cover Gasket
New Side Cover Emblems
New Spark Plugs
New Pod Filters (Uni, not cheap chinese)
New Fuses
Custom Wiring Harness ( all wires hidden and all black, took some time )
New Headlight Ears
New Headlight Bulb
New Clutch Lever
New brake Lever
New Front Tire
New Front Brake Pads
Rims Cleaned and Colored
Forks Polished
Side Covers Cleaned and Colored
Carbs Cleaned and Polished
New Brake Fluid
New Oil
New Oil Filter
New Led Brake Lights


And a few more things that are not done yet.

I painted the tank myself, found out it was repaired at some point, and was not able to paint it myself correctly a second time after ruining the clear coat on the first job.. I got the Paint gun and the tank and primer and sanded and prepped and all that jazz more times than it was worth, and it just would not come out right.

Heres a tip, if you dont have the proper paint set up and clean room where no fucking wind can blow and no water gets anywhere and you dont ruin your driveway or garage when things spill, I suggest you get the tank painted the color you want professionally. Search Craigslist, most the time you'll get a good cheap professional job that will last and look how you want it to.

So my tank is on the way, its going to be in a Toyota Super White off the 90's supras, should be great.

The wiring takes time, but if you know how these bikes work, and take your time, you will be fine. I took my time and went with ll black wire incase the tuck makes things difficult, it will blend with the black frame. heres the link to the wiring diagram that helped most:

http://www.mtsac.edu/~cliff/storage...ou all think (is anyone even reading this) :o
 

Attachments

  • DSC_1048.jpg
    DSC_1048.jpg
    2.9 MB · Views: 434
  • DSC_1051.jpg
    DSC_1051.jpg
    2.9 MB · Views: 390
  • DSC_1040.jpg
    DSC_1040.jpg
    2.9 MB · Views: 394
  • DSC_1036.JPG
    DSC_1036.JPG
    2.9 MB · Views: 378
  • DSC_1033.JPG
    DSC_1033.JPG
    988 KB · Views: 365
  • DSC_1032.JPG
    DSC_1032.JPG
    2.8 MB · Views: 357
  • DSC_1030.JPG
    DSC_1030.JPG
    2.8 MB · Views: 356
  • DSC_1029.JPG
    DSC_1029.JPG
    2.7 MB · Views: 372
  • DSC_1028.JPG
    DSC_1028.JPG
    2.8 MB · Views: 366
  • DSC_1027.JPG
    DSC_1027.JPG
    2.8 MB · Views: 424
  • DSC_1026.JPG
    DSC_1026.JPG
    2.9 MB · Views: 382
  • DSC_1039.JPG
    DSC_1039.JPG
    2.7 MB · Views: 393
looks sweet
before you do the seat pull off one shock
put spring on soft setting
ratchet strap the side with the shock down hard against the bottom out bumper
note position of tire
leave an inch clearance from there to the seat pan/or fender
if you actually are going to ride the bike on twisty roads dont lower the suspension all you will do is lose corenering clearance
it is not like a car lower is not better
try to keep the seat nearly as high as the stocker 1" lower is proly perfect, for maximum comfort and control
slamming a thin seat down on the frame is terrible thing to do to a good motorcycle
 
Back
Top Bottom