
Two tone gas tank help

ShaggyPit

Been Around the Block
Hey guys,

I am planning on doing my cb750 gas tank two toned to help the aesthetics of the line of the bike. Top half is going to be an olive drab and bottom will be either a brown to go with the leather seat or just black. Leaning towards black but will play around with photoshop to get some an ideas.

So my question is, how do I get both sides to be even besides meticulously measuring and double and triple checking everything? any tricks that you guys use when you have done this? also, how do I get the colors to connect without having a space between the two, if that makes sense, because when I think about doing this I feel it will be hard to line up the tape to the section that has been painted...i guess a little over lay is bound to happen to facilitate this?

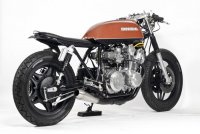
any help would be appreciated..below is a pic of what I am picturing for the tank, different colors obviously but you get the idea.

Thanks guys!
 

Attachments

  • CHOPPERSHOTZ331.jpg
    CHOPPERSHOTZ331.jpg
    46.2 KB · Views: 1,551
  • White tank 750.jpg
    White tank 750.jpg
    270.9 KB · Views: 827
There are different ways to approach this:

Shoot the color that covers the most area first, completely covering the piece. Then tape off and shoot the second color. The thickness of the second color's film will determine how much of a ridge is left where the colors meet.

Back taping is another option. Tape and shoot the first color. Then untape, and then tape tape off for the second color. Be sure to line up the edge of the tape exactly with the edge of the paint. This should ensure that the two colors are nearly the same thickness and there will not be much a ridge if any at all.

If you are using single stage paints, careful wet sanding and buffing will minimize the ridge between colors. If you are using two or three stage paints, carefully wet sand and clear coat. Then cut and polish the clear.

Most two tone jobs have a pinstripe between the colors. This assists in camouflaging the transition between colors.
 
3185FC1F-6455-41C0-AF4D-8A736992D59C.jpg


This is my truck I painted a few days ago. After priming I sprayed a single stage red down the middle (no tape or masking). After the red dried overnight I taped and masked off the stripes. I scuffed the the exposed red and then shot the black. After a cut and polish, the ridge where the black meets the red is barely detectable by running your hand across the surface. As far as just looking at it (without feeling it) you can barely see the ridge looking from inches away.
 
What he said, but a few more things I'll add. If you are using a multi-stage system, do NOT wet sand the base coat unless you plan on spraying more base over the top. Wet sanding base coat exposes the metallics and pearls and will cut into them making the paint look goofy. Always wet sand the clear after the item is painted to eliminate any lines or edges in the multi-tone paint jobs. If you have a a deep edge between the 2 colors, spray 3 coats of clear, after it is dry (8-24 hours depending on environmental conditions and product) wet sand with 800 grit paper just enough so that the clear is dull and spray 2-3 more coats of clear. At this time, your line should be almost completely gone on its own. Now when you wet sand and buff, you will have an extra depth of shine plus no visible edges.

As far as taping lines, it's not exactly easy, but not difficult either. The trick is to find guide points on the item you're painting and use them as references for where you want your line to run. I prefer blue vinyl tape for taping lines, it is a little stretchy, more tacky and less likely to bleed or lift while painting. To get the lines straight, start the tape at one reference point, now lightly stretch the tape across at about a 30* angle from the surface. Repeatedly lift and stretch the tape towards your next reference point, making light contact with the surface until you have the line where you want it, then lay it down and lightly run your finger across it to secure it. Curves are a little trickier, but essentially, hold the roll of tape in one hand and use your index finger of your other hand to guide the tape where you want it.
 
thanks scratcher and octane!
I will continue to research but will take this information for when the time comes...hopefully soon.

one question I have on what you guys said is about the multi stage system? what do you mean by this? As in spray light coats with heavier one then let dry then after dry period do this again? starting with primer moving to clear coat with paint as desired in between?

Thanks again guys
Appreciate the info!
 
There are several different types of paint, but the most common are single stage and multi-stage paint. Single stage is generally an enamel that you spray 2 coats on top of your primer and you're done. Multi-stage consists of primer, base coat and clear coat. Also, and kind of custom work, candy and pearl coats would fall under multi-stage. Single stage is cheaper and easier to use, multi-stage is more expensive, a bit more time consuming but will give you better results. All depends on what you are wanting.
 
Heres what I did few weeks ago. I think the most important things to succes is that you do enough thin layers, and make sure you dont spray under the tapes. I sprayed first black, then orange and white.
e3fca91fac2ae911b9f67357945d5c23.jpg
 
Munamankeli said:
Heres what I did few weeks ago. I think the most important things to succes is that you do enough thin layers, and make sure you dont spray under the tapes. I sprayed first black, then orange and white.
e3fca91fac2ae911b9f67357945d5c23.jpg

looks great munamankeli!
I am debating whether or not to put a white stripe like you have done, i like the visual separation of the two colors that the white stripe adds, but not sure if it will go with olive drab on top and black on the bottom that I am planning on doing...I guess white goes with everything tho...

How thick is that white stripe you have? .5"?
 
Back
Top Bottom