
We noticed you are blocking ads. DO THE TON only works with community supporters. Most are active members of the site with small businesses. Please consider disabling your ad blocking tool and checking out the businesses that help keep our site up and free.
You are using an out of date browser. It may not display this or other websites correctly.
You should upgrade or use an alternative browser.
You should upgrade or use an alternative browser.
'73 CB250 - Doing it right this time round.
- Thread starter Green199
- Start date
Re: '73 CB250 - Rustic Racer.
Thanks man.
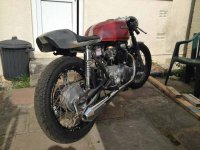
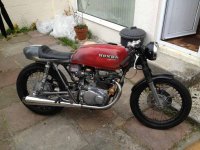
My bro just sent me a few more pictures of the finished stage one, so thought I'd pop them up.
iContango said:Nice work - really unique look. Hope we get to see the finished product.
Thanks man.
My bro just sent me a few more pictures of the finished stage one, so thought I'd pop them up.
Attachments

Re: '73 CB250 - Rustic Racer.
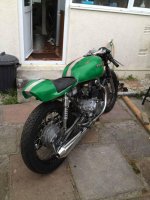
Just for you Steve! haha
haha
SteveG said:Looking good, that would look fantastic in green.
Just for you Steve!
hahaAttachments
Re: '73 CB250 - Rustic Racer.
Thanks VonYinzer. No idea where the seat came from. Got it with the bike. The seat pan itself has markings from a shop in London, but nothing on the seat itself. Practically everything that wasn't standard on this bike was taken off of a yamaha, so im guessing it was taken from some other bike. The quality of it is very good so it could have been off an old race machine or something, who knows! haha
VonYinzer said:Looks good. Where did that seat come from?
Thanks VonYinzer. No idea where the seat came from. Got it with the bike. The seat pan itself has markings from a shop in London, but nothing on the seat itself. Practically everything that wasn't standard on this bike was taken off of a yamaha, so im guessing it was taken from some other bike. The quality of it is very good so it could have been off an old race machine or something, who knows! haha
kauai1800
New Member
Re: '73 CB250 - Rustic Racer.
Aloha Green
I'm trying to mount a fairing on a Suzuki 250 and so I'm going through a lot of the same questions...paint scheme, mounting of the fairing, etc. Your thread is a great resource so thanks and good luck! I can't wait to see how it turns out.
Aloha Green
I'm trying to mount a fairing on a Suzuki 250 and so I'm going through a lot of the same questions...paint scheme, mounting of the fairing, etc. Your thread is a great resource so thanks and good luck! I can't wait to see how it turns out.
Re: '73 CB250 - Rustic Racer.
Thanks kauai1800.
Thats the pain of having a fairing. Its got massive surface area so it needs a decent paint scheme! haha
I'll try and detail/document the re-fitting of the fairing (bracket positioning and mounting) aswell as the adaption to the screen, which I hope will help!
kauai1800 said:Aloha Green
I'm trying to mount a fairing on a Suzuki 250 and so I'm going through a lot of the same questions...paint scheme, mounting of the fairing, etc. Your thread is a great resource so thanks and good luck! I can't wait to see how it turns out.
Thanks kauai1800.
Thats the pain of having a fairing. Its got massive surface area so it needs a decent paint scheme! haha
I'll try and detail/document the re-fitting of the fairing (bracket positioning and mounting) aswell as the adaption to the screen, which I hope will help!
Re: '73 CB250 - Rustic Racer.
No worries!
Welcome to my little slice of bike heaven/hell! haha
VonYinzer said:Thanks for the reply! Its a great looking seat.
No worries!
Corsair said:Oh yeah...
Sent from my Nexus S 4G using Tapatalk 2
Welcome to my little slice of bike heaven/hell! haha
Re: '73 CB250 - Doing it right this time round!
Ok, so i've been rebuilding the engine over the last month, and its almost finished. I decided to spray it a matt black all over. The problem is, it looked so nice that I wanted the rest to match.
Fast forward til yesterday where Im travelling a 400 mile round trip to bring my bike to my university to redo most of it!
My mate now has a workshop I can use to work in so I can actually get this thing looking good, so this project will be getting updated again, trying to make things look pretty!!
First things first....New tank! Also new paint scheme, black with metallic graphite (same as the frame) side panels, surrounded by a gold pinstripe.
The image you can see is just a quick mock up of the scheme...looks real classic!
<img src="http://imageshack.us/a/img853/9844/02032013576.jpg" alt="Image Hosted by ImageShack.us"/>
<img src="http://imageshack.us/a/img69/4044/02032013577.jpg" alt="Image Hosted by ImageShack.us"/>
<img src="http://imageshack.us/a/img856/1629/02032013579.jpg" alt="Image Hosted by ImageShack.us"/>
<img src="http://imageshack.us/a/img96/1229/02032013580.jpg" alt="Image Hosted by ImageShack.us"/>
Re: '73 CB250 - Rustic Racer.
Stripped the bike down with the intention of detabbing and cleaning up some bits on the frame before giving it a coat of paint but didn't get round to it.
<img src="http://imageshack.us/a/img688/7978/03032013583.jpg" alt="Image Hosted by ImageShack.us"/>
I started stripping the existing shit paint off of the rims and hubs, and checked the condition of the spokes. They were in very bad shape, and I had to cut a few out so will need to pick up some new spokes now.
<img src="http://imageshack.us/a/img255/6425/03032013582.jpg" alt="Image Hosted by ImageShack.us"/>
The rims seemed to clean up ok at first, but I noticed quite a few pits in the chrome. I really want to run polished rims, but cant afford new ones, So I will have to see if I can rub them back a bit and try and clean up some rust/corrosion before I try and polish. If not, I'll just have to paint them.
The hubs however, seemed to turn out great!
<img src="http://imageshack.us/a/img11/518/03032013585.jpg" alt="Image Hosted by ImageShack.us"/>
<img src="http://imageshack.us/a/img90/4/03032013586.jpg" alt="Image Hosted by ImageShack.us"/>
Going to give it a quick once over with some wire wool after I lace the rims.
SONICJK
Reminds me of...me No, I'm sure of it. I hate him
I like the new paint.
Good luck getting any class work done with the bike with you.
Cant even tell you how many classes I skipped in college because I was in the middle of doing something on the bike.
Funny thing is I did the same thing when I was teaching, cancelled several classes because my engine was in need of a rebuild ;D
SONICJK said:I like the new paint.
Good luck getting any class work done with the bike with you.
Cant even tell you how many classes I skipped in college because I was in the middle of doing something on the bike.
Funny thing is I did the same thing when I was teaching, cancelled several classes because my engine was in need of a rebuild ;D
Thanks man!
haha i've already told myself thats not going to happen but we'll see how that turns out!
Started taking some tabs off, and cleaning up the frame a bit on wednesday. Will finish the work on that and then get some pictures up.
Also figured out what I plan to do to mount the seat and a tailight. Going to order a Lucas MT110 rear light, and have it attached to a metal underseat plate which curves up at the rear and follows the lines of the seat, should look good.
Got some goodies today, from Colby, Isle of Man.
10 metres of gold pinstripe tape to replace the shit looking stuff on the tank at the minute and some nice vintage honda wing decals in gold too!
<img src="http://imageshack.us/a/img850/1807/07032013588.jpg" alt="Image Hosted by ImageShack.us"/>
<img src="http://imageshack.us/a/img541/643/07032013587.jpg" alt="Image Hosted by ImageShack.us"/>
Got a toggle switch through today. Its going to be mounted in the headlight and replace the started button as Im running kick only. Its going to be used for the headlight, whether for the light be on or off, or for the fullbeam to be on or off is undecided yet.
<img src="http://imageshack.us/a/img10/9936/09032013589.jpg" alt="Image Hosted by ImageShack.us"/>
Continued working on the frame, trying to lose some weight.
Started trimming battery tabs and such off, as well as grinding the centre stand mounts. I also removed the cross brace bar for the side stand, which will be repositioned securely later on. Also removed the chain guard mounts on the swinngarm as I wont be running one, atleast not one on the original mounts anyway.
Then I got particularly anal, and started removed weld spatter and filling in the spot welds. Told you I was doing it right this time! haha
<img src="http://imageshack.us/a/img824/5614/09032013590.jpg" alt="Image Hosted by ImageShack.us"/>
<img src="http://imageshack.us/a/img255/3711/09032013592.jpg" alt="Image Hosted by ImageShack.us"/>
<img src="http://imageshack.us/a/img255/5858/09032013593.jpg" alt="Image Hosted by ImageShack.us"/>
<img src="http://imageshack.us/a/img542/315/09032013595.jpg" alt="Image Hosted by ImageShack.us"/>
I still have some shaping to do on the rear of the swingarm to make it match the other sides curves.
<img src="http://imageshack.us/a/img10/9936/09032013589.jpg" alt="Image Hosted by ImageShack.us"/>
Continued working on the frame, trying to lose some weight.
Started trimming battery tabs and such off, as well as grinding the centre stand mounts. I also removed the cross brace bar for the side stand, which will be repositioned securely later on. Also removed the chain guard mounts on the swinngarm as I wont be running one, atleast not one on the original mounts anyway.
Then I got particularly anal, and started removed weld spatter and filling in the spot welds. Told you I was doing it right this time!
haha<img src="http://imageshack.us/a/img824/5614/09032013590.jpg" alt="Image Hosted by ImageShack.us"/>
<img src="http://imageshack.us/a/img255/3711/09032013592.jpg" alt="Image Hosted by ImageShack.us"/>
<img src="http://imageshack.us/a/img255/5858/09032013593.jpg" alt="Image Hosted by ImageShack.us"/>
<img src="http://imageshack.us/a/img542/315/09032013595.jpg" alt="Image Hosted by ImageShack.us"/>
I still have some shaping to do on the rear of the swingarm to make it match the other sides curves.
fill...prime...sand repeat....you get it.
<img src="http://imageshack.us/a/img255/3306/10032013595.jpg" alt="Image Hosted by ImageShack.us"/>
<img src="http://imageshack.us/a/img194/6671/10032013596.jpg" alt="Image Hosted by ImageShack.us"/>
Swingarm done....continuing with the frame now.
<img src="http://imageshack.us/a/img24/8725/10032013597.jpg" alt="Image Hosted by ImageShack.us"/>
<img src="http://imageshack.us/a/img543/9744/10032013598.jpg" alt="Image Hosted by ImageShack.us"/>


