Follow along with the video below to see how to install our site as a web app on your home screen.
Note: This feature currently requires accessing the site using the built-in Safari browser.
We noticed you are blocking ads. DO THE TON only works with community supporters. Most are active members of the site with small businesses. Please consider disabling your ad blocking tool and checking out the businesses that help keep our site up and free.
Mounted the Caliper. Ignore the length of the braided hose, its being shortened now that I know the length that I need.
<img src="http://imageshack.us/a/img442/2792/06062013751.jpg" alt="Image Hosted by ImageShack.us"/>
<img src="http://imageshack.us/a/img13/7848/06062013752.jpg" alt="Image Hosted by ImageShack.us"/>
<img src="http://imageshack.us/a/img198/549/06062013756.JPG" alt="Image Hosted by ImageShack.us"/>
Starting the long and tedious process of wiring now. Got a plan up my sleeve for the battery, so just making a basic loom until I finalise details of it.
<img src="http://imageshack.us/a/img713/2703/06062013757.jpg" alt="Image Hosted by ImageShack.us"/>
<img src="http://imageshack.us/a/img835/3159/06062013758.jpg" alt="Image Hosted by ImageShack.us"/>
<img src="http://imageshack.us/a/img404/3510/06062013759.jpg" alt="Image Hosted by ImageShack.us"/>
<img src="http://imageshack.us/a/img9/5003/06062013760.jpg" alt="Image Hosted by ImageShack.us"/>
<img src="http://imageshack.us/a/img27/1736/06062013761.jpg" alt="Image Hosted by ImageShack.us"/>
Replaced the inner tubes yesterday so now it rolls! haha
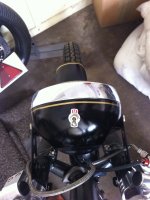
I also painted the headlight bucket and the mudguard to test the paint scheme. I think it looks great. Will get some pictured of it up soon.
I put both sprockets on and reduced to chain to the right fit, and dropped my cylinders off to the machine shop to be bored out. Should be back tomorrow so she may be running soon! ;D
Started off by testing some paint and the pinstripe tape on my headlight bucket and mudguard. I really could should have used a filler primer but as this was a test I just sprayed both as they were.
<img src="http://imageshack.us/a/img69/6435/wmvs.jpg" alt="Image Hosted by ImageShack.us"/>
<img src="http://imageshack.us/a/img585/9028/1jef.jpg" alt="Image Hosted by ImageShack.us"/>
<img src="http://imageshack.us/a/img703/2222/4hw6.jpg" alt="Image Hosted by ImageShack.us"/>
Turned out relatively ok so I think I may keep it as it is for the minute and respray it properly eventually.
I then mounted them on the bike. As a whole, the front of the bike is now done.
<img src="http://imageshack.us/a/img13/5582/zulm.jpg" alt="Image Hosted by ImageShack.us"/>
<img src="http://imageshack.us/a/img706/4139/2xg0.jpg" alt="Image Hosted by ImageShack.us"/>
<img src="http://imageshack.us/a/img203/1390/r56w.jpg" alt="Image Hosted by ImageShack.us"/>
<img src="http://imageshack.us/a/img13/3716/96w4.jpg" alt="Image Hosted by ImageShack.us"/>
<img src="http://imageshack.us/a/img29/5412/bd3i.jpg" alt="Image Hosted by ImageShack.us"/>
Need to straighten the switch when I wire it.
<img src="http://imageshack.us/a/img40/3972/sujl.JPG" alt="Image Hosted by ImageShack.us"/>
<img src="http://imageshack.us/a/img200/1964/yim.JPG" alt="Image Hosted by ImageShack.us"/>
I also started on a new rear set brake linkage.
<img src="http://imageshack.us/a/img692/403/oju3.jpg" alt="Image Hosted by ImageShack.us"/>
<img src="http://imageshack.us/a/img708/5902/2g7.jpg" alt="Image Hosted by ImageShack.us"/>
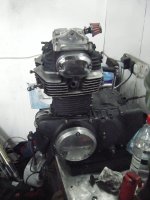
And then I got a phone call from the machinist saying my cylinders were done!
<img src="http://imageshack.us/a/img22/2566/lcxy.jpg" alt="Image Hosted by ImageShack.us"/>
<img src="http://imageshack.us/a/img706/4686/55h3.jpg" alt="Image Hosted by ImageShack.us"/>
<img src="http://imageshack.us/a/img23/5301/bg24.jpg" alt="Image Hosted by ImageShack.us"/>
<img src="http://imageshack.us/a/img534/5196/cclq.jpg" alt="Image Hosted by ImageShack.us"/>
<img src="http://imageshack.us/a/img198/2870/3fg.JPG" alt="Image Hosted by ImageShack.us"/>
Going to clean and get the head on it tomorrow If I can.....we're getting there!
I still need to set the timing, and I really need to touch up taint. Not sure on whether or not to paint the head once fully assembled, or to leave it unpainted and just clean it really well!
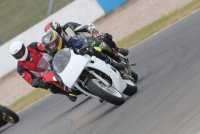
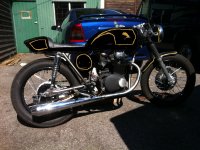
Progress is slowing a little bit at the minute. I recently purchased a race bike to start motorcycle road racing. I completed my ACU race license a few days ago, so have been spending my time playing with my race bike! Never the less. progress will resume soon! ;D
That's me on the '94 cbr400rr...about to be overtaken by many bikes! hahaa
Having a bit of a hard time with wiring. I am less than useless at electrical stuff so i'm trying work through it but its taking a while.
I have hollowed out the starter motor, and planned to put a small battery in there. As there is no starter or turn signals, and all the lights could be turned off independently to help starting, the battery was just going to be there to boost the spark while trying to start it.
Ive ran into a problem trying to find one small enough that will fit inside, and one which I could realistically afford, so im currently looking into running a battery eliminator. I have no real idea about them, but found a 10,000 micro farad one designed for a yamaha sr500 which I was looking at trying out. Can any one chime in?
I've just bought some pancake style filters from an MG to try and adapt to replace" the knock off pods currently on my bike. Im going to clean them up, and try and adapt them to fit like cafePete's "Lucky 7even".
(http://www.dotheton.com/forum/index.php?topic=10532.330)
If the chrome on them doesn't clean up, I can always just paint them to resemble sidecovers for the bike.
I have looked in to using one of them, just not sure the hump is big enough to hide the battery under....will measure today. Have you had any experience with this battery?
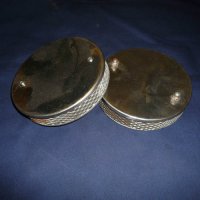
Pretty good condition. I sprayed the backs of them matt black just to cover the rust spots I couldn't clean up but the chrome fronts are in very good condition.
The filters were made for an MG midget, so the manifolds are 1 1/2"....which is smaller than the intake on the standard carbs, so im gonna widen them up a bit.
Pictures of the filters....I cleaned the back up using a brillo pad, then put coat of matt black paint on the back to clean it up.
<img src="http://imageshack.us/a/img706/9240/tjaz.jpg" alt="Image Hosted by ImageShack.us"/>
The fronts polished up quite nicely aswell!
<img src="http://imageshack.us/a/img69/5089/r7py.jpg" alt="Image Hosted by ImageShack.us"/>
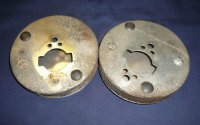
I got the manifolds for them too. They seemed to leave exposed gaps, and came without gaskets. I wasn't sure if the holes were meant to be left after the gasket was on, or they were meant to cover.
<img src="http://imageshack.us/a/img843/7606/8wnz.jpg" alt="Image Hosted by ImageShack.us"/>
So I made my own to cover the gaps.
I used a spare rocker cover gasket I had lying around, and just traced and cut a pair out.
<img src="http://imageshack.us/a/img191/8499/d7ua.jpg" alt="Image Hosted by ImageShack.us"/>
<img src="http://imageshack.us/a/img41/7737/f5dr.jpg" alt="Image Hosted by ImageShack.us"/>
<img src="http://imageshack.us/a/img197/4483/nq6.JPG" alt="Image Hosted by ImageShack.us"/>
<img src="http://imageshack.us/a/img849/7521/i3ht.jpg" alt="Image Hosted by ImageShack.us"/>
The filters will be placed like so once I can find some rubber piping to mount them.
<img src="http://imageshack.us/a/img27/7931/htdz.jpg" alt="Image Hosted by ImageShack.us"/>
<img src="http://imageshack.us/a/img809/6562/k8rr.jpg" alt="Image Hosted by ImageShack.us"/>
Got some pictures of the intense wiring job I have going on. Getting very confused by the wiring. Covering it all in a nice braided cover, which looks the tits!!
<img src="http://imageshack.us/a/img819/6729/1v33.jpg" alt="Image Hosted by ImageShack.us"/>
<img src="http://imageshack.us/a/img543/3452/8ywy.jpg" alt="Image Hosted by ImageShack.us"/>
4
<img src="http://imageshack.us/a/img534/571/a6f9.jpg" alt="Image Hosted by ImageShack.us"/>
<img src="http://imageshack.us/a/img15/8325/8oc8.jpg" alt="Image Hosted by ImageShack.us"/>
Got a few pics of the bike together with a glide coat on the bodywork....still got some filling to do!
<img src="http://imageshack.us/a/img818/8207/rjh8.jpg" alt="Image Hosted by ImageShack.us"/>
<img src="http://imageshack.us/a/img809/2356/a7vc.jpg" alt="Image Hosted by ImageShack.us"/>
<img src="http://imageshack.us/a/img706/230/oxqt.jpg" alt="Image Hosted by ImageShack.us"/>
<img src="http://imageshack.us/a/img837/3635/lptv.jpg" alt="Image Hosted by ImageShack.us"/>
This site uses cookies to help personalise content, tailor your experience and to keep you logged in if you register.
By continuing to use this site, you are consenting to our use of cookies.