We noticed you are blocking ads. DO THE TON only works with community supporters. Most are active members of the site with small businesses. Please consider disabling your ad blocking tool and checking out the businesses that help keep our site up and free.
You are using an out of date browser. It may not display this or other websites correctly.
You should upgrade or use an alternative browser.
You should upgrade or use an alternative browser.
Sakura the Sake Rocket
- Thread starter Swagger
- Start date
Swagger
Putting boot to ass since 1967!
Those coils from Z1 look like just the ticket! I've been wanting a couple blue Bosch VW coils but $15 beats the pants off $50 any day. Also nice, the silver will lend itself to what I have in mind for the exterior treatment. Thanks for pointing those out.
Kiley: I'm right there with you, if it weren't for to idea of the visual element I'd already be set on electronic myself. Fact is I'll likely ditch'm. The tank paint.....well.....got a solid plan for that.
Thanks guys!
Kiley: I'm right there with you, if it weren't for to idea of the visual element I'd already be set on electronic myself. Fact is I'll likely ditch'm. The tank paint.....well.....got a solid plan for that.
Thanks guys!
Swagger
Putting boot to ass since 1967!
Thanks Joey!
Ok, here's another update with all the info (and some boobies) at the blog:
Homagemotoworks blog
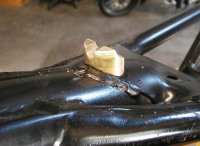
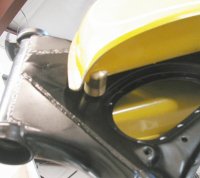
I've been thinking about my tank mounting and there just weren't any good answers coming to me. The Wards/Riverside-Bennelli dirtbike tnak in neato but it's made form some really thin sheet and I tried a couple test beads that blew thru no matter how low I turned my machine so ..... I got a little creative.
The tank will be held to the frame with a leather belt that will match the seat.
Ok, here's another update with all the info (and some boobies) at the blog:
Homagemotoworks blog
I've been thinking about my tank mounting and there just weren't any good answers coming to me. The Wards/Riverside-Bennelli dirtbike tnak in neato but it's made form some really thin sheet and I tried a couple test beads that blew thru no matter how low I turned my machine so ..... I got a little creative.
The tank will be held to the frame with a leather belt that will match the seat.
Attachments

Swagger
Putting boot to ass since 1967!
haplo_84: Yeah I could, there's enough material to work with but I don't think it'll be needed. Just the same, probably not bad to be prepared.....thanks!
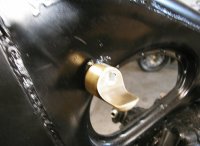
Tim: Yeah I've got some 1/8" d55 silicone that should do great there and some chubby O-rings for around the peg. I will likely solder in some additional surface area to the front mounts too just for shits and giggles.....this tank hold around a gallon and a half so not a lot of weight to worry about....
Tim: Yeah I've got some 1/8" d55 silicone that should do great there and some chubby O-rings for around the peg. I will likely solder in some additional surface area to the front mounts too just for shits and giggles.....this tank hold around a gallon and a half so not a lot of weight to worry about....
haplo_84
Been Around the Block
actually i think i may have just had a stroke of genius depending on if you can fo this. But ig you where to machine it in such a way that it slots into a divot in the brass clip so that when you bolt it down it locks into place that way there would be no need for a clip. Idk if that made sense or not?
 lightbulb came on*, to bad my ability and lack of tools prevents me from following through on my ideas.
schaubster
Been Around the Block
looking good!
Swagger
Putting boot to ass since 1967!
Thanks, it's starting to imply 'motorcycle' again instead of 'heap-o-parts'.
After listening to several people tell me I'm a moron and (unfortunately for my ego) also point out exactly HOW I'm a moron, it looks like I'll be redoing the mounting. Same setup just a little more developed. I'll be implementing Haplo's rear peg locking idea (that's a good one) and redoing the front mounts to allow for larger bottom contact pads. My plan was to build up a silicone rubber 'pad' to take the vibration so the crap tank material doesn't fatigue and die. I just didn't leave enough surface area this time around so they'll have to be redone.
damnit........
Swagger
Putting boot to ass since 1967!
I haven't had much time to mess with the project, lots of work and such....that's a good thing. Oh...and Dad decided to climb his 69 year old butt up a ladder then fall off his roof...so there's that.
But....I did have time to do a little work this afternoon.....
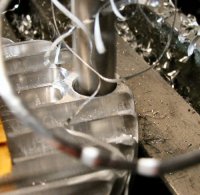
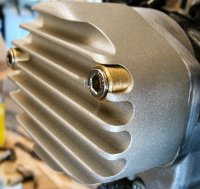
I made the finned bits you see in these pics and am in the process of making matching motor mount plates because fins make it faster.....right? RIGHT!! By making I mean I've painted dyechem on a piece of aluminum and scribed all the important cut lines....and propped the entire thing up against the wall with the intentions of getting 'round to it'....soon(?)
These parts are sand blasted post process..
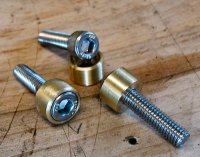
In the mean time, I decided she needed a little contrast so I added some pretty brass bits just for giggles.
Unfortunately the camera I'm using in the shop (crappy old D510) makes the otherwise lovely patina on the cases look like shit so I'll likely be yanking hte engine and painting then at some point....soon(ish?)
But....I did have time to do a little work this afternoon.....
I made the finned bits you see in these pics and am in the process of making matching motor mount plates because fins make it faster.....right? RIGHT!! By making I mean I've painted dyechem on a piece of aluminum and scribed all the important cut lines....and propped the entire thing up against the wall with the intentions of getting 'round to it'....soon(?)
These parts are sand blasted post process..
In the mean time, I decided she needed a little contrast so I added some pretty brass bits just for giggles.
Unfortunately the camera I'm using in the shop (crappy old D510) makes the otherwise lovely patina on the cases look like shit so I'll likely be yanking hte engine and painting then at some point....soon(ish?)
Attachments
Swagger
Putting boot to ass since 1967!
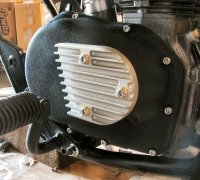
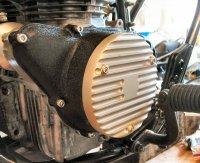
Top = timing cover
middle = oil filter cover
bottom = stator cover
The oil filter cover was an amazing pain in the ass to make, as the engine oil passes thru this piece like some kind of crazed Rube Goldberg bad dream. In this case the fins are functional as an oil cooler. I think it's neato but I'll never make another unless someone throws GIANT piles of money at me. It's got roughly 220% the surface area of the original flat piece so can only help...
Swagger
Putting boot to ass since 1967!
Thanks Rich! I promise you're manifolds are coming I could just sneak a few minutes on this one.....
For general edification, the brass 'cup washers(?)' are inset into the aluminum 4mm deep. Here's the only pic I have of that particular piece of the puzzle:
For general edification, the brass 'cup washers(?)' are inset into the aluminum 4mm deep. Here's the only pic I have of that particular piece of the puzzle: