
We noticed you are blocking ads. DO THE TON only works with community supporters. Most are active members of the site with small businesses. Please consider disabling your ad blocking tool and checking out the businesses that help keep our site up and free.
You are using an out of date browser. It may not display this or other websites correctly.
You should upgrade or use an alternative browser.
You should upgrade or use an alternative browser.
1976 CB360t Slightly modded, restored to roadworthiness - Workin' on Beauty
- Thread starter mydlyfkryzis
- Start date
mydlyfkryzis
当有疑问时踢你的敌人在生殖器上,你可以道歉后
1976 CB360t Slightly modified restore to roadworthiness - Beauty later project
Carbs are 100 % stock. I looked at the plugs yesterday and they are textbook right on color.
The old MAC exhaust is pretty long, which I believe helps and I am using 4 inch long UNI foam filters.
Sent from planet Earth using mysterious electronic devices and Tapatalk
Carbs are 100 % stock. I looked at the plugs yesterday and they are textbook right on color.
The old MAC exhaust is pretty long, which I believe helps and I am using 4 inch long UNI foam filters.
Sent from planet Earth using mysterious electronic devices and Tapatalk
Re: 1976 CB360t Slightly modified restore to roadworthiness - Beauty later project
Nice, Mine seems to like the new uni filters as well.
mydlyfkryzis said:Carbs are 100 % stock. I looked at the plugs yesterday and they are textbook right on color.
The old MAC exhaust is pretty long, which I believe helps and I am using 4 inch long UNI foam filters.
Sent from planet Earth using mysterious electronic devices and Tapatalk
Nice, Mine seems to like the new uni filters as well.
mydlyfkryzis
当有疑问时踢你的敌人在生殖器上,你可以道歉后
Re: 1976 CB360t Slightly modified restore to roadworthiness - Beauty later project
I've been fiddling around with stuff. Finding time has been hard, but I've made a little progress.
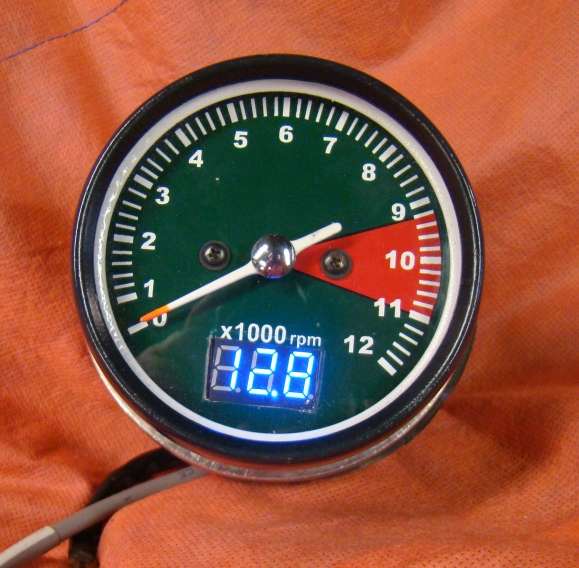
First, I finished the Tachometer restore with Voltmeter. I haven't installed it on the bike yet, but it is together and I am happy with the results.
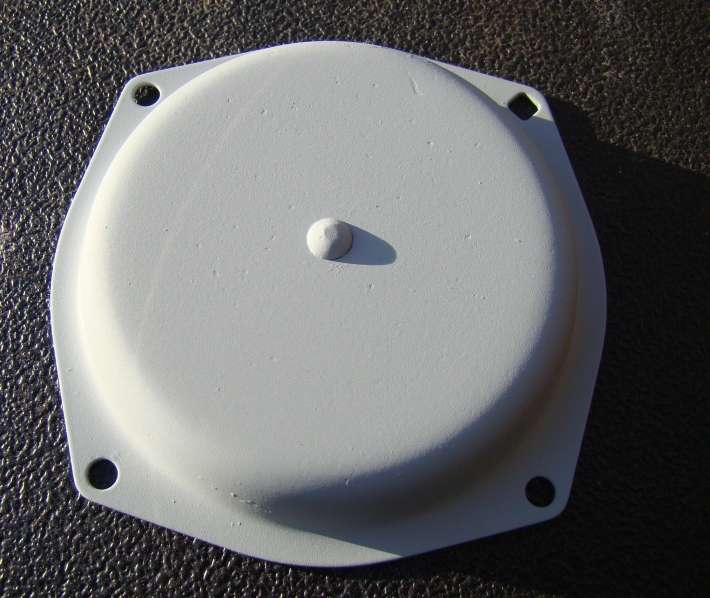
Next on the agenda are those horribly rusted Carburetor Diaphragm Covers. I have seen various treatments, painting, krinkle paint, colors. I'd like original chrome, but just a reasonable shiny look would do.
So I tried this:
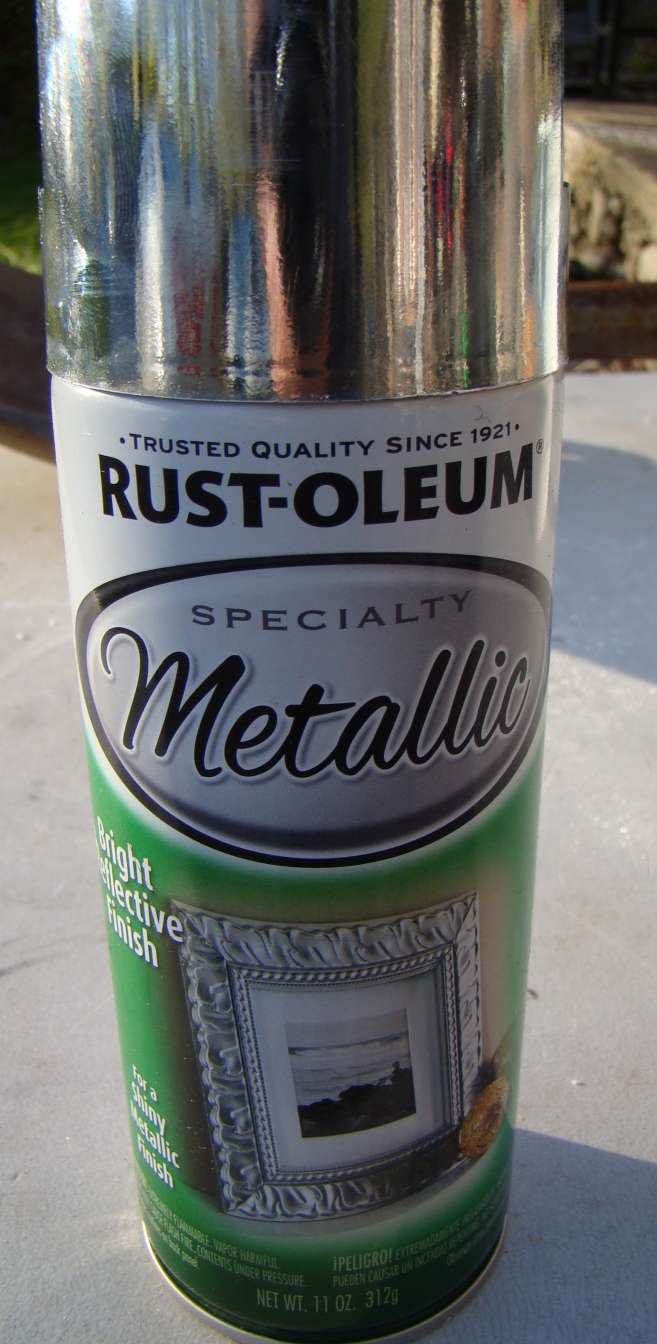
I know it won't look like chrome, but maybe it will be better then "silver".
So I took a spare Carb top cover off:

Then I wire brushed it and sanded it with my B&D Mouse and 220 Grit, then some 400 grit to smooth it a little.

I primed it with rustoleum automotive primer
Then painted with a liberal amount of the Rustoleum Metallic paint.
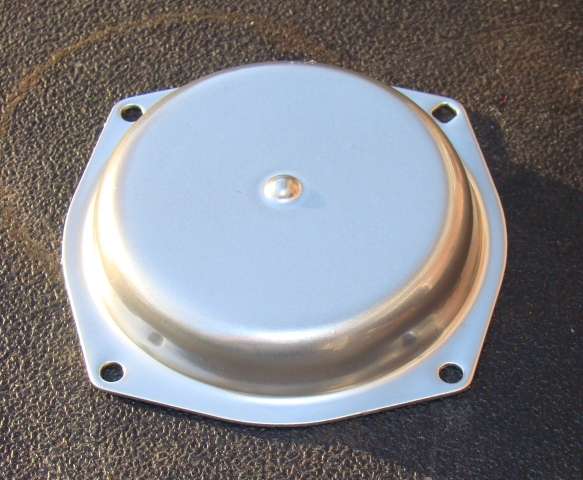
It does not look chrome. It does look like reasonably shiny metal, and much nicer then the rusty and pockmarked original.
I am going to do both Tops like this, and I post pics when she is done. I am Happy with the results.
I've been fiddling around with stuff. Finding time has been hard, but I've made a little progress.
First, I finished the Tachometer restore with Voltmeter. I haven't installed it on the bike yet, but it is together and I am happy with the results.
Next on the agenda are those horribly rusted Carburetor Diaphragm Covers. I have seen various treatments, painting, krinkle paint, colors. I'd like original chrome, but just a reasonable shiny look would do.
So I tried this:
I know it won't look like chrome, but maybe it will be better then "silver".
So I took a spare Carb top cover off:
Then I wire brushed it and sanded it with my B&D Mouse and 220 Grit, then some 400 grit to smooth it a little.
I primed it with rustoleum automotive primer
Then painted with a liberal amount of the Rustoleum Metallic paint.
It does not look chrome. It does look like reasonably shiny metal, and much nicer then the rusty and pockmarked original.
I am going to do both Tops like this, and I post pics when she is done. I am Happy with the results.
mydlyfkryzis
当有疑问时踢你的敌人在生殖器上,你可以道歉后
Did some more work today:
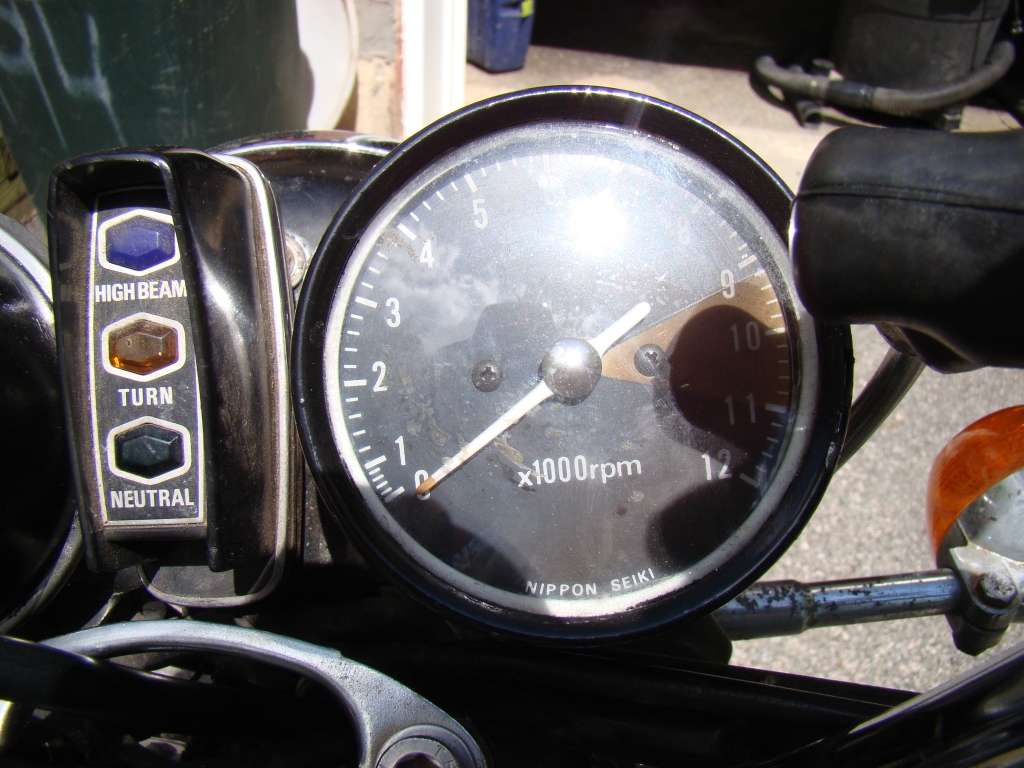
Old Tachometer:
"New" Tach:
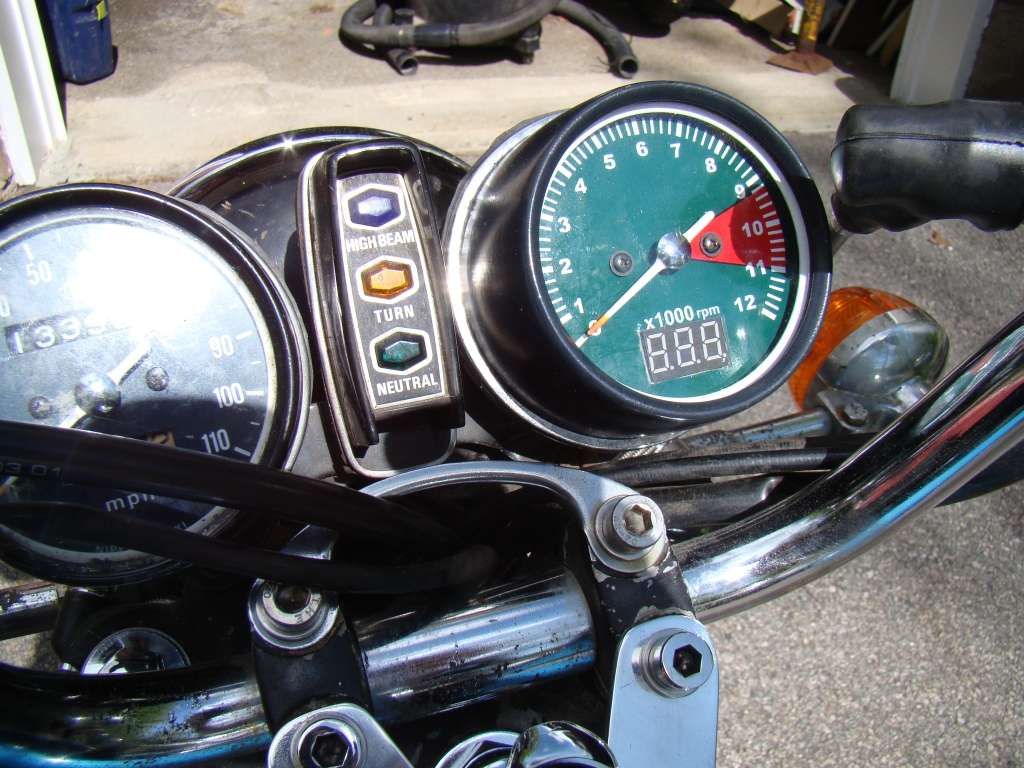
The Voltmeter is hooked to the unused brown wire in the headlight Shell. The voltage read is about 1 volt less then battery voltage. So I am just going to add "1" to whatever I read. Amazing the voltage drop through the harness and grounds. I checked the volts with my Fluke Meter and it read the same, so the voltage drop is real. I will work on that as time goes by..
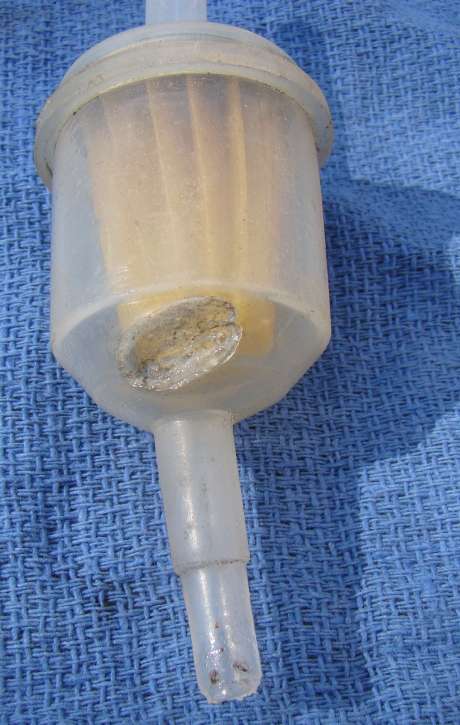
I learned to be careful where you route your fuel lines. I know better, but didn't notice. I was running the bike today and I smelled fuel. The fuel filter was touching a cooling fin and melted:
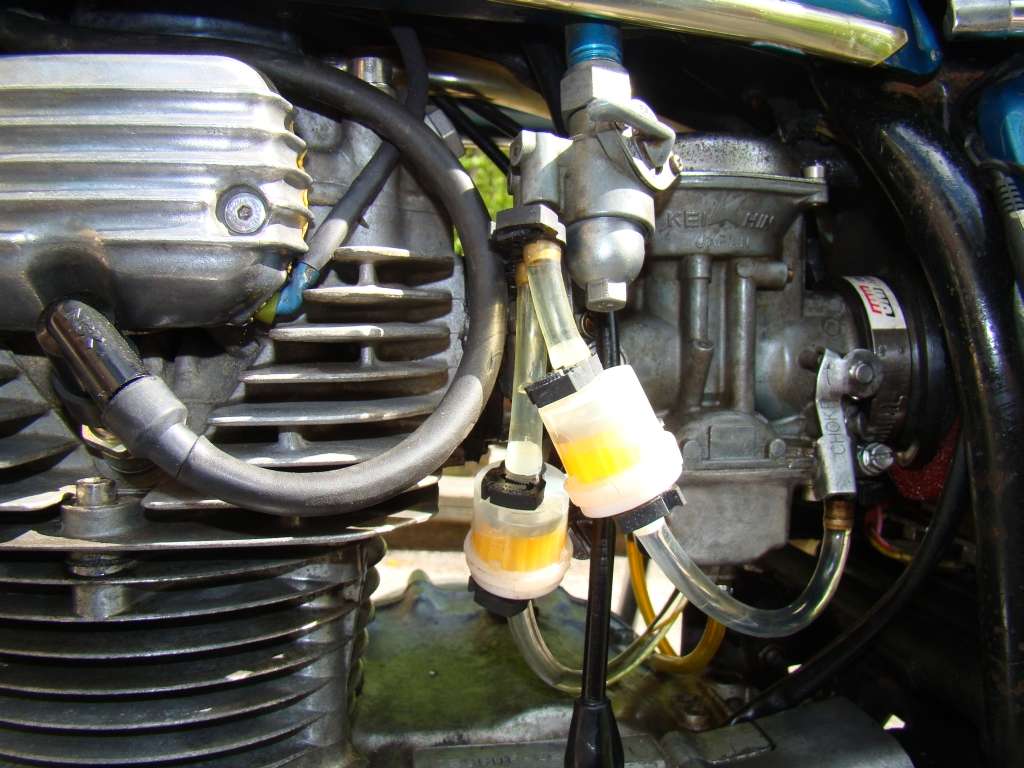
I replaced the filters with smaller ones. I also replaced the Tygon fuel lines. the Tygon was advertised as ethanol resistant and better then PVC. The Tygon lines are all rubbery feeling and are stretching out. So they are replaced and I used my new nylon clamps. Should be no more fuel leaks for me.
I showed pictures of my headlight mod, but I never showed the front. The 5 1/4 inch car headlight with 35/35W H4 works well, but I am not happy with the gap in the front.
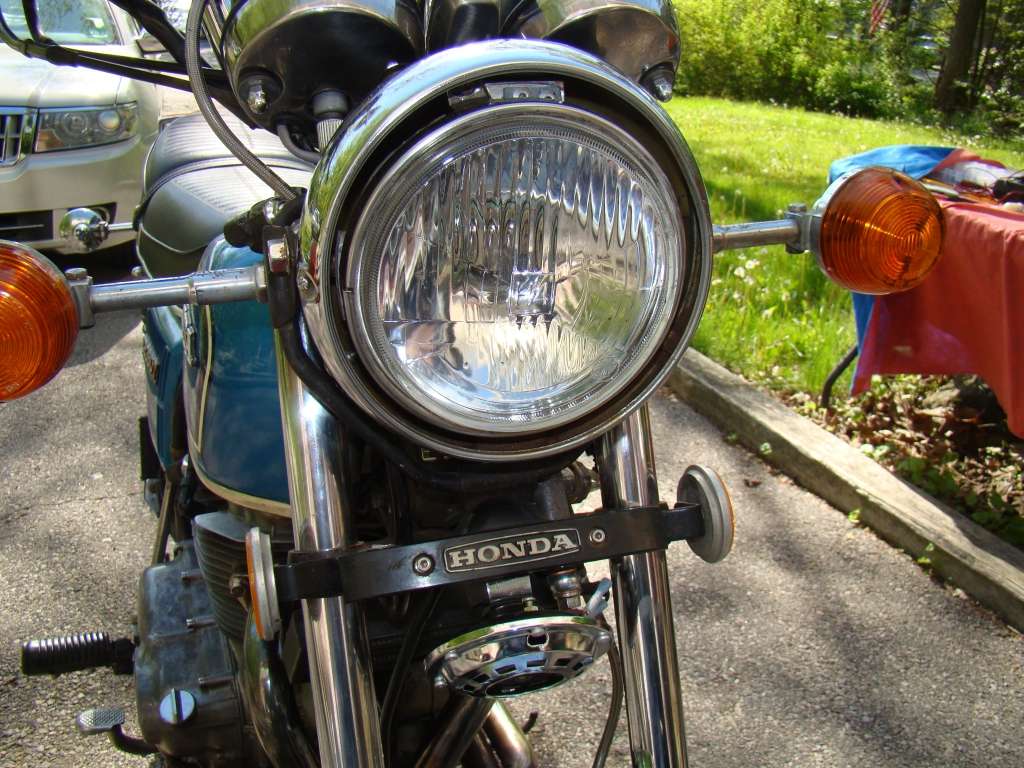
Something to work on later. Maybe a new Headlight and shell. Dime City as a 6 1/2 inch headlight with shell, that is same size as stock but will be H4 and look like a new Honda part...On my wishlist.
Finally, just an overall front shot. You can see the "new" fender from a guy on DTT.
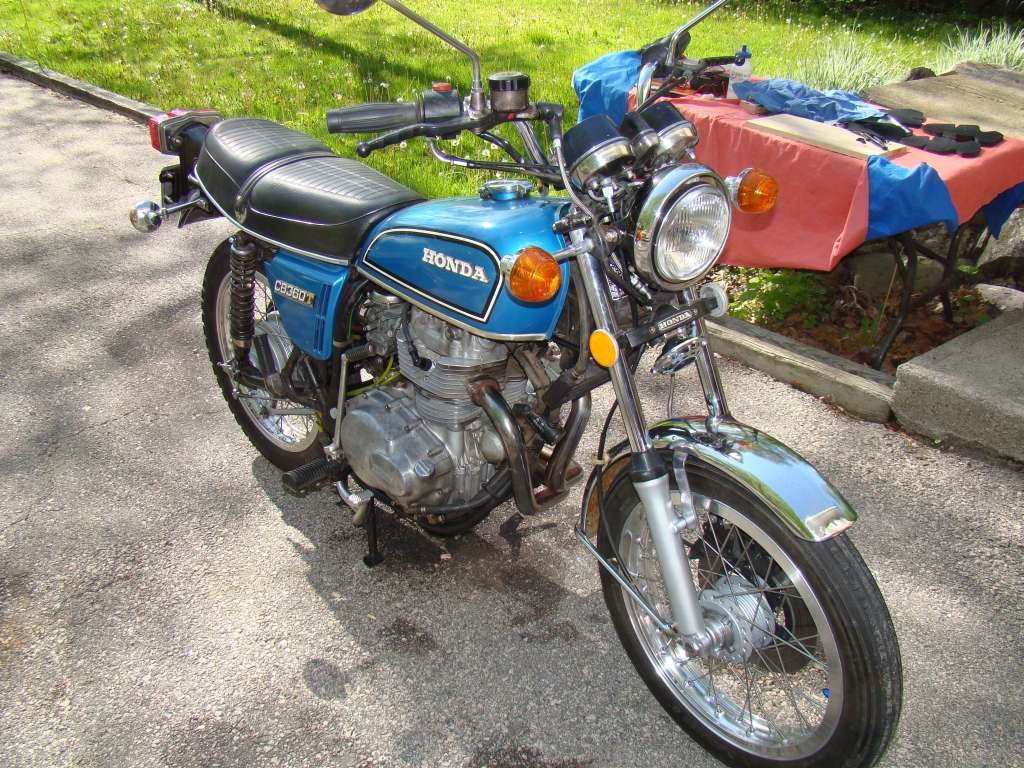
Sophie is running well, started right up today....
Need to go for a ride....
Old Tachometer:
"New" Tach:
The Voltmeter is hooked to the unused brown wire in the headlight Shell. The voltage read is about 1 volt less then battery voltage. So I am just going to add "1" to whatever I read. Amazing the voltage drop through the harness and grounds. I checked the volts with my Fluke Meter and it read the same, so the voltage drop is real. I will work on that as time goes by..
I learned to be careful where you route your fuel lines. I know better, but didn't notice. I was running the bike today and I smelled fuel. The fuel filter was touching a cooling fin and melted:
I replaced the filters with smaller ones. I also replaced the Tygon fuel lines. the Tygon was advertised as ethanol resistant and better then PVC. The Tygon lines are all rubbery feeling and are stretching out. So they are replaced and I used my new nylon clamps. Should be no more fuel leaks for me.
I showed pictures of my headlight mod, but I never showed the front. The 5 1/4 inch car headlight with 35/35W H4 works well, but I am not happy with the gap in the front.
Something to work on later. Maybe a new Headlight and shell. Dime City as a 6 1/2 inch headlight with shell, that is same size as stock but will be H4 and look like a new Honda part...On my wishlist.
Finally, just an overall front shot. You can see the "new" fender from a guy on DTT.
Sophie is running well, started right up today....
Need to go for a ride....
mydlyfkryzis
当有疑问时踢你的敌人在生殖器上,你可以道歉后
Here's my favorite shot:
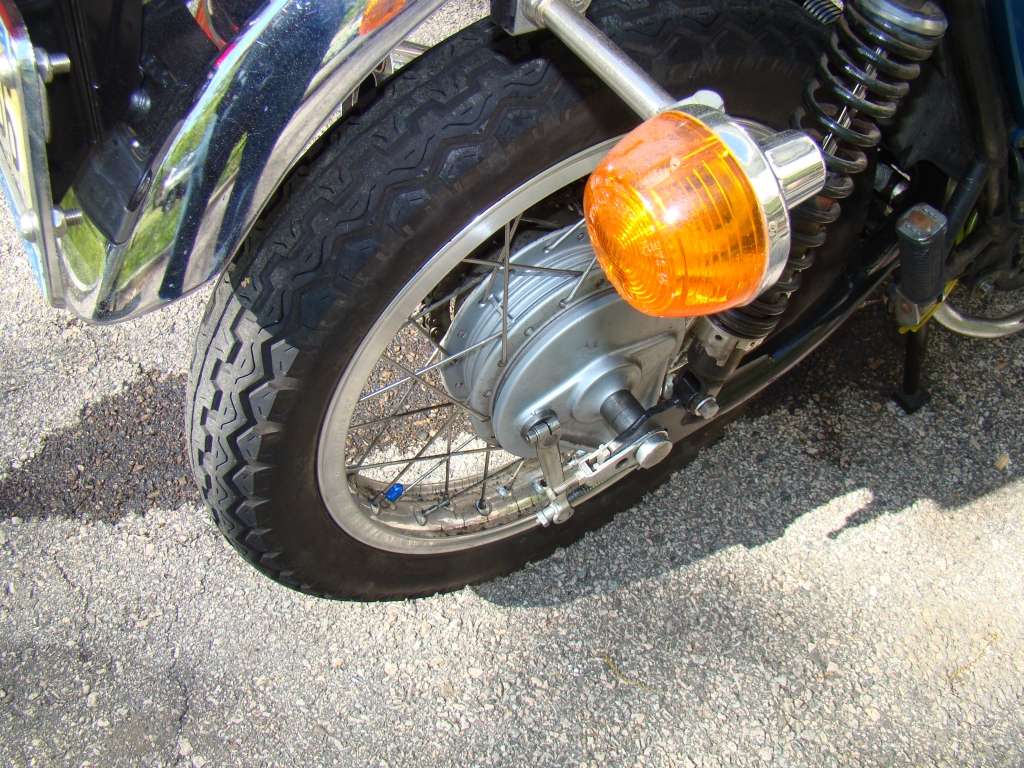
The rear wheel is getting filthy from the oil from the new chain being thrown off....Dirt from riding is a good thing!!!!
The rear wheel is getting filthy from the oil from the new chain being thrown off....Dirt from riding is a good thing!!!!
mydlyfkryzis
当有疑问时踢你的敌人在生殖器上,你可以道歉后
The countershaft seal is dry. the chain was from Dime City Cycles. It was heavily oiled in the plastic bag. Most of that was from the first 20 miles or so...I've gone about 120 now. I need to clean it up, it has flung most of it off now. Real chain Lube will not fling off so bad.
mydlyfkryzis
当有疑问时踢你的敌人在生殖器上,你可以道歉后
when this chain/sprocket wear out, I think I am going to grab the 520 conversion setup from Motomadness. The o-ring chains are a lot better and require less lubrication. My NH750 still has the original 0-ring chain on with nearly 25K miles on it. I had it off not to long ago and cleaned and examined it. All the o-ring are intact and there are no stiff spots.
The 520 will be lighter and stronger the the "heavy Duty" 530 chain. Of course, the DCC chain was only $24. But the o-ring is a good deal.
The 520 will be lighter and stronger the the "heavy Duty" 530 chain. Of course, the DCC chain was only $24. But the o-ring is a good deal.
mydlyfkryzis
当有疑问时踢你的敌人在生殖器上,你可以道歉后
I bought mine in 1980 from JCWhitney. The brand was not listed, but the instructions and box Said MAC on them. They may of been special for Whitney the time I also bought the finned alternator cover at that time.
Sent from planet Earth using mysterious electronic devices and Tapatalk
Sent from planet Earth using mysterious electronic devices and Tapatalk
mydlyfkryzis
当有疑问时踢你的敌人在生殖器上,你可以道歉后
Been Busy traveling with work, foul weather when home, and a busy personal life. Still have some remaining improvements to do.
A a high note, my son just made Eagle Scout. Really proud of him.
I am on vacation next week, so Sophie will get some attention and some fresh pictures posted.
A a high note, my son just made Eagle Scout. Really proud of him.
I am on vacation next week, so Sophie will get some attention and some fresh pictures posted.
mydlyfkryzis
当有疑问时踢你的敌人在生殖器上,你可以道歉后
I am not thrilled with the fuel line setup.... I am considering using copper, and use the vinly tubing at the connections. I also have some 1/4 inch copper elbows and tees (from pneumatic control systems). So I will change this to something neater, cleaner when I have the chance. It is working pretty well now. No flow issues, and the filters aren't rubbing on anything.
thanks for the tip though...
thanks for the tip though...
mydlyfkryzis
当有疑问时踢你的敌人在生殖器上,你可以道歉后
Just a quick update. This past weekend I managed to weld a new tab for the left side stock airbox. Painted the repair, and installed the stock airbox and filters. The Airboxes were from a rider on DTT. They had new filters in them too. So for now, I have the OEM filters in there. Bike runs great with them.
I'll have some pictures shortly. I took pics, but haven't uploaded them off the camera yet.
I have 2 older airfilters, so I am going to start converting them to foam. I will document that too...
I'll have some pictures shortly. I took pics, but haven't uploaded them off the camera yet.
I have 2 older airfilters, so I am going to start converting them to foam. I will document that too...


