
We noticed you are blocking ads. DO THE TON only works with community supporters. Most are active members of the site with small businesses. Please consider disabling your ad blocking tool and checking out the businesses that help keep our site up and free.
You are using an out of date browser. It may not display this or other websites correctly.
You should upgrade or use an alternative browser.
You should upgrade or use an alternative browser.
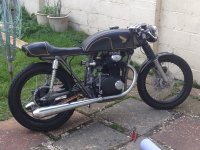
'73 CB250 - Doing it right this time round.
- Thread starter Green199
- Start date
 But I will be pushing on with it soon - Hopefully! hahaha
Wow. Well my exams start tomorrow, so thought id take a break from revising and do a bit of work on the bike.
No more progress on the front end upgrade at the minute, don't have time to get in the workshop to machine a new steering stem.
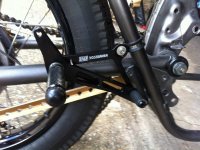
But I did order some rear sets from a company called CarbonMoto in the UK. Really I got them because they were cheap, and I really didn't trust using ones from Thailand. They aren't too bad quality wise, just a few slight machining errors like countersinks being on the wrong side, but other than that they seem ok.
I have mounted them using a P-clip on the upper mount for the time being until I can weld a new mount on in the workshop. Even with the P-clip they seem to be mounted securely and don't move at all. (tested them by jumping around for 15 mins on them! haha).
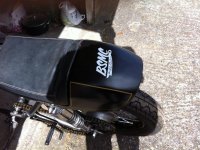
I also got a few stickers from The Bike Shed here in London, so they took pride of place on the tail and mudguard, ready to be cleared over.
No more progress on the front end upgrade at the minute, don't have time to get in the workshop to machine a new steering stem.
But I did order some rear sets from a company called CarbonMoto in the UK. Really I got them because they were cheap, and I really didn't trust using ones from Thailand. They aren't too bad quality wise, just a few slight machining errors like countersinks being on the wrong side, but other than that they seem ok.
I have mounted them using a P-clip on the upper mount for the time being until I can weld a new mount on in the workshop. Even with the P-clip they seem to be mounted securely and don't move at all. (tested them by jumping around for 15 mins on them! haha).
I also got a few stickers from The Bike Shed here in London, so they took pride of place on the tail and mudguard, ready to be cleared over.
Attachments

SHE LIVES!
Finally, after 2 years on/off work, she is running. Found out the spark advancer was 180 degrees out. Disassembled and put it on, fired up after 2 or 3 kicks.
I still need to fine tune A LOT. Got a few fuel leaks, need to sync the carbs again and adjust the idle, as well as solder an end on to my throttle cable.
Don't worry, the Pods will be gone too....only things I had laying around to stop bugs getting sucked in.
http://youtu.be/Gdc7KyeqM-Q
Fine tuned the idle this morning so she's purring nicely.
I have quite a bit of tappet noise going on though. The head will be coming off soon to replace with a ported one with brand new valves in. I also plan to safety wire the cam bolts.
What is the main cause for tappet knocking?
I will get a video of the noise up soon...
I have quite a bit of tappet noise going on though. The head will be coming off soon to replace with a ported one with brand new valves in. I also plan to safety wire the cam bolts.
What is the main cause for tappet knocking?
I will get a video of the noise up soon...
I Pm'd crazypj asking about the off the clearances Kop, but he came back with nothing.
He DID tell to ensure that I was setting he gap on TDCC and not TDC.
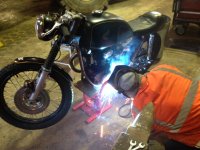
I actually had some NOS valves delivered recently so thought I would take the head of and install them this morning. On reassembly, I had another go at setting the valve clearances using PJ's words of wisdom.
Made sure I was absolutely at TDC of the compression and didn't 'overlap' slightly.
Fired her up a minute ago and she is running much quiter, and sounds mean! haha
I'll put a comparison video up soon showing the lack of valve knock.
He DID tell to ensure that I was setting he gap on TDCC and not TDC.
I actually had some NOS valves delivered recently so thought I would take the head of and install them this morning. On reassembly, I had another go at setting the valve clearances using PJ's words of wisdom.
Made sure I was absolutely at TDC of the compression and didn't 'overlap' slightly.
Fired her up a minute ago and she is running much quiter, and sounds mean! haha
I'll put a comparison video up soon showing the lack of valve knock.
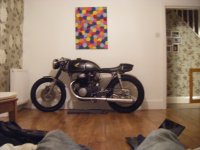
Just relocated to start a new job as a Design Engineer for Triumph.
I moved into an empty house so thought I would put some 'art' in and liven the place up!
Still just need to finish my wiring loom, and shorten the throttle/clutch cables and she's good to go!
I moved into an empty house so thought I would put some 'art' in and liven the place up!
Still just need to finish my wiring loom, and shorten the throttle/clutch cables and she's good to go!
Attachments
deepwaterimports
Over 1,000 Posts
Mate I have been wanting to put my bike in the house for a year now you are a strong man. I would be in the dog house for sure if I did. one day one day my kahunas will be as big as yours
deepwaterimports said:Mate I have been wanting to put my bike in the house for a year now you are a strong man. I would be in the dog house for sure if I did. one day one day my kahunas will be as big as yours
Haha I decided to do it when the Girlfriend was away for a week. We'll see if it stays when she gets back! ;D
xb33bsa said:like your 250
be sure and check the camshaft endplay it will make noise if too much
go ahead and set it to the very low end on the tolerance
you can do the check and setting on the bench,before final assembly, with just the rocker box, cam and end housings
Thanks very much!
I checked the endplay before final assembly a while ago. It think it was in spec, but I can't remember the exact value. The change of valves and timing made it much less noisey than it was originally.
Is it something I should double check??
Green199 said:Haha I decided to do it when the Girlfriend was away for a week. We'll see if it stays when she gets back! ;D
Thanks very much!
I checked the endplay before final assembly a while ago. It think it was in spec, but I can't remember the exact value. The change of valves and timing made it much less noisey than it was originally.
Is it something I should double check??
well it is quite easy to check even with a fully assembled motor
dial indicator to the end of the advancer bolt and pull back and forth with vise grips
teazer said:Congrats on the job with Triumph.
Thank you very much Teazer, my real world engineering is much better than my attempt at piecing together a cheap bike without tools! haha
xb33bsa said:well it is quite easy to check even with a fully assembled motor
dial indicator to the end of the advancer bolt and pull back and forth with vise grips
Ahh good shout, thanks or the advice. Ill check it before I next run it. Still working on the wiring loom at the minute.
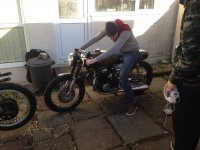
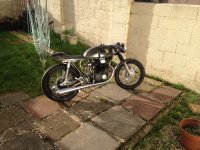
Well, its been a while since i've updated this.
I haven't done too much since last time, but I have a semi complete wiring loom. The only thing left to wire up are my switches, indicators, rear brake and speedometer. I have created all the wiring runs, just need to cut them length and crimp connectors on.
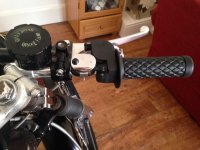
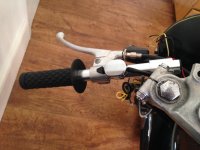
I have also mounted my seat now using rivnuts on the underseat pan. A few other details have been changed, like the grips (Biltwell Thrusters), the Lucas style switches on both clip-ons, the Domino throttle housing and the new fuel lines and filters.
Also just had the stock side-stand welded on as the threads for the 2 mounting bolts were beginning to strip and I wanted it to be solid.
Still got to sort the mount for my speedometer (universal 2 1/2"), the rear brake arm and the rear brake switch.
I haven't done too much since last time, but I have a semi complete wiring loom. The only thing left to wire up are my switches, indicators, rear brake and speedometer. I have created all the wiring runs, just need to cut them length and crimp connectors on.
I have also mounted my seat now using rivnuts on the underseat pan. A few other details have been changed, like the grips (Biltwell Thrusters), the Lucas style switches on both clip-ons, the Domino throttle housing and the new fuel lines and filters.
Also just had the stock side-stand welded on as the threads for the 2 mounting bolts were beginning to strip and I wanted it to be solid.
Still got to sort the mount for my speedometer (universal 2 1/2"), the rear brake arm and the rear brake switch.
Attachments

Re: '73 CB250 - Fresh powder!
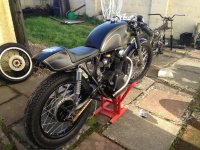
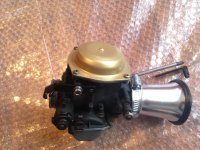
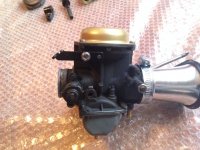
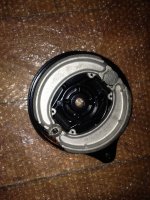
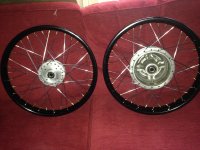
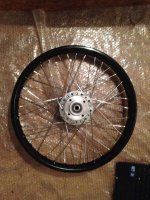
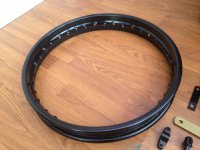
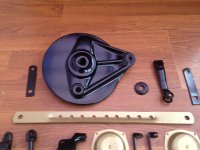
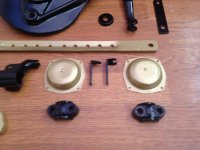
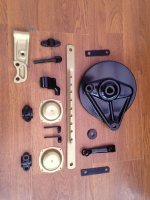
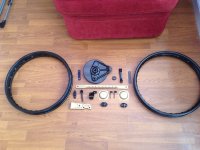
The paint on my rims started to chip and peel. so thought I may as well get some powder work done. Got quite a few small bits coated in gloss black, and redid all the gold parts in powder too.
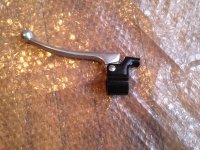
I also finally got rid of the ridiculously long brake hose I had, and bought a shorter Venhill braided hose.
Just need to re-true my rims, then I have a set of Avon Roadriders ready to mount up. Got stainless bolts on the way for the caliper to replace the corroded ones, some for the carb bowls and diaphram covers and some for the brake disk and rear sprocket.
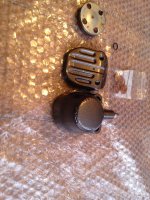
Also, the coated laid powder on the inside of my brake plate as you can see in the pictures. Is this ok or should the powder be removed?
The paint on my rims started to chip and peel. so thought I may as well get some powder work done. Got quite a few small bits coated in gloss black, and redid all the gold parts in powder too.
I also finally got rid of the ridiculously long brake hose I had, and bought a shorter Venhill braided hose.
Just need to re-true my rims, then I have a set of Avon Roadriders ready to mount up. Got stainless bolts on the way for the caliper to replace the corroded ones, some for the carb bowls and diaphram covers and some for the brake disk and rear sprocket.
Also, the coated laid powder on the inside of my brake plate as you can see in the pictures. Is this ok or should the powder be removed?
Attachments
-
 379.JPG1 MB · Views: 221
 -
 382.JPG2.4 MB · Views: 201
 -
 385.JPG1.4 MB · Views: 208
 -
 388.JPG1.3 MB · Views: 221
 -
 390.JPG1.6 MB · Views: 227
 -
 391.JPG1.5 MB · Views: 229
 -
 378.JPG1 MB · Views: 210
 -
 375.JPG1.6 MB · Views: 210
 -
 373.JPG1.2 MB · Views: 208
 -
 371.JPG2.2 MB · Views: 221
 -
 370.JPG1.8 MB · Views: 197
 -
 369.JPG1.8 MB · Views: 207
 -
 368.JPG991.5 KB · Views: 217
 -
 367.JPG2.1 MB · Views: 219
 -
 392.JPG2.1 MB · Views: 202
Maritime
Over 10,000 Posts
Nice, I am about to get 2 wheels, drum cover and springs done in gloss black, I read the email for this post and thought crap that sucks about powder in the drum, but just on the back of the cover should be ok, if it was the in the hub on the drum friction surface, that would be bad. Looks good.
Maritime said:Nice, I am about to get 2 wheels, drum cover and springs done in gloss black, I read the email for this post and thought crap that sucks about powder in the drum, but just on the back of the cover should be ok, if it was the in the hub on the drum friction surface, that would be bad. Looks good.
Yeah i'm hoping its alright on the brake plate. I was just thinking if any on the inside was to chip or peel off and go between the shoes and brake surface that it will affect brake performance. We shall see haha.
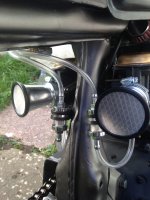
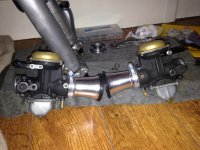
xb33bsa said:lots of pretty parts
....but if you are concerned about performance then you need to yank the screens outta those stacks it will never pass enough air for hp at larger throttle openings and the screens do nothing but keep out low flying birds anyway
More about if the brake would just stop working really. But I will be looking at the engine performance once I get it back on the road.
Would the filters be better placed at the bottom of the stack, close to the carb?
I only really went with stacks because I didn't want cheap pods, and the mounts for the stock airbox had already been remved when I bought it, so I just removed the other side too.
Can the CB250/350 run well with velocity stacks?


