'74 CB 125 1st Build

Haha, I had a lot going on and couldn't get any work done. But now I'm living alone for a month and should be able to finish it up quick!

I probably won't have time to give this one away. But Project2Wheels will be giving away bikes in the near future. I figured out a decent business plan to still be able to make money. It will allow me to work on more projects, learn, and build my reputation.

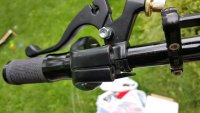
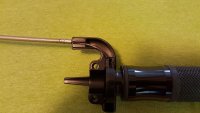
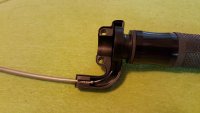
In the meantime I'm stumped by some simple stuff. I'm changing from a throttle slide to a "normal" throttle so I can switch bars. I got a kit, but the cables don't seem to line up right. Here is my list of questions.

1. Why are there 2 places for the cable to go in? I've seen some bikes that have 2 cables, one to pull back? Anyway, can I get away with just using 1?

2. Am I missing that little screw tightener thing where the cable meets the throttle?

3. Do I need new cables?

4. How do measure and order new cables that will fit?

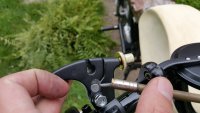
5. The brake cable really doesn't fit, if I disconnect it from the brake will it give me slack to slide into the lever? Or do I just need to order a new cable there too?

Thanks!
 

Attachments

  • 20150619_134009.jpg
    20150619_134009.jpg
    5.1 MB · Views: 219
  • 20150619_135138.jpg
    20150619_135138.jpg
    6.4 MB · Views: 226
  • 20150619_135035.jpg
    20150619_135035.jpg
    6.1 MB · Views: 220
  • 20150619_133955.jpg
    20150619_133955.jpg
    5 MB · Views: 229
  • 20150619_134300.jpg
    20150619_134300.jpg
    2.3 MB · Views: 222
I also fixed the side covers. I think I have one more layer to go on the tank to get the right shape, then its just time to get it perfectly smooth.

Here are the side covers.
 

Attachments

  • 20150609_125115.jpg
    20150609_125115.jpg
    1.3 MB · Views: 209
  • 20150609_151709.jpg
    20150609_151709.jpg
    1.4 MB · Views: 227
  • 20150609_151816.jpg
    20150609_151816.jpg
    5.7 MB · Views: 208
I'm trying to use the stock seat pan and foam, but am not very good at this stuff. I cut the foam in half and will probably use the bottom layer since it wraps around the pan. I'll probably shape it a bit more, then cut a thin layer from the top piece to have a nice flat surface (no holes). I plan on grabbing some faux leather and simply wrapping it tight. If it sucks, I'll try to sew some patterns into it.

I really don't want the seat to be that long or wide but the screws to hold the pan in place are right near the end of it, and there seems to be little room to narrow it down. Any tips on how to solve these problems?

I also decided to go with brushed aluminum instead of mirror finish on the engine parts. After taking the picture I spent a little more time getting the lines straight.
 

Attachments

  • 20150619_165636.jpg
    20150619_165636.jpg
    5 MB · Views: 214
  • 20150619_172427.jpg
    20150619_172427.jpg
    6.7 MB · Views: 196
  • 20150619_172418.jpg
    20150619_172418.jpg
    4.9 MB · Views: 221
It's time to make the seat. It was far to big so I tried to narrow it down by trimming the sides. After 2.5 hours and 15 heavy duty dremel wheels it was done. Yeah I know now, don't use a dremel. I spent a long time cutting the original padding to try to make it fit with the pan. The whole thing never felt right, but I needed the pan for it's connection points to the frame. Then, when I finally removed the helmet lock I noticed two bolt holes much further up the frame!


I decided to cut the frame off with a hack saw, which was surprisingly simple. And started back at it with the masking tape method in mind. I added some cardboard to the sides to get the disired width. The dome is a gardening styrofoam ball that I hacked up. It is hardly still spherical, but its a decent base to build from. It's still taller than I'd like. I might take the mold I make from this and fill it with a filler foam, sand that to a more perfect shape, and reglass it.

If you check out the last two pictures it is clear how important cutting the frame was. It is odd and long/big before.


Off to lay some fiberglass! Wish me luck, like everything else I'm doing, I've never done it before.
 

Attachments

  • 20150624_102253.jpg
    20150624_102253.jpg
    8.1 MB · Views: 213
  • 20150624_100619.jpg
    20150624_100619.jpg
    8.3 MB · Views: 184
  • 20150624_085604_001.jpg
    20150624_085604_001.jpg
    1.3 MB · Views: 189
  • SeatPanDark copy.jpg
    SeatPanDark copy.jpg
    1.5 MB · Views: 205
  • Right Side Foam.jpg
    Right Side Foam.jpg
    2.3 MB · Views: 213
  • Dome on pan side.jpg
    Dome on pan side.jpg
    2 MB · Views: 211
  • Right foamy bright.jpg
    Right foamy bright.jpg
    2.4 MB · Views: 188
Looking good bud. Did you use epoxy on the cracked side covers? I'm trying jb weld plastic welder. Seems pretty tough, but haven't snapped them on or off the bike yet.
 
Yeah, I'd like to know the results too.

I've got a few side covers for my 750 that are cracked.

The 100 I have is missing the right side......hint....hint.....looking for covers for the CB100, 1972.

But.......dayyyyyum...that seat and tank is coming along.
 
Make sure of wheel/seat clearance otherwise you could go over a big bump and the back wheel will reprofile your arse crack ;)
 
I used a high quality body filler on the side covers. The one that is cracked down the middle however recracked as I pushed it into place. I'm sure I could have been more gentle as I wasn't thinking about it, but it flexes too much, now I see why the previous owner glued a washer to the back of it.

I went to make my seat pan today out of fiberglass. I spent a good hour cutting pieces to fit, going over how to's etc. Then I opened my resin and it was jelly. It became near impossible to work with. I didn't take any picutres as I was covered in resin, but I'm uploading a video as we speak.
 
Erskine said:
Make sure of wheel/seat clearance otherwise you could go over a big bump and the back wheel will reprofile your arse crack ;)

Thanks, I left around 3 inches maybe more. It looks similar to where the old fender was.

**EDIT** I forgot I had removed the rear springs by the time I made my final measurements. So I'm sure the wheel is indeed going to be too close. It doesn't matter though. I accidentally bought fiberglass jelly instead of resin. It was nearly impossible to spread. I'll be trying again on monday. Yes, I have to wait until monday because I work with food and can't have glassy fibers in peoples food.

P.S. F.U. fiberglass. In my bed, clothes, drinking water, etc.
 
Ok, all the body filling is done! Well, I need to smooth out a few spots with the glaze. Then it's on to paint!

I did something dumb and left my engine outside under a tarp without some pieces on it. It looks like the photo below. Do I need to worry about moisture, or bugs inside?
 

Attachments

  • Top down all Bondo.jpg
    Top down all Bondo.jpg
    8.9 MB · Views: 204
  • 20150702_163347.jpg
    20150702_163347.jpg
    2.1 MB · Views: 196
Man you should not have left that engine outside, in summer, with the generator exposed... get it inside man. moisture from humidity, rain, heat.. that shit is all bad
 
Yikes, yeah I have 100 excuses for it being out there but none of them are good enough. What do I need to do to check it before trying to start her up?
 
Make sure it's nice and dry before you start it up but if it hasn't been out there too long it should be alright. Keep it sealed next time :p

Loving the progress, I am currently making a seat the same way you are except using insulation foam because in Canada that green floral foam is somehow more expensive.
 
MinneMotors said:
Ok, all the body filling is done! Well, I need to smooth out a few spots with the glaze. Then it's on to paint!

you need to do a few more bondo coats and sanding before starting glaze.

If glaze has any real "thickness" to it at all. 1/16th of an inch or so. It will crack.

Glaze is used to smooth small imperfections in primer coat...its exactly like primer paint. Only thicker.
 
trek97 said:
you need to do a few more bondo coats and sanding before starting glaze.

If glaze has any real "thickness" to it at all. 1/16th of an inch or so. It will crack.

Glaze is used to smooth small imperfections in primer coat...its exactly like primer paint. Only thicker.

Will do, thanks! I'll have to buy another bucket of filler though :/ Not only am I wasting it by over globbing and sanding away all day, but I left a plastic spatula in there and it "melted" into the mix. I probably lost about 1/3 of my gallon.
 
You really dont need any more bondo...just a lot more sanding.
In reality you could sand that thing down pretty much to bare steel. Just leaving the bondo to fill the low dents.
 
The problem lies in keeping the shape I want. Those knee dents are not actually dented nearly that much. I had to build up a decent amount of filler to get the edge.
 
I second Trek's recommendation to keep sanding (regardless of the look you're going for). Most manufacturers of filler state that you should not build up more than 1/8" of thickness in any one spot. Anything greater will lead to cracking. A lot of people say even 1/8" is too much. Since it seems like maybe you want to do this somewhat professionally in the future I think it's best to learn the proper way to do it. If your work starts to look shoddy in a short amount time then that's not going to help your reputation.
 
Back
Top Bottom