With the suggestion of a edneeves decided to post my 750 build progress.
I see a lot of great builds on this site so hopefully this one wont bore you guys too much.
I bough this 74 last year with the idea that I could use it to putt around town. But its kind of a pig and I didnt like how it handled so one thing led to another and I pulled it all apart:

I bought the benji set a a while ago, kinda regret it now because my taste have changed but you use what you have

I didnt like how long it is so I decided to shorten it... wont be the most comfortable thing but I'm small and I like the look better. I ended up taking off 4 inches off the end too.

I'll weld up the hoop later


The swing arm seemed so short on the 74 , for the mono shock setup I wanted to do, I decided to swap in a later model .. i think its a 79
Swap was pretty easy I just had to mill the long end to fit the frame and lathe off the inner race:

On to the mono shock!
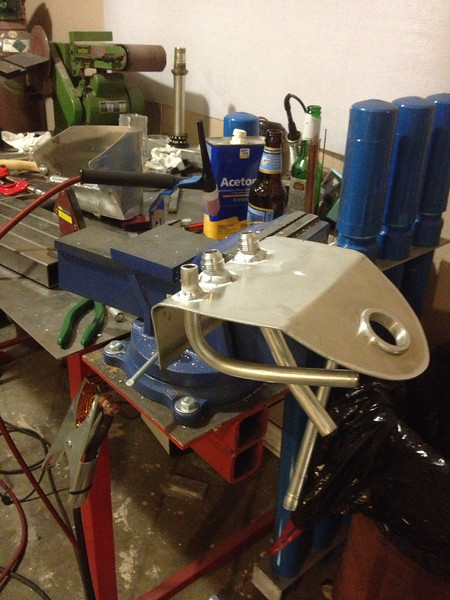
I noticed not many people post up how to make the top link ... its kinda important. After checking out a few bikes I went with this. Its DOM milled with a 3deg angle to fit into the CB750 frame


I'm using a donor shock from a 96 CBR1000. Which I know has a linkage. Now I can't replicate the linkage with the stock swing arm but talking with one of the RnD guys at honda he suggested as long as I keep the correct ratio it should work fine. To get this ratio down I made a mock strut:
Match the eye-to-eye

Match the travel length

Add a couple of 10mm lines and tada we have mock strut


Figure this will take the guess work from when I get to welding the upper swing arm support

Now I can't get the right height without the right forks.
here's the doner 2005 GSXR fork.

Got to use my new 20 ton .. that was fun. the "pop" when the stem finally pops out will scare your balls (scared mine)
*Be sure to support the closest point of where you're actually pressing it out. I got lucky, probably because I was going so slow, that nothing got distorted (bent or cracked). if you're gonna do this support the triple.*


The stem is half an inch too short so I made this plug this I made a plug out of 6061 alloy :

V-grooved both the plug and the stem pieces, tig'd it up filling the V and rough lathed off the excess


This was all kosher according to an engineer i've been bouncing Ideas off of.
But one thing I didn't consider.. What is the alloy type of the stock steering stem? does anyone know?
Still lots of work to do!
I see a lot of great builds on this site so hopefully this one wont bore you guys too much.
I bough this 74 last year with the idea that I could use it to putt around town. But its kind of a pig and I didnt like how it handled so one thing led to another and I pulled it all apart:
I bought the benji set a a while ago, kinda regret it now because my taste have changed but you use what you have
I didnt like how long it is so I decided to shorten it... wont be the most comfortable thing but I'm small and I like the look better. I ended up taking off 4 inches off the end too.
I'll weld up the hoop later
The swing arm seemed so short on the 74 , for the mono shock setup I wanted to do, I decided to swap in a later model .. i think its a 79
Swap was pretty easy I just had to mill the long end to fit the frame and lathe off the inner race:
On to the mono shock!
I noticed not many people post up how to make the top link ... its kinda important. After checking out a few bikes I went with this. Its DOM milled with a 3deg angle to fit into the CB750 frame
I'm using a donor shock from a 96 CBR1000. Which I know has a linkage. Now I can't replicate the linkage with the stock swing arm but talking with one of the RnD guys at honda he suggested as long as I keep the correct ratio it should work fine. To get this ratio down I made a mock strut:
Match the eye-to-eye
Match the travel length
Add a couple of 10mm lines and tada we have mock strut
Figure this will take the guess work from when I get to welding the upper swing arm support
Now I can't get the right height without the right forks.
here's the doner 2005 GSXR fork.
Got to use my new 20 ton .. that was fun. the "pop" when the stem finally pops out will scare your balls (scared mine)
*Be sure to support the closest point of where you're actually pressing it out. I got lucky, probably because I was going so slow, that nothing got distorted (bent or cracked). if you're gonna do this support the triple.*
The stem is half an inch too short so I made this plug this I made a plug out of 6061 alloy :
V-grooved both the plug and the stem pieces, tig'd it up filling the V and rough lathed off the excess
This was all kosher according to an engineer i've been bouncing Ideas off of.
But one thing I didn't consider.. What is the alloy type of the stock steering stem? does anyone know?
Still lots of work to do!