Follow along with the video below to see how to install our site as a web app on your home screen.
Note: This feature currently requires accessing the site using the built-in Safari browser.
We noticed you are blocking ads. DO THE TON only works with community supporters. Most are active members of the site with small businesses. Please consider disabling your ad blocking tool and checking out the businesses that help keep our site up and free.
Re: 74 RD250...is now a 350 - Anything more than 2 strokes is a waste
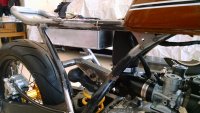
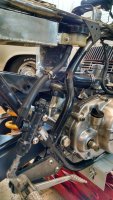
Things are starting to look like a motor-bike. I had to bring the bike to the local DMV office for a title inspection, so the freshly rebuilt engine met the frame for the first time. I figured I'd snap a shot and make a post to share such a milestone. I was also able finish weld my seat hoop and frame plugs along with tack weld an under-seat tray. I'm going to lay out the electronics that will go under the seat, start to fab an oil tank, and layout a battery in order to start working on a fiberglass seat/cowl. combo.
I was expecting to have a number of parts back from the laser cutter, but apparently, the laser broke. It's going to be a few more days until I get those parts, finish machine them, and then get my brake calipers and rearsets installed.
If you guys are interested, I've been working on my new website that details this RD350 build along with the Scrambler CL450 I did a few years back. Check it out at www.sevenninesystems.com It's not as up to date as this post is, but I'm adding to it daily.
Re: 74 RD250...is now a 350 - Anything more than 2 strokes is a waste
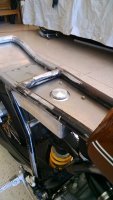
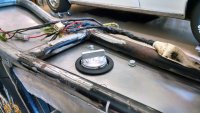
I mocked up the Ballistic EVO2 8 cell battery to see how big/where it could go...It's taking up a lot more room than I was hoping. I was really hoping that the 4 cell battery would be enough juice to run the RD system...
I guess option A is to park it behind the seat and move the oil tank to somewhere under the seat.
Option B would be to lay it down behind the seat and decrease the size of the oil tank I was planning to put back there.
Option C would be to put the battery behind the seat, and fab an oil tank that sits under the rear of the tank. It'd have to be long and low profile.
Looks like I'll be doing more mocking up of some different scenarios to find out which one looks/fits/suits my build the best.
thats awfully far forward remember its a tiny bike you dont wanna be stuck with yer nuts jammed against the tank
best place for the bat is near stock location CG of the bike right down on top of the upper shock support bracket is the only logical place
up high and rearward is anti- performance
Really like the build. Great work. Could I ask what your solution to fitting the GSXR steering stem to the Yamaha yoke was? Did you just machine the original GSXR stem to match the Yamaha yoke and re-press it into the lower triple?
Have you got any idea on what the bike will weigh when finished? It looks as if it could flirt with the 300lb mark.
thats awfully far forward remember its a tiny bike you dont wanna be stuck with yer nuts jammed against the tank
best place for the bat is near stock location CG of the bike right down on top of the upper shock support bracket is the only logical place
up high and rearward is anti- performance
Sorry for the confusion - that cardboard battery mock up is just sitting there in the seat pan. I didn't plan to run it that far forward - it was to show the size of the battery relative to the rest of the bike and available packaging. I spent some time last night cleaning up my reed cages so I can get them installed, the carbs i place, the Y-boot, and the air filter in order to determine where the battery can go. I still think the oil tank will have to sit behind the seat.
Really like the build. Great work. Could I ask what your solution to fitting the GSXR steering stem to the Yamaha yoke was? Did you just machine the original GSXR stem to match the Yamaha yoke and re-press it into the lower triple?
Have you got any idea on what the bike will weigh when finished? It looks as if it could flirt with the 300lb mark.
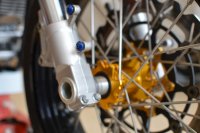
If you visit www.allballsracing.com and use their fork conversion look up, you can find bearing conversion part numbers. It was actually pretty simple to do the swap - I got lucky in that the Suzuki steering stem was pretty damn close to the length I needed. During my initial mock ups, I just took some measurements and figured out how many/how thick of a shim needed to go under the lower bearing to ensure that I had sufficient threads available to install the top bearing nuts (there are 2) along with the top clamp/nut.
I'm not 100% sure where the weight will end up, but I"m guessing I'll be pretty close to 300lbs. Even when I'm wheeling this thing around, I can tell it's light. I do plan to get it on a set of scales to find the final weight once it's done.
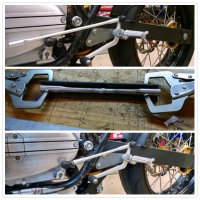
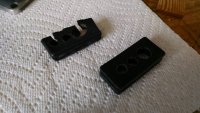
I got a few parts back from the laser cutter on Friday. On the front faces things look great. With a few parts, the burn through on the back side seems to wander just a little bit. It's not a big deal - nothing a file won't clean up. Now I need to finish off some hole sizes for threads and start bolting parts on the bike.
I think once you drive the bike that you will want the operating arm on the shift shaft rotated counter clockwise at least a couple of splines. I realize you are stuck with the angle between the pedal and its operating arm, and there is a popular notion that the two arms should be parallel, but that really only holds forth at arm to rod angles very close to 90 degrees. However, ergonomically it is a lot easier to down shift than up shift, and the large angle between the arm and rod at the shift shaft will afford decreasing effort on up shifts, the opposite of what you want. Ideally you would like 90 degrees or less in your application to get the maximum leverage (90 degrees) right when the shift cam starts to move. Your pedal actually adds mechanical advantage with the more acute angle, but it is at the expense of additional rotation and in practice the extra motion sort of compounds the missed shifts issue. - in any event you can't adjust it without relocating its pivot point or changing its orientation. My whole point is that you may find you need to make some unexpected adjustments to get the linkage to work optimally. Also, I have found the shifting in RD's to be very surprisingly influenced by what fluid you put in the transmission, so you might consider experimenting once you start riding it around.
Bike is turning out awesome - beautiful work - looking forward to its completion!
exactly the angle at the gearbox shaft needs to be close as possible to 90 degrees ideally that is the case at both ends,but the way it is now upshifting is going to suck if it even works at all
^^^^
Thanks for your detailed responses fellas. I 100% agree with both of you. I worked on the bike all day and the last thing I did was "mock-up" my shift setup. My shop and my internet connection are about 20 minutes from each other, and I quickly realized that my mock-up was less than optimal when I got home and uploaded photos from phone to computer.
The good news is that there is plenty of adjustability and I'll keep playing around with it until I get things to my liking. If not, I'm not afraid to cut and weld something to get it right.
Please keep the feedback coming!
It's been a while fellas. I've been busy going to some of the southeast supercross races and some other life things that get in the way of building vintage motored bikes.
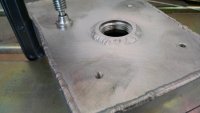
I was informed that I had to return the Miller TIG welder that I have been borrowing for the past few months, which meant that anything to be built from aluminum needed to be built. So I got on it and built an oil tank. Full deets and write up at http://sevenninesystems.com/2015/03/lubrication-station/
I need to find some 1/4" OD tubing for an outlet and fab some steel tabs to weld to the frame to support the tank. I don't plan on hanging it from the seat pan.
1. The original oil line grommet for the clutch cover had exceeded it's usable life. The replacement oil lines I ordered didn't fit inside the original grommet either, so I 3D printed a new one. I also designed in a groove to accommodate a sealing o-ring in the groove that fits over/under the case covers.
2. After I installed a grommet around the oil tank cap through hole, I couldn't get the cap off. So I TIG welded some leverage onto the cap. I had to return the TIG welder to my buddy today and go really sad seeing that machine go. That's probably why I started drinking at 10:30am.
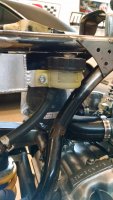
3. I added a rear brake reservoir mount to the oil tank, thus covering up the tumor of weld bead that I laid trying to weld .035" wall 1/4" tubing to .083" thick oil tank wall. Shit happens. No leaks though.
This site uses cookies to help personalise content, tailor your experience and to keep you logged in if you register.
By continuing to use this site, you are consenting to our use of cookies.

![IMG_20150202_183728496_HDR[1].jpg](/data/attachments/57/57691-6a6c0caa417b8398bd7e614d8402093e.jpg)
![IMG_20150204_084307582_HDR[1].jpg](/data/attachments/57/57692-3993e92d818304ef602beb1c52d5e79a.jpg)
![IMG_20150131_123902737[1].jpg](/data/attachments/57/57693-ea920573fdeb5a8839c281c8822895dc.jpg)
![IMG_20150204_185237229_HDR[1].jpg](/data/attachments/57/57719-5c7ff1c5eac67ea83e8650a7cd50b0c5.jpg)
![IMG_20150208_180733029[1].jpg](/data/attachments/57/57882-a7ae6cbd1a1bfa96aa59e1fcb2a79ec9.jpg)