
We noticed you are blocking ads. DO THE TON only works with community supporters. Most are active members of the site with small businesses. Please consider disabling your ad blocking tool and checking out the businesses that help keep our site up and free.
You are using an out of date browser. It may not display this or other websites correctly.
You should upgrade or use an alternative browser.
You should upgrade or use an alternative browser.
76 CB360, Cherry Bomb at Barber's
- Thread starter trek97
- Start date
Re: 76 CB360, before & after
Wow...I dont have time to post pics now...damned job is always getting it the way. But it is pretty gross in there. The top of the left piston reminds me of the first time I tried grilling ribeyes on dads GAS grill, back in high school...lol
Also I found the suspect left ex valve DOES in fact have some small chips in the edge...The whole reason I started collecting parts for this project to start with! anyway got head and jugs pulled this morning...Ill post pics of the horror after work this afternoon.
No broken rings though.
Koestum
Coast to Coast
Re: 76 CB360, before & after
I think Autozone has a free loaner piston ring compressor for when you get ready to slide the pistons into the head which makes that part a lot quicker.
You'll probably have to slide both pistons into the head but sticking out the bottom, then the head down over the studs part way, then install the pistons on the rods, then the head all the way down. Don't forget the gasket, it would suck to do it twice
Don't forget to offset the ring gaps too... and would be a good idea to check ring gap too for new rings.
Also, Are you honing the cylinders? It needs to be done.
Re: 76 CB360, before & after
Yes I just borrowed a hone from Tim in the automotive shop here at work, today. He didnt have one of those cross hatching ball deals. so the hone will be fine. and these cylinders have a nice little taper in them that help start rings in.
Im still up in the air about cracking open the crank case. It dont leak now. But I would like to install the new rubbers. And see what needs cleaning.
Im leaving work early...here in about 6 minutes...so I get will the nasty pics loaded pretty soon.
Re: 76 CB360, before & after
Actually, a taper is exactly what you're looking to avoid and it's one of the main reasons a lot of bike guys try to avoid working with machinists that mainly deal with autos. Generally, auto cylinders are only honed from one side and this tends to create a taper in the honing stones. That taper is then transferred to the cylinders on which the stones are used. Always, always, always, have your cylinders honed from both the top and bottom. This will help prevent taper in your cylinders as the taper from the stones will be working from both directions.
A taper in your cylinders is a bad thing as it causes your rings to flex and wear prematurely. Taper should be kept to less than .001" whenever possible.
Re: 76 CB360, before & after
You misunderstood me. Im talkin about this taper.

and here is the nastiness.
"GASP !?!? NOooooo, the HORROR !
the exhaust chipped valve

this GROSS Left piston, the right piston was dry w black soot.
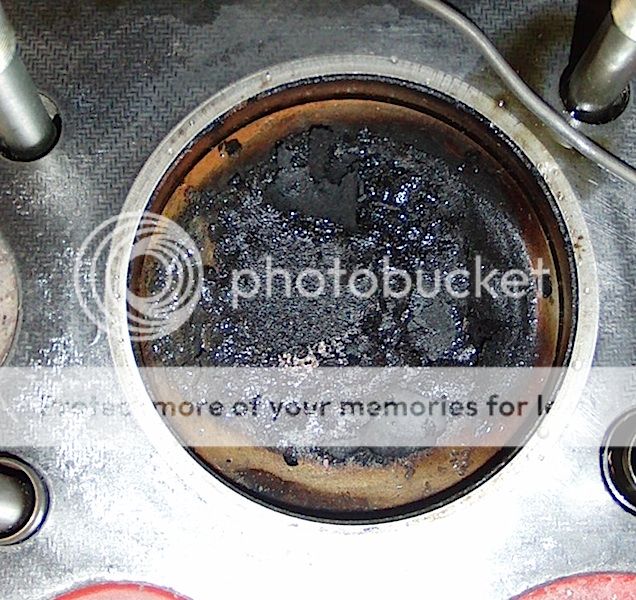
Im guessing maybe it was just the raw fuel getting dumped in there at the end of my ride, once the plug was out of cylinder ?....maybe? Started dissolving all the crap on the piston?
You misunderstood me. Im talkin about this taper.
and here is the nastiness.
"GASP !?!? NOooooo, the HORROR !
the exhaust chipped valve
this GROSS Left piston, the right piston was dry w black soot.
Im guessing maybe it was just the raw fuel getting dumped in there at the end of my ride, once the plug was out of cylinder ?....maybe? Started dissolving all the crap on the piston?
Koestum
Coast to Coast
Re: 76 CB360, before & after
Just move the hone in and out while doing it and it makes a beautiful cross-hatch. Just don't get the rpms up to high and move it accordingly and in a several minutes after the glaze is gone the cylinders will look great.
trek97 said:...He didnt have one of those cross hatching ball deals. so the hone will be fine...
Just move the hone in and out while doing it and it makes a beautiful cross-hatch. Just don't get the rpms up to high and move it accordingly and in a several minutes after the glaze is gone the cylinders will look great.
3DogNate
"You Meet the Nicest People on a Honda"
76 CB360, before & after
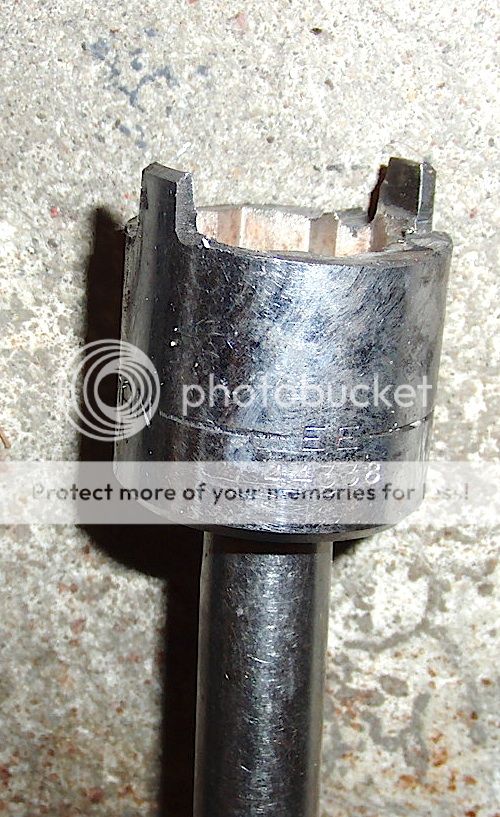
That's like the one I got off eBay only mine was in a red case.... Worked a charm.
trek97 said:so Im lookin at this one. do you know...will it work?

That's like the one I got off eBay only mine was in a red case.... Worked a charm.
Re: 76 CB360, engine build, HELP questions, before & after
OK fellas...I am beginning to get real anxious about this.

1 do I even NEED to remove this to continue disassembly...are there any rubber oil seals on crank that I will want to replace? and this part HAS to come off to do this ? I am not seeing any in the exploded views.
2 It seems loosening this bolt shouldve been on page 1 of manuel not page 46...How do I hold crank to loosen this bolt ?...This task wouldve been easy w motor assembled. would it be best to reinstall jugs and head...and employ the piston stop?
3 Also just removed oil filter cap on right side, do I need to remove the oil filter rotor housing, primary gear and all that? I do not have a special tool for removing the lock nut inside oil filer rotor on right side of crankshaft. Gonna try to make something real quick.
4 should starter chain be so loose I could remove it and sprocket, with this stuff still assembled?
ALSO PJ,
would it be in my best interest to drill the holes I can?

OK fellas...I am beginning to get real anxious about this.
1 do I even NEED to remove this to continue disassembly...are there any rubber oil seals on crank that I will want to replace? and this part HAS to come off to do this ? I am not seeing any in the exploded views.
2 It seems loosening this bolt shouldve been on page 1 of manuel not page 46...How do I hold crank to loosen this bolt ?...This task wouldve been easy w motor assembled. would it be best to reinstall jugs and head...and employ the piston stop?
3 Also just removed oil filter cap on right side, do I need to remove the oil filter rotor housing, primary gear and all that? I do not have a special tool for removing the lock nut inside oil filer rotor on right side of crankshaft. Gonna try to make something real quick.
4 should starter chain be so loose I could remove it and sprocket, with this stuff still assembled?
ALSO PJ,
would it be in my best interest to drill the holes I can?
crazypj
Split personality, I fake being smart
Re: 76 CB360, before & after
Hi Eric,
the stuff you can't drill was done at the factory, don't worry about it.
I drilled a 10mm hole opposite the factory one to improve balance (it's minimal)
The rotor doesn't need to come off, just the guide plate.
If you want to loosen bolt and remove it, put bar through small ends and use wood blocks on crankcase.
Give wrench a smack to jarr bolt loose then use 18 or 20x1.5mm bolt to remove rotor
BTW, I think the circles on the edge are from ejector pins when hub was cast?
Re: 76 CB360, before & after
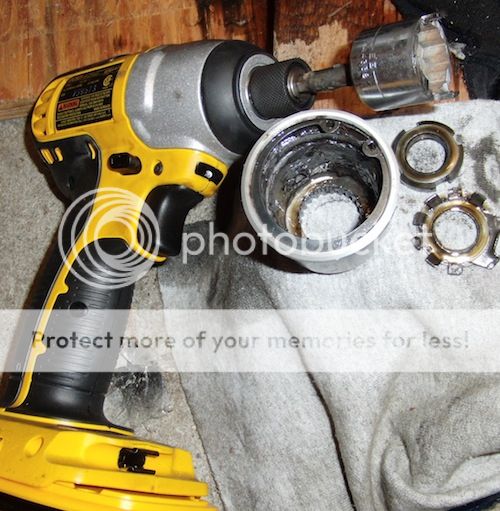
I have flattened the lock washer real good. double and triple checked it. I made a spanner for oil filter lock nut from a 13/16 socket...it fits really nice. I am giving it ALOT!!! and still cant break that filter nut loose! does that have to come off? I cant get the back of the clutch plate off w the filter on there.
CAN I continue splitting the case? or, am I getting myself into trouble doing that? I am just barely starting to get frustrated and pissed off.
Re: 76 CB360, before & after
I think you can split the cases with the filter still in place, but it starts getting tricky. I'd really get it off if you can. When I removed mine, it was a real bastard, too. I had to wedge a penny into the primary to keep the crank from spnning and then I took a mallet to the end of the socket wrench.
It may be worth shining a light in there to ensure the lock washer behind the nut isn't bent. That could prevent the nut from coming loose if the washer were jammed up in there.
Re: 76 CB360, before & after
WOW a penny. That is actually a great idea. I will do it. I just got nut to loose.
Sonreir said:I think you can split the cases with the filter still in place, but it starts getting tricky. I'd really get it off if you can. When I removed mine, it was a real bastard, too. I had to wedge a penny into the primary to keep the crank from spnning and then I took a mallet to the end of the socket wrench.
It may be worth shining a light in there to ensure the lock washer behind the nut isn't bent. That could prevent the nut from coming loose if the washer were jammed up in there.
WOW a penny. That is actually a great idea. I will do it. I just got nut to loose.
frogman
'74 CB360, '71 CB450, '75 CB550SS
Re: 76 CB360, before & after
Stick a couple pennies right in the gears between the crank and the clutch housing and then turn the stator bolt out. REAR axle for a 360 makes a great rotor puller. Thread it in tight against the crank and smack the end of the axle with a hammer, bet the thing pops right off. IF not a few more turns will push it off.
Edit Damnit matt, got there before I did.
Re: 76 CB360, before & after
thanks guys for the help...I will definitely add both tips (pennies and axel) to my next http://www.hondabrat.com/ blog post...I will credit both you guys w it.
and again...I was just kidding bout the whole A-hole thing. I think you guys are wonderful. I dont know I woulda had the balls to start this engine repair...without knowing I got you guys to back me up when I need you. so please keep checking back...Im sure I will have more cries for help again.
Re: 76 CB360, before & after
I did...as soon as cap came off...It woulda been lost within 30 seconds!!!
crazypj said:Did you re-fit the circlip into oil filter cup?
It looks distrorted?
Looks pretty damn dirty in there as well
I did...as soon as cap came off...It woulda been lost within 30 seconds!!!


