
We noticed you are blocking ads. DO THE TON only works with community supporters. Most are active members of the site with small businesses. Please consider disabling your ad blocking tool and checking out the businesses that help keep our site up and free.
You are using an out of date browser. It may not display this or other websites correctly.
You should upgrade or use an alternative browser.
You should upgrade or use an alternative browser.
76 CB360, Cherry Bomb at Barber's
- Thread starter trek97
- Start date
crazypj
Split personality, I fake being smart
Re: 76 CB360, before & after
Use it all the time, it's a high pressure additive that works well on cam and rockers plus transmission gears.
I only add 2oz to a gallon of oil as Rotella already has ZDDP in it
You don't want too high a level, 1800ppm seems to be optimum/maximum, 1200ppm is lower 'limit'.
Somewhere in the middle is better than low level but I don't know what level would be present using 4oz bottle /gal (it wouldn't matter in car engine, don't have a wet clutch to worry about)
Re: 76 CB360, before & after
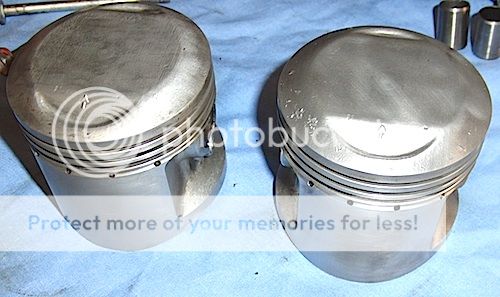
Pistons cleaned up pretty nice. Any more tips for installing rings? I broke the bottom ones trying to peel them off both pistons. (I wasnt trying to be super careful, but they broke pretty easily) Enough so, I am a little concerned about installing new. Also, I am going to shove a tooth pick in those holes to clean em out.
The cheap valve compressor didnt fit springs exactly as it was intended. But it worked very well.

crap is really baked on there!


I used the extra fine wire wheel on bench grinder to gently scrub away debris.
OK now for a lesson in lapping. after a minute or two. I can still see like 5 tiny shiny spots, should I continue working until all these are gone, and the valve is evenly colored all the way around?
OR is this as close as I need to be?
the spot is almost centered in pic.

Good head.

Pistons cleaned up pretty nice. Any more tips for installing rings? I broke the bottom ones trying to peel them off both pistons. (I wasnt trying to be super careful, but they broke pretty easily) Enough so, I am a little concerned about installing new. Also, I am going to shove a tooth pick in those holes to clean em out.
The cheap valve compressor didnt fit springs exactly as it was intended. But it worked very well.
crap is really baked on there!
I used the extra fine wire wheel on bench grinder to gently scrub away debris.
OK now for a lesson in lapping. after a minute or two. I can still see like 5 tiny shiny spots, should I continue working until all these are gone, and the valve is evenly colored all the way around?
OR is this as close as I need to be?
the spot is almost centered in pic.
Good head.
Re: 76 CB360, before & after
OK, Im pitching that head. Ive got another, a 1974. Its still fully assembled. I sprayed plenty of WD in there and its got no leaking to start with. Its freaking filthy. got a couple mud dobber nests in it. But w a closer inspection It looks as if the cam bearing surfaces may be better than the other head. So, here I go again.
Give me some time.
AND because it has no leaking of WD40 to start w it should be good to go.....right?
Re: 76 CB360, before & after
re-installed all valves in 1st replacement head w springs and sprayed.
The LEFT valve (leaker) held tight. no leak. The right leaks. ( I only made one pass on that one). But even still it pissed me off a bit. So I set it aside.
Got 2nd replacement head. Still dirty, still fully assembled. Sprayed WD again. All valves held tight. And the cam bearing surfaces DO look better. So, I am using it.
Also, I got curious about the rubber valve seals. I pulled original Junk head out. Pulled the suspect cracked valve. It indeed is cracked in 4 spots. And the seating angle is all messed up. rounded scoopy like.


So, getting started cleaning the 2nd replacement head.
re-installed all valves in 1st replacement head w springs and sprayed.
The LEFT valve (leaker) held tight. no leak. The right leaks. ( I only made one pass on that one). But even still it pissed me off a bit. So I set it aside.
Got 2nd replacement head. Still dirty, still fully assembled. Sprayed WD again. All valves held tight. And the cam bearing surfaces DO look better. So, I am using it.
Also, I got curious about the rubber valve seals. I pulled original Junk head out. Pulled the suspect cracked valve. It indeed is cracked in 4 spots. And the seating angle is all messed up. rounded scoopy like.
So, getting started cleaning the 2nd replacement head.
crazypj
Split personality, I fake being smart
Re: 76 CB360, before & after
That valve has been lapped before, and it was overdone.
It should show a 45 degree angle, that looks like it's sunk into the 60 degree throat angle
The face hardening has probably worn away, if any of the other valves look the same they are also scrap
That valve has been lapped before, and it was overdone.
It should show a 45 degree angle, that looks like it's sunk into the 60 degree throat angle
The face hardening has probably worn away, if any of the other valves look the same they are also scrap


Re: 76 CB360, before & after
Ill open them up. and check em out. This is another pair I just recently got from my buddy, nick. They came off a running bike. Same bike as this second head.crazypj said:Carb bodies are the same, probably different jets though.
Could also be screw in or press in air jets?
crazypj
Split personality, I fake being smart
Re: 76 CB360, before & after
I wouldn't mess with those valve seats, now it's clean, put it back together and re-check for leaks.
I would also fit new valve guide seals
I would remove the step where seat insert is fitted into head, just blend it into the radius of port
I wouldn't mess with those valve seats, now it's clean, put it back together and re-check for leaks.
I would also fit new valve guide seals
I would remove the step where seat insert is fitted into head, just blend it into the radius of port
Re: 76 CB360, before & after
The first head had this rough casting imperfections.

2nd head much nicer...

checked the mating edges of each seat. really nice. They are smooth enough I cant catch a finger nail on any of the edges.

new blue seals just popped on. This whole job shouldve went as easy as these!

Springs installed in the correct orientation...and, SUCCESS NO LEAKS!!! HUZZAH!

crazypj said:I wouldn't mess with those valve seats, now it's clean, put it back together and re-check for leaks.
I would also fit new valve guide seals
I would remove the step where seat insert is fitted into head, just blend it into the radius of port
The first head had this rough casting imperfections.
2nd head much nicer...
checked the mating edges of each seat. really nice. They are smooth enough I cant catch a finger nail on any of the edges.
new blue seals just popped on. This whole job shouldve went as easy as these!
Springs installed in the correct orientation...and, SUCCESS NO LEAKS!!! HUZZAH!


