'81 CB750C "Rock-It" (X-Basket Case)

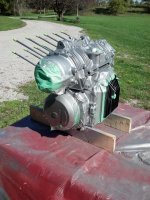
Clean as a whistle HD. Looks great! Wish i was as far ahead as you. Patience is noooooo fun. Looking forward to seeing what you get with that $$$.
 
Thanks for the compliments, by nature I really am a "tight wad" so I am trying to slowly spend it wisely. I am making a list of things I NEED, and things I WANT... Then get the NEEDS first.
bigtexan449 said:
Hey Hoosier. How'd ya build ur engine stand for cleaning and painting?
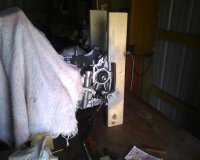
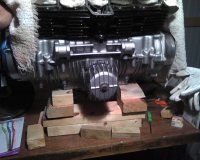
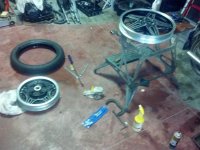
I made rear stand legs by taking a pair of 1 x 3 firring stips I had and cut out a crescent shape with two holes for the rear mount bolts. Then, bolted the top and slid a piece of all-thread through the bottom with a few washers to evenly space it out. Then either 2x4 blocks under the front mounts or I can roll it over onto the legs to access the bottom.
 

Attachments

  • engine paint.jpg
    engine paint.jpg
    365.2 KB · Views: 303
  • Engine stand.jpg
    Engine stand.jpg
    136.9 KB · Views: 293
  • Engine stand2.jpg
    Engine stand2.jpg
    169.1 KB · Views: 334
Damn "webshots" is giving me fits on my pix. ::)
Sorry, failed to generate codes: resource temporarily unavailable
Please try again later
So I'll direct upload pictures as attachments unit they get it figured out.
Got me some rubber... They are the same as I put on the Zook, Shinko 712's in the stock sizes front and rear. The ride and grip is good and I didn't get the noisey, almost siren like "howel" that is reported with the 230's
It's supposed to be '70 today, maybe I can get the old skins off and the wheels cleaned realy well then mount the new ones while it's warm enough for them to be flexable.
 

Attachments

  • tires.jpg
    tires.jpg
    126 KB · Views: 321
How is it I always seem to think dismounting 30 year old tires is going tho be easier THIS time... ::)
Jeezus H. Christ... 9:30 in the Fuckin morning and I was ready for a God-Damn beer. I oughtta throw them cocksuckin tire irons out in the lake so I am not tempted to do it again.

Wasn't really that bad, I got it done in short time. But my arms feel like rubber and I am ready for a beer. ;D
Now that I've seen the rims up close and personal, I am going to paint them so here we go with LOTS of prep work before I mount the new skins, and at least THESE are tubeless.
 

Attachments

  • Bastards.jpg
    Bastards.jpg
    98.1 KB · Views: 320
Sent from my MB525 using Tapatalk 2
Ha. Yuo should try the angle grinder method. If the tires are shit, just cut with a grinder and cutting wheel almost to the rim the snip the rest with shears. Makes beer time come faster
 
I made a homemade tire changing stand out of a truck wheel. Worked OK for sport bike tires. Try mounting a 190 tire sometime. Now that's a work out. I find the most difficult and frustrating thing on a vintage spoke wheel is to fit a tube into a tubeless tire and line up the damn air valve! Really rough on the digits. For vintage wheels/tires, I found the easiest way to go is to lay some cardboard on the floor and do the mounting/removal. You can kneel on the tire and really get good leverage on the irons. A long time ago, a clerk at AutoZone told me to use generic white hand cleaner as tire lube, less than $2.00 a tub. Works amazingly well. Oh, yeah. Cut up a plastic orange juice jug, the white plastic like a Tropicana jug, as rim savers! That shit won't puncture or rip, and is so thin, you can pull them out easily. Also, they won't fall into the tire. Bonus!
 
biker_reject said:
For vintage wheels/tires, I found the easiest way to go is to lay some cardboard on the floor and do the mounting/removal. You can kneel on the tire and really get good leverage on the irons....
Yep, the rear was done on the floor, I got the Work-mate Bench for the front to clear the bearing hub.
... Oh, yeah. Cut up a plastic orange juice jug, the white plastic like a Tropicana jug, as rim savers! That shit won't puncture or rip, and is so thin, you can pull them out easily. Also, they won't fall into the tire. Bonus!
Yep again, I used the sides cut out of an old Prestone anti-freeze jug. First set I ever did I bought those thick plastic rim protectors and they almost made it worse.
Thanks for the thoughts though, already been down this road 8)
 
You have been busy! This thing is gonna be nice HD. I put my 73 R75/5 on the lift today and took before pictures. :)
 
Autotek said:
You have been busy! This thing is gonna be nice HD. I put my 73 R75/5 on the lift today and took before pictures. :)
I found it and posted to follow along, nice!
Scottyfunj: The engine is painted with Duplicolors Engine Enamel and the color is their # 1650. Use it on all my builds as the color match is almost perfect to the factory paint. If the prep is thurough it holds up really well.
Krylon-DE1650-rw-73238-89405.jpg
 
Nope, no clear-coat. It and I have not had a good relationship in the past. It either yellows, cracks, or chips leaving a worse appearance in no time. No matter what I use it on but especially on an engine with the heat and chemicles in that environment.

I have been doing some thinking and searching on the Comstars. I may try and reproduce the factory appearance, paint them entirely black, OR... use all this time I got until spring and my newly purchased buffing equipment and try me hand at THIS.


Picture443.jpg


Of course that would also mean having to polish the rear brake hub and the sprocket carrier... but like I said, I got all winter.
 
Wow, I'm imagining the hours of work that would have gone into that wheel, and the hours spent keeping it shiny once on the bike and I cringe.
 
I feel like I have seen a clear coating that will stick to polished. You should look into it, clear powder maybe? haha
 
Just to keep it straight, that's not my wheel. I found it as I was searching for an example of a "Polished Comstar". That's a very good point TommyRocker not only would it be a bitch to do, but the devotion to keep it that way would be insane... Mine has a large section at the rear brake drum that the black has flaked off so I gotta do somthing. Guess we will just have to see.
Meanwhile last night my Allsballs steering neck bearing kit showed up. 8)
 
That wheel was done by a memember here a few years ago. He took the comstars apart and it really didn't take long on a buffer wheel to do it, however the upkeep after without a clear powder over them would be hell. My polished valve covers look like complete shit after one ride to Mid Ohio and back and will likely take me hours to re-do this winter.
 
I will mull this one over... Maritime, I'm gonna search that thread out! Comstars say right on them "DO NOT DISASSEMBLE" so because I tend to try and think safe, I won't be taking them apart. No way to re-rivet if I did and would't trust another fastener 100%.

I saw a thread on Deuces where a guy used paint stripper on the black, but had to sand the clear portions on his Comstars and then used Mother Mag polish follow by another Mothers product, for billet aluminum. No power buffer involved! :eek: http://www.deuceswilddohc.com/tech/polishing_comstars/comstars.html

This is the 3rd season on my polished Golwing pieces. I hit them with a coat of Mothers after the buffer and then a coat of car wax. With the Mothers and car wax repeated each spring. The polished covers on the Zook still look good with little thought to them, but it has virtually no miles (200?) since completion back in December.
 
He did a good job re-assembling the comstars with new bolt etc. Check the thread. I ride in all weather and dont wash the bike for weeks so polish goes to shit fast for me.

Sent from my MB525 using Tapatalk 2
 
Back
Top Bottom