A Kiwi build from scratch

you rteally dont want it bolted down hard to a steel fixture,too much difference in expanmsion rates aluminum is twice of steel
it will just crawl around and then more chance of pulling out of spec
the swiingarm itself has enough hard points to use to stabalize those dropouts with some careful placement of some strutty type deals if you make them shot as possible,out of aluminum and let them get warm during preheat then you are walking on water
if you made an aluminum fixture and heated it up same time as preheat , different story
the key of course is minimal gaps in welds a perfect fit suck best tit
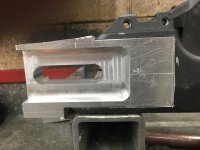
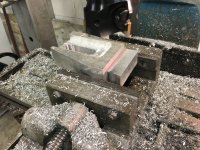
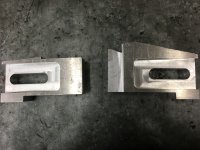
the final alternative and the ultimate best solution is skim cutting the faces of the plates,dead nuts square to pivot, when all done with the melty stuff
you do have the skills and tools
 
We typically use the fact that the aluminum picks up heat faster than steel and that steel is more stable. The fixtures are heavy masses of steel and we beat to about 180degrees via gas torch on the weld lines. You follow along with welder. The gas is a helium mix.

Since the swingarm is used, I would blast the powdercoat off, wash thoroughly, and do a few heating/washing cycles to ensure no residual chain lube etc is in the casting.
 
andycafe said:
Well done, looking forward to seeing them welded in ;)
Cheers mate, cant wait my self for the final product. as it stands, Im pretty happy with things, so should hopefully keep flowing nicely :)
 
Yep ;D

I am learning new shit here so hope the added educational tutorials are welcome. Heat... knew thaaaat... no clamping ally nope but makes cents :eek:
 
redwillissuperman said:
We typically use the fact that the aluminum picks up heat faster than steel and that steel is more stable. The fixtures are heavy masses of steel and we beat to about 180degrees via gas torch on the weld lines. You follow along with welder. The gas is a helium mix.

Since the swingarm is used, I would blast the powdercoat off, wash thoroughly, and do a few heating/washing cycles to ensure no residual chain lube etc is in the casting.
sweet :) would love to see images of the lashup the detail of cooking out moisture and petro residue is an outstanding
the growth is not as much as i had imagined it might be :-[,i did some actual math and 200f over ambient and a 16" long section of aluminum only grows 1mm
i was just testin yall anyway ::)
 
if you took those chunks and ran u bunch of deep groves or hollowed drops with a ball end mill, in them paralell with the welds it will lighten up and the weld penetrate better not such a heat sink anymore and it look trick hollowerd in
 
So the RH side is done, notched out the inner shoulder and fits like a glove
 

Attachments

  • IMG_0227.JPG
    IMG_0227.JPG
    2.8 MB · Views: 275
  • IMG_0237.JPG
    IMG_0237.JPG
    2.1 MB · Views: 280
  • IMG_0240.JPG
    IMG_0240.JPG
    2.5 MB · Views: 267
Tune-A-Fish said:
Awesome! Gonna spool gun splatter them in for that factory weld look??
Dont think so, going to TIG it up. better control of heat and movement. Going to see how close I can get the sides to blend in, and may even file it back to tidy it up some more, but will wait and see
 
OK, so that is all the milling out of the way for now. LH side is finished and have to say not real happy with the end result on this one. bit of a gap and not sure where my measurements and or cuts went wrong, but to much time invested into these parts to redo. any way, will start making the new axles, packers, spacers and hold down to clamp it all together ready for welding. only just realized my tap and die set only go to 18mm so will have to go and get me a 20mm tap and die over the next few days to make axle
 

Attachments

  • IMG_0246.JPG
    IMG_0246.JPG
    3.6 MB · Views: 322
  • IMG_0250.JPG
    IMG_0250.JPG
    2.7 MB · Views: 277
  • IMG_0253.JPG
    IMG_0253.JPG
    2.1 MB · Views: 325
  • IMG_0254.JPG
    IMG_0254.JPG
    2.2 MB · Views: 269
  • IMG_0256.JPG
    IMG_0256.JPG
    2.7 MB · Views: 323
Tune-A-Fish said:
Dang Sexy!! Our axle is coming up short... again haha! ::)
;D yep, for sure. Ordered new 20mm tap and die so that should hopefully arrive tomorrow, so back to the shop tomorrow night and time for some lathe time, turn down two axle dummy shafts and thread them into the packers. This swingarm is going to take longer to make than the frame I feel :-\, but sh!t happens I suppose, all part of the fun ::)
 
kiwiguy said:
sh!t happens I suppose, all part of the fun ::)

Unless you have another coming down the line at you, take all the time it takes to be precise like you are and be happy to have fun doing it.
 
Tune-A-Fish said:
Unless you have another coming down the line at you, take all the time it takes to be precise like you are and be happy to have fun doing it.
No Tuna, not another one yet. I think I will be able to use this one. these are around 10 hours work each, so not really wanting to make another. I will finish off the jig and pieces and make the final decision then, but I think I already have the answer ::)
 
i still think they need more stock removall the one on the right side a bathtub up ahead the axle plate relief same edge thicknesses and depth would really liven it up and weld better
you could even blow a rect hole All the way through
 
xb33bsa said:
i still think they need more stock removall the one on the right side a bathtub up ahead the axle plate relief same edge thicknesses and depth would really liven it up and weld better
you could even blow a rect hole All the way through
For sure XB, there is some more that could come out, I just dont want to go for the last little bit and turn them into shinny paper weights. there is a bit of excess on the R/h side, but still thinking about it
 
Back
Top Bottom