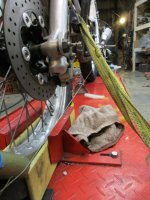
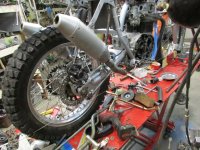
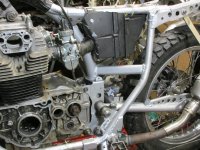
A big carpenter's square for camber. 4 jack stands and string for alignment.
We noticed you are blocking ads. DO THE TON only works with community supporters. Most are active members of the site with small businesses. Please consider disabling your ad blocking tool and checking out the businesses that help keep our site up and free.
You are using an out of date browser. It may not display this or other websites correctly.
You should upgrade or use an alternative browser.
You should upgrade or use an alternative browser.
acetelyne n hammertone ADVtwin
- Thread starter xb33bsa
- Start date
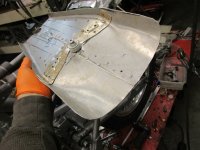
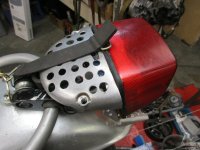
Suprised and digging that headlight/cowl.
irk said:A big carpenter's square for camber. 4 jack stands and string for alignment.
yep theres lots of ways to run the strings the jackstands work excellent used them many times to align the toe in on my own cars/pickups
you would love this carbon fiber stuff i am going to need to buy some myself this lot i have i got a bunch of it free dumpster diving my neighbors ,they had all kinds of weird cool stuff to throw out ,man i really miss them now there gone :'(,thanks obama

they were sub contractors for secret military shit like back enginerering alien tech and developing cloaking etc
thanks,mancanyoncarver said:Suprised and digging that headlight/cowl.
quite frankly i am supprised too,i have been looking at that tailight screwed to the wall for years
ha an instatution, thanks ,but i can pik the locksTune-A-Fish© said:If this was built a hundred years ago... Smithsonian Mang
I used a mechanical ceiling laser to track the BSA N.S,E,W... looking forward to learning the string methodology. Likely same as my dear ole Dad taought me to align a truck after new front parts no dog trackin nope. also he taught me to count joint threads from a hacksaw mark then turn rods n ball joints back on the same turns to grt a close baseline. A Stanly 25er and pro tractor is always close by 8)
Grammar IS for pussy grabbers. :
your dad was right on target about the thread,any thread is a precision deal that you count on,repeatability wise
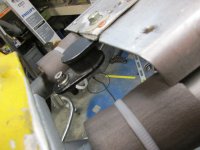
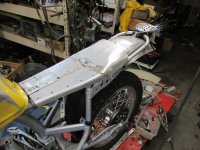
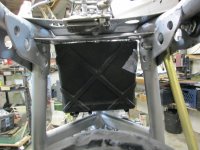
progress seat base was too wide i made it wide so i could modify it
ayt first i narroed just the front section that wouldnt do nope, had to go all the way.... but that is why the crossways cut was done
when i was beating it into form over the space-age polymer buck , i was saying to myself, geez, seams wide ...........................indeed \
one aircraft wedjit holds the seat in place, now has remote release with niple clevis and spoke release rod
Attachments


My favorite build. Thanks for the update. Hey xb, a question for you: Having mentioned the air box next, I wonder if you have any insights on changing the size/shape of an airbox for CV carbs. Any general advice/observations? Say cutting the size down? What to look for in those cases? Great build!
Is the taillight shroud an aluminum side cover? Nice.
Tune-A-Fish
BOTM LOSER Proudly Deplorable
I have seen that crabon fibre string before... I was one of the first to ever use fiberglass rebar in general construction. look it up, Hughes Brothers Seward Nebraska, I got the stuff for free, all sizes from 1/4 to 1.5 in including bends at all angles. That line is how its made, when I was in the factory they showed me the process... fookin 100 plus spools of that line twisting into a big epoxy spray then wound tight and tied with a colored line denoting size... I may still have 20 miles of that shit on the farm :-[
Bike is cick mang keep on keepin on 8)
Bike is cick mang keep on keepin on 8)
thanks pleeblyuns carbon fibre i think its just stout as fuk packaging twineyes adxvco yamaha dt1 oil pump cover
there is one on the mcflyskreen as well
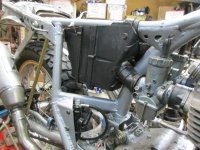
cv carbs i didnt even know this ,i have never owned with cv carbs lol ,never even addresed riidability isuues on a cv bike
airbox so far in my head has on each carb like a cb100, nice funnels one fromn each side sucking air from shared box,good sized element perched on top
i would like to use a papere cassette type element but they must be kept dry
basically i am not just clamping on a green weenie
maybe go all bose wave
there is one on the mcflyskreen as well
cv carbs i didnt even know this ,i have never owned with cv carbs lol ,never even addresed riidability isuues on a cv bike
airbox so far in my head has on each carb like a cb100, nice funnels one fromn each side sucking air from shared box,good sized element perched on top
i would like to use a papere cassette type element but they must be kept dry
basically i am not just clamping on a green weenie
maybe go all bose wave

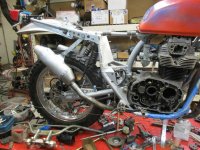
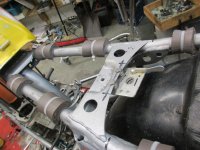
Brodie said:Nice, are they 1-1 or is there a cross over?
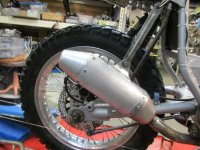
thanks brodie i am happy with them for now 1-1 from what i understand about the 180 crank twin is that 1-1 is best honda doesn't use a cross pipe on the dohc 450 either
and this here system is longer overall than what i had been running with the low hp low rev sl350 spec head/cam/carbs
i had been running stock sl head pipes with a slip on mid pipe and these same honda crf250 silencers
i was never happy with the layout and look what i had before
overall it was too short and the silencers pointed outward it just looked akward, clumsy
considering by all theory and testing and considering i am going to be running a much higher state of tune ,i needed more length
picked up a nice kz650 after market 4-1 to butcher up into these pipes
they are not bigger by much at all in diameter over the sl head pipes maybe a mm is all
and i have an insert at the port which slightly reduces pipe diameter
bringing it to be match-able to port size
bla bla bla bottom line is the extra pipe length allowed these silencers to be tucked in much better than before and to go full into dakar bike high level design , as shown below by the fastest chic on the planet

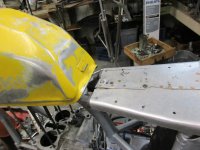
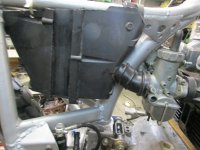
airbox sorted of course the funnels get a sealing to the boxc box will have a high shelf slightly sloped rearward to lashin a filter element
2006 ktm 99654 hypermotard airbox butcherd without a second thought
2006 ktm 99654 hypermotard airbox butcherd without a second thought
Attachments
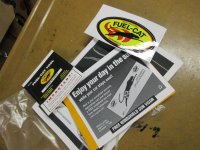
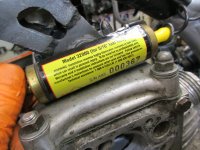
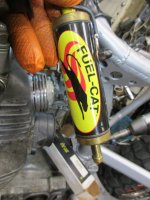
here kitty here kity kity kity whoop never mangs got me full on sponsorship from the cat the fuel cat
these are so new on the market i had never seen um,its like an fmf powerbomb fer yer gas when its still liquid
kinda ironic i get that factory deal from the cat you wouldnt think that little pussy would put out
these are so new on the market i had never seen um,its like an fmf powerbomb fer yer gas when its still liquid
kinda ironic i get that factory deal from the cat you wouldnt think that little pussy would put out
Attachments
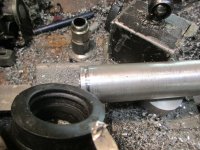
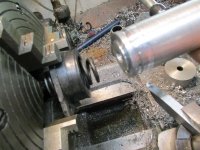
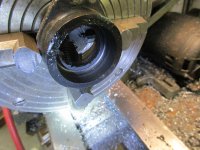
just to prove i do not shun the 4 jaw tookpics
mission objective have a pair of carb boots to fit the ko 750 keihin and 350 head during design and first testing
i had plenty that did not fit good, am not sure what will be final solution was not in a hurry to buy what i may not use but for mockups i said fuck it bore out the sl ones
plenty of rubber left and they are good for holding the cabs accurate to airbox as i finalize the airbox ducts this method of quick easy initial 4 jaw alignment of the part to be turned can be applied a hundred different ways for chucking up odd shapes
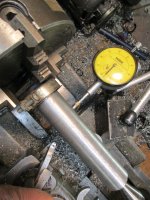
many times i have bolted up a skinny stud and used the tailstock jacobs chuck to place the part in the jaws very close to perfect
the flange is at an angle to the boot so clamping to a face plate requires fiddly bits
actuallly this method of extending a temporary spud out the axis centerline is just ass handy on the milling machine
for this deal i turned a groove in the spud and a center hole at the end
a spring holds the spud and poart snug upo nto the live center
from there it is very quik and easy to dial in the spud near chuck out at the center it already is running true
mission objective have a pair of carb boots to fit the ko 750 keihin and 350 head during design and first testing
i had plenty that did not fit good, am not sure what will be final solution was not in a hurry to buy what i may not use but for mockups i said fuck it bore out the sl ones
plenty of rubber left and they are good for holding the cabs accurate to airbox as i finalize the airbox ducts this method of quick easy initial 4 jaw alignment of the part to be turned can be applied a hundred different ways for chucking up odd shapes
many times i have bolted up a skinny stud and used the tailstock jacobs chuck to place the part in the jaws very close to perfect
the flange is at an angle to the boot so clamping to a face plate requires fiddly bits
actuallly this method of extending a temporary spud out the axis centerline is just ass handy on the milling machine
for this deal i turned a groove in the spud and a center hole at the end
a spring holds the spud and poart snug upo nto the live center
from there it is very quik and easy to dial in the spud near chuck out at the center it already is running true