Bad noise after rebuild

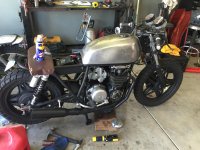
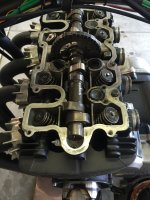
Alright, So picture and video dump! I have been crazy busy with work so bike had to go on back burner for a few days....However after sitting for a few days I took the tank off to look at valves and wires and such, pulled choke cable and hit the starter (with the ever so slightest blow on the fuel line to push out the gas as the tank wasn't on so no pressure from that) and she fired right up....I haven't taken her for a ride because I don't want to get stuck again, and I haven't had the time. So lets go over what I found when I took the tank off.

So first, here is a video I took with no spark plugs, everything sounds good.
https://www.youtube.com/watch?v=UXUoitkUtb4


Now lets get to pictures.
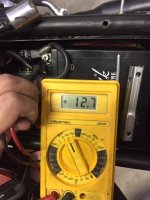
1. Battery charge wasn't the issue, and this was after trying to start it many times day of.
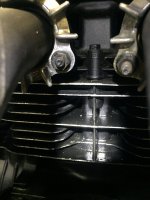
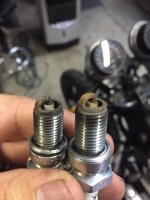
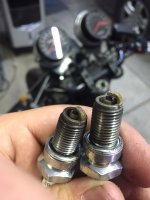
2. spark plugs 1-2, look good (maybe a little lean? might richin up a little)
3. Spark plugs 3-4, same as 1-2
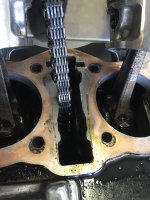
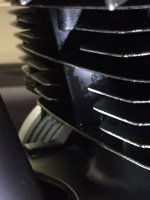
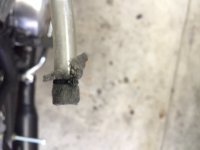
4. Well breather hose looked pretty oily after the bike sat for a few days in the upper triple digit degrees garage. So maybe I did over fill, and that caused the smoke and loss of power? (can that happen? oil getting into the cylinders causing loss of power in the upper rpm and stalling in the lower? [wouldn't this show on the spark plugs?])
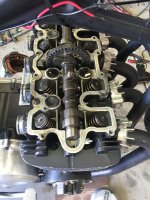
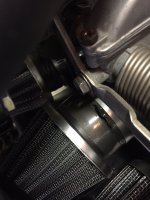
5. Well the silicon didn't hold......Anyone got any great ideas? I would love one of those filter boxes that go over two carbs but I don't have $300, let alone $50 for K&N / velosity stacks......
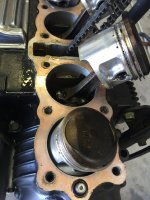
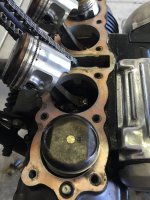
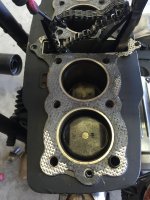
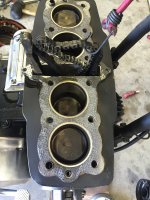
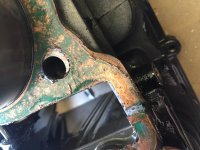
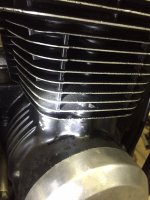
6.-11. Misc leaks with new gaskets and O-Rings, This really makes me think there was too much oil by all the leaks with all news seals.

So what do you guys think? Tank is still off so I can do whatever test you guys need.
 

Attachments

  • IMG_2377.JPG
    IMG_2377.JPG
    285.4 KB · Views: 174
  • IMG_2371.JPG
    IMG_2371.JPG
    285 KB · Views: 189
  • IMG_2370.JPG
    IMG_2370.JPG
    164.7 KB · Views: 182
  • IMG_2369.JPG
    IMG_2369.JPG
    301.7 KB · Views: 188
  • IMG_2368.JPG
    IMG_2368.JPG
    219.2 KB · Views: 180
  • IMG_2365.JPG
    IMG_2365.JPG
    259.5 KB · Views: 173
  • IMG_2367.JPG
    IMG_2367.JPG
    309.5 KB · Views: 170
  • IMG_2366.JPG
    IMG_2366.JPG
    170 KB · Views: 180
  • IMG_2374.JPG
    IMG_2374.JPG
    252 KB · Views: 179
  • IMG_2373.JPG
    IMG_2373.JPG
    253 KB · Views: 170
  • IMG_2372.JPG
    IMG_2372.JPG
    291.9 KB · Views: 179
Blocked or crushed engine breather causes all sorts of oil leaks when motor gets hot and oil thins down. Gearchange shaft oil seal can actually get pushed out of case. 650, being based on 1974 CB500 motor has most of the issues fixed but the oil feed to cam bearings on outside of cylinders still has a problem as the 'o' ring isn't supported and eventually leaks
 
Alright, I am going to spend today taking the top end off to see if I can figure out where the leak is......pray for me lol
 

Attachments

  • image.jpeg
    image.jpeg
    770.1 KB · Views: 175
Pic dump, here is what everything looks like. I assume the base casket was cracked before I pulled it off.......that's what I am sticking too. I will be buying high grade cut your own gasket material and cutting it exactly for this head With copper coat spray. Is that suffice or should I see about having it ground? Or get a tiny bit thicker gasket? Everything was properly torqued.
Do I need to replace the head gasket? Which I think is backwards....
 

Attachments

  • image.jpeg
    image.jpeg
    1.2 MB · Views: 177
  • image.jpeg
    image.jpeg
    814.2 KB · Views: 176
  • image.jpeg
    image.jpeg
    1.1 MB · Views: 176
  • image.jpeg
    image.jpeg
    1 MB · Views: 174
  • image.jpeg
    image.jpeg
    1 MB · Views: 169
  • image.jpeg
    image.jpeg
    1.1 MB · Views: 176
  • image.jpeg
    image.jpeg
    1.2 MB · Views: 184
  • image.jpeg
    image.jpeg
    1.2 MB · Views: 172
  • image.jpeg
    image.jpeg
    1 MB · Views: 167
  • image.jpeg
    image.jpeg
    772 KB · Views: 172
You need the metal flame rings in head gasket, personally, I would get copper gaskets top and bottom they have much higher heat transfer capabilities.
 
Yep. Needs a real head gasket to withstand the heat and pressure and flame front.
 
Copper will be a fair bit more expensive than DIY gasket material but I think it's worth it.
http://www.coppergaskets.us/
Lani likes having a chat with customers. I've found he isn't much more expensive than DIY if your making copper gaskets and to be honest, it's way easier to just buy them ready made. I would get the thinner base gasket, I think 0.031"?
I counterbored the cylinder on my 550 and fitted a dowel from side cover (approx 6mm hole) Then use an oversize 'o' ring plus open oil hole in gasket. Bike did around 70,000 without leaking instead of the 6~8,000 miles I previously got between top end re-builds.
Don't use aluminium for head gaskets, it can get hot spots and cause pre-ignition
 
For base gaskets I like OEM and for head gaskets I like Cometic if I have a choice. Copper can work, but I they are more difficult to get them to seal. I agree with Tune that they can be problematic and tend to need gasket goo and I hate to use that on gaskets and on head to barrel joints unless there are no other options.
 
So I finished the rebuild with all athena gaskets. I cant really tell if its holding or not because get this, I AM ABOUT TO REDO THE STARTER CLUTCH AGAIN!!!! hahahaha I tried firing it up after the rebuild and it was back to the horrible sound and free spins......So new game plan is, Bought all new oem rollers, springs, caps. Taking emery cloth to the sprocket so it isn't as smooth like teazer mentioned way back. I will also take a mic to the ramps to make sure they are flat as F***. Also am going to inspect every tooth from starter to primary chain drive. I serviced the starter motor the other day and noticed the main power wire in was barley hanging on (which fixed my starter bog issues) I am willing to bet that the last time I "fixed it" the starter wasn't going full balls and thats why it would grab. Now that it has power I think it may be causing slipping with the rollers. I am going to replace all consumables and refinish every surface..... I will not be beaten!


So, is this a good place to mention the rpm surge I have after rebuild? or should I start a new thread?
 
The 'bearing' the rollers lock onto needs to be dead smooth, 400+ emery to polish it is a good idea (it will also show it it has 'dents' in the surface) The ramps inside the starter clutch are normally the problem, the cast steel is 'softer' than the roller and can also crack
 
crazypj said:
The 'bearing' the rollers lock onto needs to be dead smooth, 400+ emery to polish it is a good idea (it will also show it it has 'dents' in the surface) The ramps inside the starter clutch are normally the problem, the cast steel is 'softer' than the roller and can also crack

Got it, on the last run I took it to 600 then used a Brillo pad and carbon rubber stick to polish it......maybe a bit to far. I will looks for cracks and mill it flat
 
crazypj said:
The 'bearing' the rollers lock onto needs to be dead smooth, 400+ emery to polish it is a good idea (it will also show it it has 'dents' in the surface) The ramps inside the starter clutch are normally the problem, the cast steel is 'softer' than the roller and can also crack

Not smooth but radially round with no roller divots would be the direction, if you can chuck it up and barely skim it off, I think the rollers have some tolerance room, the ramps get jumpy for sure, but the sides or wall also gets trashy and needs to be deburred.

index.php
 
Tune-A-Fish said:
Not smooth but radially round with no roller divots would be the direction, if you can chuck it up and barely skim it off, I think the rollers have some tolerance room, the ramps get jumpy for sure, but the sides or wall also gets trashy and needs to be deburred.

index.php


Wow, that really put it into perspective. I'm going to chuck it and see what I can do while staying in the service limit.
As for the one way bearing I am for sure going over every inch of it, I will check the walls for burrs and same with the cap holes
 
First time I've seen that picture but it explains exactly what goes wrong.
Quite often a picture IS worth a 1000 words 8)
How did you manage to turn it down? All the sprocket centers I've seen have been hardened
 
crazypj said:
First time I've seen that picture but it explains exactly what goes wrong.
Quite often a picture IS worth a 1000 words 8)
How did you manage to turn it down? All the sprocket centers I've seen have been hardened

That's a new one, they may be hard but smash up easier than the rollers so not real hard, I also was able to sand mine fairly easy
 
Back
Top Bottom