
We noticed you are blocking ads. DO THE TON only works with community supporters. Most are active members of the site with small businesses. Please consider disabling your ad blocking tool and checking out the businesses that help keep our site up and free.
You are using an out of date browser. It may not display this or other websites correctly.
You should upgrade or use an alternative browser.
You should upgrade or use an alternative browser.
CB200T cafe racer build
- Thread starter wfo speedracer
- Start date
wfo speedracer
Been Around the Block
Thanks I am trying to get the main fab work done before I have to start doing actual work again. I just got released by the ortho Dr from my hip replacement Wednesday.You're making really nice progress.
So after thinking about the bending brake I decided to just redneck bend it , I would have had to load the bike up and haul it to my friends house and bend a little at a time till I got it just right then unload the bike, too much sugar for a dime as my dad used to say .
Instead I marked my bend line with masking tape and clamped it between a piece of angle on my trailer and another piece of steel on top of it and from the backside bent it down , I had to do this a couple of times on the first one and once on the second one , on this it is better to bent too far out as I can pull it back in at the bottom , I think I got it pretty close.
Attachments
Last edited:
wfo speedracer
Been Around the Block
wfo speedracer
Been Around the Block
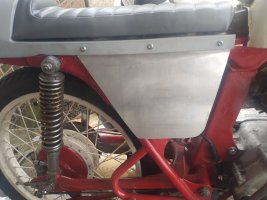
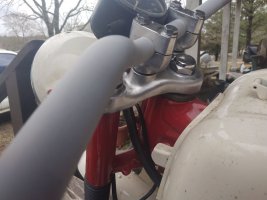
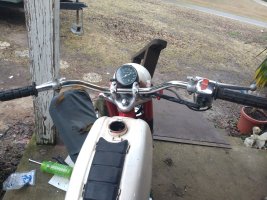
I have one sidecover polished up , I still needs just a bit but it's looking good , The guy that had this must have been a bodyman because he painted everything including the top triple tree clamp and handlebar risers, I have remedied that situation.
I think that the brushed finish turned out really well , the handlebars are getting swapped for Chrome Daytona bars this afternoon and that will be enough shiny for that end of the bike.
I bought the Daytona bars for my other build but the Emgo bars are slightly undersized on Black Betty which means they don't clamp down tightly enough on that bike , so I will order a different set that is probably thicker and use those bars on here.
Attachments
wfo speedracer
Been Around the Block
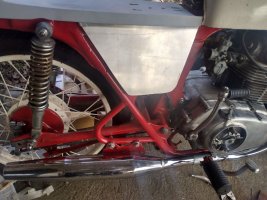
I got the tabs welded onto the battery box and I started painting it with Rust oleum peel coat, basically plastidip, I picked up about 20 cans at Walmart a few years back for $1.50 a can. I figured the plastidip will gave the box at least some insulation just in case Murphy strikes.
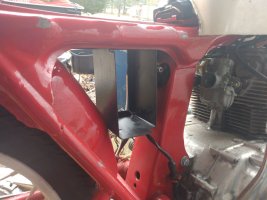
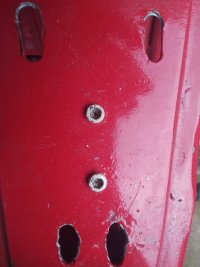
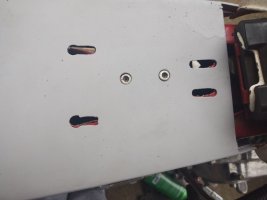
Anyway this is how it all mounts up , battery box is bolted to the frame under the seat , two short head Allen bolts secure it in place , then there are two holes in the seat base that correspond to those two bolts and locate the seat pan in the proper location. and the seat base gets secured with fout bolts through the bottom and sandwiches the seat pan between the frame and the wooden seat base.
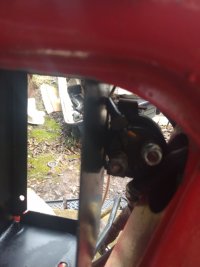
The starter solenoid is tucked in there snug as bug in a rug , the starter cable will run up through the frame and connect to it and a very short Positive wire will connect from the solenoid to the battery. Mostly hidden and pretty slick if I have to say so myself.
At least one of the sidecovers will have to be removed to get the seat on and off but I plan on putting a batter tender wire on the battery so I shouldn't be removing it that much..
Anyway this is how it all mounts up , battery box is bolted to the frame under the seat , two short head Allen bolts secure it in place , then there are two holes in the seat base that correspond to those two bolts and locate the seat pan in the proper location. and the seat base gets secured with fout bolts through the bottom and sandwiches the seat pan between the frame and the wooden seat base.
The starter solenoid is tucked in there snug as bug in a rug , the starter cable will run up through the frame and connect to it and a very short Positive wire will connect from the solenoid to the battery. Mostly hidden and pretty slick if I have to say so myself.
At least one of the sidecovers will have to be removed to get the seat on and off but I plan on putting a batter tender wire on the battery so I shouldn't be removing it that much..
Attachments
wfo speedracer
Been Around the Block
Thanks now I have to do the other one lolThe side-covers turned out nice man.
wfo speedracer
Been Around the Block
wfo speedracer
Been Around the Block
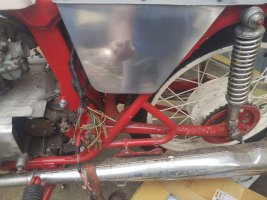
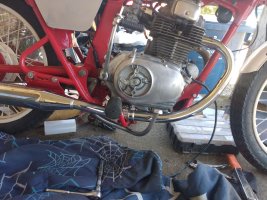
Exhaust clamps are in , the air filters also but I sent the air filters to the wrong address so I have to make a run to pick them up.
The clamps work well on the muffler side but won't quite clamp down on the header pipe so I may have to beer can shim it or cut a slot in the tube and beer can shim it so it will tighten down securely.
I tried several different positions with the clamps , this is the best I came up with and tightening them in that position is difficult but I can always take the whole pipe loose tighten it down the put it back on in one piece like the stockers.
If you put it with the bolt hanging down you can't tighten the front one at all and the bolt sticks down too far for my tastes, but I will fool with it more later.
I will most likely leave the galvanized finish on the pipe coupler , you can't see enough of it to matter anyway.
The Spiderman comforter is mine, I am keeping it , get your own.
Attachments
Last edited:
wfo speedracer
Been Around the Block
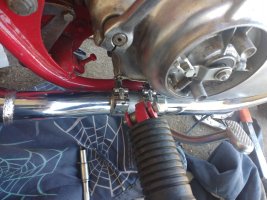
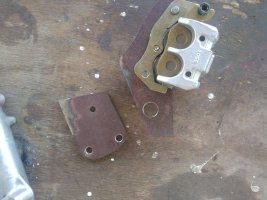
I had a leftover caliper from a 660 Rhino project that I worked on last year , it is brand new , I decided to see if I could make it work on here.
After looking at pretty much every CB200T hydraulic brake conversion I could find on the internet I realized two things, on every thread either they didn't have clear instructions and they didn't have clear pictures so I decided to just have a go at it myself , what's the worse than can happen ?
I made poster board patterns and remade them and remade them again till I thought I had something that would work , then I got it all cut out in metal and drilled the holes just to find out it still wouldn't work , so I then figured out a way to make it work.
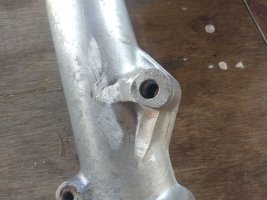
This is defiantly not the path for everyone as it involves some aluminum work on the fork leg , but I do have a unique situation here , the bike came with an extra set of fork legs and the forks have to be rebuilt anyway , it also came with the new fork seals , at any rate here goes.
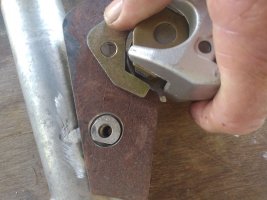
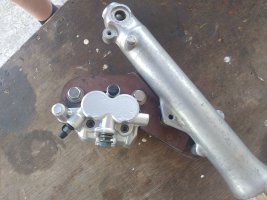
Basically the first bracket fits over the 8mm lug for the front brake , the second bracket goes on top of it and the 8mm bolt goes through both brackets , then the two fender bolts go through the second bracket as well .
I could probably just bolt the two brackets together but I feel more comfortable welding them together so there will be no flex, everything is made from 1/4" plate steel.
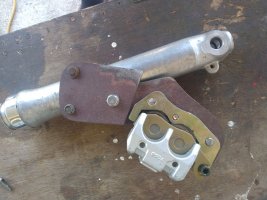
The bolt holding the caliper on still has to be ground down a bit and I messed up on the small bracket I will have to remake it and redrill the holes , hopefully I can get it dead on by using the first bracket and relocating the holes slightly , it would work as is but I am a bit of a perfectionist.
I hope the pics will explain this better than I can , all I have left is to put the fork leg on the bike and get the position right, clamp the two pieces together and weld it up. Of course I still need to make the other bracket and dress up the fork leg then maybe get the bracket powdercoated, I have a friend that does powdercoat on the cheap.
After looking at pretty much every CB200T hydraulic brake conversion I could find on the internet I realized two things, on every thread either they didn't have clear instructions and they didn't have clear pictures so I decided to just have a go at it myself , what's the worse than can happen ?
I made poster board patterns and remade them and remade them again till I thought I had something that would work , then I got it all cut out in metal and drilled the holes just to find out it still wouldn't work , so I then figured out a way to make it work.
This is defiantly not the path for everyone as it involves some aluminum work on the fork leg , but I do have a unique situation here , the bike came with an extra set of fork legs and the forks have to be rebuilt anyway , it also came with the new fork seals , at any rate here goes.
Basically the first bracket fits over the 8mm lug for the front brake , the second bracket goes on top of it and the 8mm bolt goes through both brackets , then the two fender bolts go through the second bracket as well .
I could probably just bolt the two brackets together but I feel more comfortable welding them together so there will be no flex, everything is made from 1/4" plate steel.
The bolt holding the caliper on still has to be ground down a bit and I messed up on the small bracket I will have to remake it and redrill the holes , hopefully I can get it dead on by using the first bracket and relocating the holes slightly , it would work as is but I am a bit of a perfectionist.
I hope the pics will explain this better than I can , all I have left is to put the fork leg on the bike and get the position right, clamp the two pieces together and weld it up. Of course I still need to make the other bracket and dress up the fork leg then maybe get the bracket powdercoated, I have a friend that does powdercoat on the cheap.
Attachments
Last edited:
wfo speedracer
Been Around the Block
I am not going to lie , it took about three tries to get the holes drilled properly using the first plate and a set of calipers I finally got it , this time I worked a little smarter, I drilled the three holes first then when I got all the holes all lined up I cut out the bracket, the result is a perfect fit.
wfo speedracer
Been Around the Block
One disc and the bleeder will be fine, even if you didn't have a bleeder valve you can still bled the system out by cracking the banjo bolt , plus I have a vacuum bleeder setup , long story short this is not my first rodeo .
wfo speedracer
Been Around the Block
No problems , the budget on this build is zero , I am just trying to use up parts I have on hand.No insult intended.")


