
We noticed you are blocking ads. DO THE TON only works with community supporters. Most are active members of the site with small businesses. Please consider disabling your ad blocking tool and checking out the businesses that help keep our site up and free.
You are using an out of date browser. It may not display this or other websites correctly.
You should upgrade or use an alternative browser.
You should upgrade or use an alternative browser.
CB200T cafe racer build
- Thread starter wfo speedracer
- Start date
wfo speedracer
Been Around the Block
Yes I looked at a lot of taillights and made a lot of mockups and measurements before picking that one, it just needs to be mounted a little lower and I may space it out about 1/4 ".That taillight fills up the space for it nicely, I think the shape fits the bike pretty well, lookin good dude
wfo speedracer
Been Around the Block
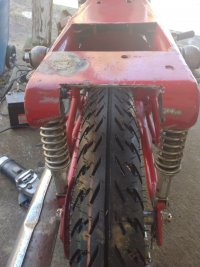
So when I got the bike it had a rolled piece of sheet metal and a 1/4" square tube welded across the rear frame rails, with the shock that are on it now ( which probably are not the correct ones, there was no way the tire was not going to hit.
It's another one of the things on this bike that was form over function , it just wasn't going to work. I had already removed some of the metal and put a curvature in it , it wasn't going to be enough.
So I cut another section out , it still wasn't going to be enough.
Now I am not planning on taking it off any sweet jumps but I do want it to be safe , to check it I removed the bottom bolt on one shock , rotated the shock out of the way then put a ratchet strap across it down to the swingarm and yes it would defiantly hit before the shocks fully compressed.
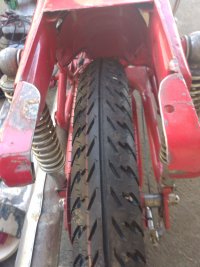
I finally just cut it all out and left a bit on each side , then I installed the seat and rechecked it , that particular part of the seat pan is not filled in so there is some space for the tire to protrude into without hitting anything , it's really close but it doesn't hit at full compression , with both shocks on it I believe it will be fine, at least till I can get some more shocks for it anyway .
I will probably remove some material off the rear lip of the seat just to be sure, there is plenty of metal there, this seat is heavy.
It's another one of the things on this bike that was form over function , it just wasn't going to work. I had already removed some of the metal and put a curvature in it , it wasn't going to be enough.
So I cut another section out , it still wasn't going to be enough.
Now I am not planning on taking it off any sweet jumps but I do want it to be safe , to check it I removed the bottom bolt on one shock , rotated the shock out of the way then put a ratchet strap across it down to the swingarm and yes it would defiantly hit before the shocks fully compressed.
I finally just cut it all out and left a bit on each side , then I installed the seat and rechecked it , that particular part of the seat pan is not filled in so there is some space for the tire to protrude into without hitting anything , it's really close but it doesn't hit at full compression , with both shocks on it I believe it will be fine, at least till I can get some more shocks for it anyway .
I will probably remove some material off the rear lip of the seat just to be sure, there is plenty of metal there, this seat is heavy.
Attachments
Last edited:
wfo speedracer
Been Around the Block
So in case you are wondering the budget on this build is zero, I will spend what I have to spend but I have to keep it low low low.
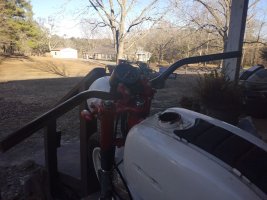
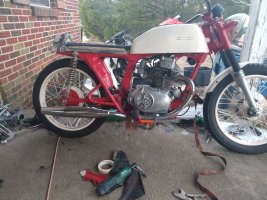
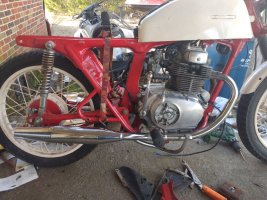
I finished welding up the seat pan and I filled in the holes for the taillight, I will drill more holes and mount it where I want it now.
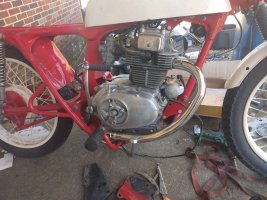
I cut the plywood for the seat and shaped it up , I would rather have used plastic but the difference in plastic and plywood is I have plywood, I also found my Superbike bars and put them on, I may go with Daytona bars , not sure just yet on that one, I also dug around in my stuff and found a set of CMX 250 mufflers, I mocked one side up and I think it looks pretty good.
I will know more when the exhaust collars come in so I can mount the headpipes up to the head solidly.
So far it looks like I could make exhaust hangers out of sheet aluminum or steel and just use a straight piece to hang the pipes from the rear hoops , I am thinking polished Aluminum to match the polished sidecovers. Also looks like the axle will come out over the top of the pipe.
I finished welding up the seat pan and I filled in the holes for the taillight, I will drill more holes and mount it where I want it now.
I cut the plywood for the seat and shaped it up , I would rather have used plastic but the difference in plastic and plywood is I have plywood, I also found my Superbike bars and put them on, I may go with Daytona bars , not sure just yet on that one, I also dug around in my stuff and found a set of CMX 250 mufflers, I mocked one side up and I think it looks pretty good.
I will know more when the exhaust collars come in so I can mount the headpipes up to the head solidly.
So far it looks like I could make exhaust hangers out of sheet aluminum or steel and just use a straight piece to hang the pipes from the rear hoops , I am thinking polished Aluminum to match the polished sidecovers. Also looks like the axle will come out over the top of the pipe.
Attachments

Last edited:
wfo speedracer
Been Around the Block
Update , the headpipes that came with this bike are rusty crusty junk, actually the whole exhaust system is junk, since I have a fairly decent set of mufflers now I need decent headpipes to go with them , in this case chrome will get you home .
The right headpipe has a large dent in it which I tried to remove but since it is doublewall construction it wasn't happening , I could have cut the section out and welded another in but I would still be stuck with a nasty set of headpipes and I would have had to wrap them .
I found a new set for a CB175 on Ebay , while I am not 100% sure they will fit but I am pretty sure I can make them fit, it won't be the first time I have bent- adjusted a new pipe to make it fit , the seller cut me a deal and I went for, what can I say new chrome makes me weak in the knees.
This is probably the single biggest purchase I will make on this bike , we will see the build is still young .
wfo speedracer
Been Around the Block
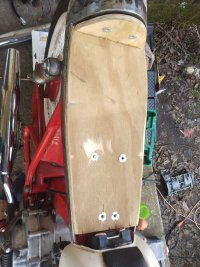
I glued up the seat base and nailed it with brads, then I marked the holes and drilled them and installed tee nuts , so bolts coming up through the frame from the bottom will mount the whole thing to the bike , bolts at the back part will keep the seat and base together .
I should be ready to start on the upholstery , bodyworking and painting the seat base now.
I should be ready to start on the upholstery , bodyworking and painting the seat base now.
Attachments
Last edited:
wfo speedracer
Been Around the Block
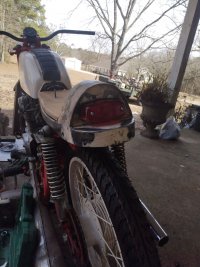
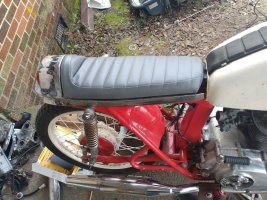
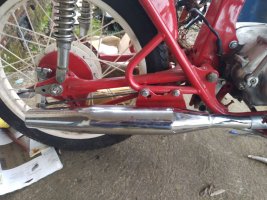
I remounted the taillight lower , it looks much better now, yes I know the tag light won't be that functional that low but then again I don't see well at night and thus won't be driving very much after dark.
Now I just have to figure out something for a tag bracket , if those mufflers mount low enough I may just make one to attach to the lower shock bolt.
I am also considering a rear fender, if so it can go there, no telling what I might do , wee will see how it plays out.
Now I just have to figure out something for a tag bracket , if those mufflers mount low enough I may just make one to attach to the lower shock bolt.
I am also considering a rear fender, if so it can go there, no telling what I might do , wee will see how it plays out.
Attachments
Last edited:
wfo speedracer
Been Around the Block
wfo speedracer
Been Around the Block
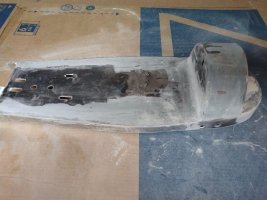
I am bodyworking the seat base, I got one pull of Duraglass on it today and will continue on that tomorrow, one more pull with the duraglass and on to bondo and primer
The pipes should be in Tuesday and the air filters come in some time later next week.
I still have some figuring out to do on the exhaust system and muffler bracketry .
The pipes should be in Tuesday and the air filters come in some time later next week.
I still have some figuring out to do on the exhaust system and muffler bracketry .
Attachments
Last edited:
wfo speedracer
Been Around the Block
Stock replacement header pipes with stock 250 Rebel mufflers is what I am trying to use.
wfo speedracer
Been Around the Block
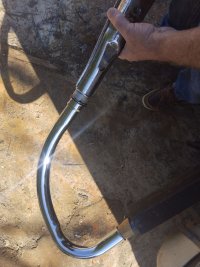
Header pipes came in today and just as I thought they had to be stretched just a bit , these CB175 head pipes are a little bit shorter which works fine on this bike and the angle is slightly off as I suspected.
One thing I do like about the header pipes is they are single-wall , not double- wall like the restrictive stock pipes were it also makes them a lot easier to rebend .
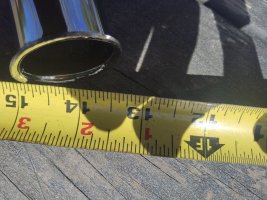
First I measured the pipe so I would have a reference number , that number was 14 1/2 inches , then I wrapped my jack handle with cardboard , inserted it into the pipe and put the jack handle into my tube truck bumper, then I put the stock muffler on the other end, cranked on it and test fit it, I did this a few times rechecking the measurement, the magic number seems to be about 14 7/8 inches although you could probably go to 15.
One thing I do like about the header pipes is they are single-wall , not double- wall like the restrictive stock pipes were it also makes them a lot easier to rebend .
First I measured the pipe so I would have a reference number , that number was 14 1/2 inches , then I wrapped my jack handle with cardboard , inserted it into the pipe and put the jack handle into my tube truck bumper, then I put the stock muffler on the other end, cranked on it and test fit it, I did this a few times rechecking the measurement, the magic number seems to be about 14 7/8 inches although you could probably go to 15.
Attachments
Last edited:
wfo speedracer
Been Around the Block
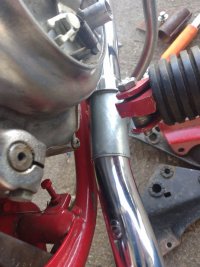
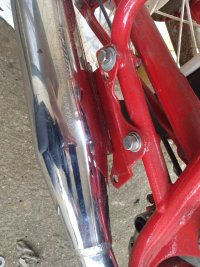
I bought an 1 3/8" top rail fence connector tube from Lowes and cut it in half, it is just the right size to slide the two pipes into after removing some zinc slag from inside the pipe , a couple of exhaust clamps and it should be good to go.
And here is how it looks on the bike. all mounted up the connector is mostly hidden by the footpeg bracket but I plan on painting it high temp silve and putting two exhaust clamps per side , it should pretty much disappear..
I know on a lot of the stock Honda pipes there is a silver painted section where the pipes are welded together .
I am hoping there will be some pieces of aluminum sheet left over from the sidecovers that are big enough to make rear muffler brackets out if , if not I will buy another piece.
Attachments
Last edited:
Maritime
Over 10,000 Posts
That works well. Looks good too.I bought an 1 3/8" top rail fence connector tube from Lowes and cut it in half, it is just the right size to slide the two pipes into after removing some zinc slag from inside the pipe , a couple of exhaust clamps and it should be good to go.
And here is how it looks on the bike. all mounted up the connector is mostly hidden by the footpeg bracket but I plan on painting it high temp silve and putting two exhaust clamps per side , it should pretty much disappear..
I know on a lot of the stock Honda pipes there is a silver painted section where the pipes are welded together .
I am hoping there will be some pieces of aluminum sheet left over from the sidecovers that are big enough to make rear muffler brackets out if , if not I will buy another piece.
wfo speedracer
Been Around the Block
Thanks , I ordered 4 stainless steel band clamps off of Amazon this morning to attach the two pipes together, maybe I can get a decent seal, if not I will break out the red silicone lol .That works well. Looks good too.
wfo speedracer
Been Around the Block
I don't know that it matters anything is better than the rusty crusty stock exhaust system that came with this bike.Beer cans and red silicone can get a noce tight seal.
I also found these on Amazon if the other clamps don't work these should , the connector piece comes in at around 38 mm OD which is 1.496 in inches.
https://www.amazon.com/Floshine-Exhaust-Muffler-PCS,1-5-Stainless/dp/B0B5X5BB5J/ref=sr_1_10?crid=1F9ZOIP973ZIE&keywords=1+1/2”+butt+joint+clamp&qid=1707411822&sprefix=1+1/2+butt+joint+clamp,aps,120&sr=8-10&th=1
Last edited:
wfo speedracer
Been Around the Block
Ok here is the part where it's better to be lucky than good . on the stock muffler brackets the rear bolt hole not only lines up it put the muffler in the correct position . so what I am going to do is lop off the other mounting tab in the front of the bracket , then cut the bracket and weld the two pieces together to get the second mounting hole where it needs to be , most of it will be hidden behind the muffler but it's steel , I can weld, grind and paint so it's just like Stanley Steemer, like it never even happened.
Attachments
wfo speedracer
Been Around the Block
Aluminum is in for the side-covers so I made a set of side-covers , I do still have to do some filing and fitting , then sanding and polishing but you get the general idea , I also need to borrow my friends sheet metal brake and bend the side-covers out slightly at the bottom , I did get the seat base bodyworked and primed with urethane high build .
The seat will lift off with the sidecovers attached to the seat base , I just have to connect them together or to the battery box wherever I can at the bottom , Rome wasn't built in a day and neither was this bike.
The seat will lift off with the sidecovers attached to the seat base , I just have to connect them together or to the battery box wherever I can at the bottom , Rome wasn't built in a day and neither was this bike.
Attachments

Last edited:


