CJsCB360 - Cafe Project

So, as spring comes around, I have been working on the engine. Took thenbest parts of two engines and put them together. I am trying to figure out how to pull off the alternator rotor, the spare engine has an upgraded stator and rotor that I want to use.

Do I just need to sick it up and buy a gear puller? Looking for any assistance.
 

Attachments

  • IMG_00000020.jpg
    IMG_00000020.jpg
    747.1 KB · Views: 216
  • IMG_00000020.jpg
    IMG_00000020.jpg
    747.1 KB · Views: 203
The "puller" is just a bolt that treads into the rotor and pushes the rotor off the shaft. Many m/c parts companies carry them. Probably some of the advertisers on this forum On some Hondas the rear axle is used to pull the rotor, not sure about the 360 as I've never tried it.
Ride52
 
This is what you need:
http://www.jcwhitney.com/motion-pro-flywheel-puller/p3059612.jcwx?filterid=d8782y1975j3
However, I don't know if this is the right size. JC Whitney is sketchy about the description and uses generic 1976 Honda CB as the motorcycle.
This one is made by Motion Pro.
Rider
 
Re: CJsCB360 - Cafe Project - engine install

Well, I was finished putting the engine back together, so I was desperate to put it on the frame. After lots of research, (I got the bike with engine out) I proceeded to clean up the bolts and hangers on the bench grinder, then shot them with a engine enamel to match the engine.

I took Sonreir's advice and laid out the engine on the right side while on a blanket on my front lawn - yeah I am that neighbor. I then rolled my frame over and dropped it over top of the engine. I admit there are a few little dings to fix, but for my first time, I thought it went well. Put in the bolt for the foot pegs, then the front left bolt, then the rear top bolt. With a little wiggle here and a lift there, and a little dings of paint there, it came together very well.


Electricals are next. Funtimes.
 

Attachments

  • IMG_00000026.jpg
    IMG_00000026.jpg
    674.1 KB · Views: 224
  • IMG_00000029.jpg
    IMG_00000029.jpg
    739.9 KB · Views: 216
  • IMG_00000028.jpg
    IMG_00000028.jpg
    810.5 KB · Views: 213
  • IMG_00000025.jpg
    IMG_00000025.jpg
    628.7 KB · Views: 214
Suited and duded! Lookin great, Big progress. I like the fins accented in black. Makes the engine look more distinguished in my opinion.
 
Re: CJsCB360 - Cafe Project - using stock controls on clip on bars

Well, here is a rookie question. Can I use the stock handle bar controls on my clip-ons?

I really don't want to drip holes into the bars. Also would rather not buy new controls for now.

Suggestions?

CJ
 
Looking good buddy, shame about the dings getting the motor in (we live and learn) Seen a couple of red frames now and I like them. Motor looks the Ducks too, keep it up.. Should be able to use the original controls without any problems, however clipons look quite long? make sure you get them in a comfortable position that gives you perfect head control.
 
I was reading the latest issue of cafe racer mag, and saw an article about a very cool cm400 café Project.

Looking at the pictures, they placed the clip ons above the top knuckle or top bridge. Now they did not use the stock forks, but wondering if that could be done with stock 33mm forks. That means you would need to drop the front by approx 1.5 inches.

What do you think? One thing that can be done?.
 
Re: CJsCB360 - Cafe Project - Electrical Mayhem

Arghhh... some of you might laugh.

So I have gotten to the point where I have re-connected all the stock connections (I have new controls, but re-connected the stock ones just to get things running). I have not connected any of the lights. I "fab'd" a little pan to mount all the electrical components normally attached to the battery box, etc.

I am looking for a little satisfaction.

So I hooked up a new battery today hopping to get something. Nothing.

I assumed that If I made the connections, I would at least get something, some satisfaction. Nothing. The horn, nothing, the starter, nothing.

So, I would appreciate a little counsel and direction. How much do I have to have connected in order for things to start working? What is the minimum?

Also is some sort of electrical rebuild/startup trouble shooting guide out there I can refer to to run through the checklist of things to check to make sure I increase my chance of success.

A fun weekend on the project, but now, sensing a little pending frustration.

Appreciate the help.

CJ.
 

Attachments

  • IMG_00000151.jpg
    IMG_00000151.jpg
    823.5 KB · Views: 219
  • IMG_00000146.jpg
    IMG_00000146.jpg
    831.3 KB · Views: 220
  • IMG_00000150.jpg
    IMG_00000150.jpg
    777.8 KB · Views: 225
  • IMG_00000148.jpg
    IMG_00000148.jpg
    530.7 KB · Views: 208
Re: CJsCB360 - Cafe Project - Fuel line help!!!

Does anyone have a nice picture of how the line from the fuel tank to the carbs?

I know I know, silly question, but I got my moto with the engine out and partly apart - so I never got to see how it was all connected.

I have two connections, one on the rear side of the carb, and another on the bottom of the float bowl.

I think I connected the float bowl lines to the tank - when I gate it a kick, fuel came out of the exhaust ports...likely not right.

Appreciate the help and guidance.

CJ
 
You have to get a wiring diagram and just simplify the wiring. There is no amount of "things" to be hooked up for the electrical components to work. You should check the fuse. And make sure you have the keyswitch hooked up correctly the key switch controls all out going power if it's wired wrong nothing will work. Get a multimeter and learn how to use it. You absolutely will have to to get your bike working. I think those ports on the bottom of the carb bowls are likely vents or overflow the ones on the back I believe are fuel intake. Good luck bud
 
Thanks. I have the multimeter and the wiring diagram. I guess, I just need to sit down and go thought it one circuit at a time.
 
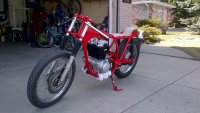
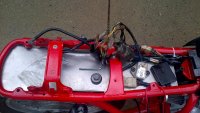
Well, it has been one year since we brought this baby home. It was apart, and a mess.
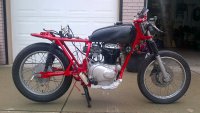
Now here we are...

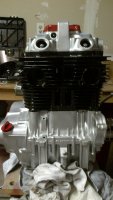
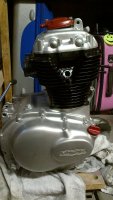
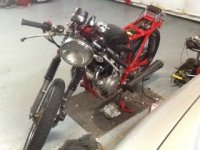
The engine was rebuilt and now runs (albeit not well), but I rode it around in 1st gear last week. Took me 6 weeks to get it going, but I did it.

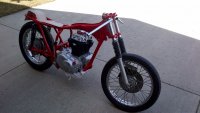
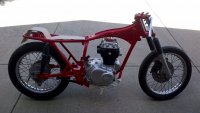
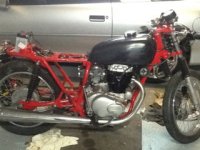
Frame was stripped and painted

The clutch issues were resolved- the big bearing inside the cup and against the rod is key...who knew??? You did DTT'rs...

Tank was filled, sanded, and painted

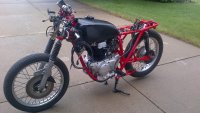
New clip-ons, and 7" light off a cb750.

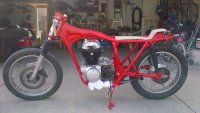
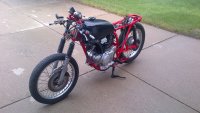
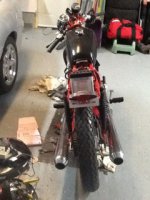
Up next, well as you might notice, I am using a old battery, because there is something not working with my charging system (battery dies after 15minutes of idle), also as my kids say, you need a seat...yeah yeah. Need a new front tire, install the turn signals (they don't flash for some reason), install new regulator and rectifier, bolt up everything tight...get it running strong, and finally over for an inspection for insurance and licensing.

Hope to have it all ready to go by next march once the Alberta snow pack melts away.

Thanks for all your collective help. This is certainly fun.

CJ


Sent from my iPad using Tapatalk HD
 

Attachments

  • ImageUploadedByTapatalk HD1350773668.499193.jpg
    ImageUploadedByTapatalk HD1350773668.499193.jpg
    29.3 KB · Views: 335
  • ImageUploadedByTapatalk HD1350773681.527615.jpg
    ImageUploadedByTapatalk HD1350773681.527615.jpg
    27.9 KB · Views: 355
  • ImageUploadedByTapatalk HD1350773689.799076.jpg
    ImageUploadedByTapatalk HD1350773689.799076.jpg
    29.6 KB · Views: 348
battery won't really charge at idle needs like 1500 rpm or something to start charging. Hope you get it figured soon It's looking nice
 
Thanks for the positive comments.

"If you don't ride it, it will die". I am not worried about the battery not charging. One of those things that just needs to get figured out. A multimeter, some time and a couple of beers should do the trick. Seems like it is a pretty common issue with rebuilds. I just ordered a new regulator and rectifier from Rick's Motorsports via Dime City. Should make things better.

CJ


Sent from my iPad using Tapatalk HD
 
I'm afraid to think the headache my builds electrical is going to be. When we got the bike, the previous owner was trying to turn it into a ghetto bobber or something and tore every wire off the bike. He said he couldn't figure out how to wire it back up, I think he's full of it, but I'm hoping for the best.

You're off to a good start, keep working at it and soon enough, you'll have a nice cafe to ride around.
 
Thanks stogz. Sound like an interesting challenge. The funny thing is that none of this is terribly difficult. Just need a wiring diagram, a multimeter, and some patience, and time to map it all out for yourself. I found that investing some time and tracking down where the electrons went, was frustrating, yet worthwhile.

Cheers!

CJ


Sent from my iPad using Tapatalk HD
 
I found it to be my best move to not reuse the original wiring harness and start from scratch. Don't know what your level of comfort is with that sort of thing but it is pretty basic electrical.
 
Back
Top Bottom