We noticed you are blocking ads. DO THE TON only works with community supporters. Most are active members of the site with small businesses. Please consider disabling your ad blocking tool and checking out the businesses that help keep our site up and free.
You are using an out of date browser. It may not display this or other websites correctly.
You should upgrade or use an alternative browser.
You should upgrade or use an alternative browser.
Guzzi Cali Cafe - Build Thread
- Thread starter Bevelheadmhr
- Start date
knumbntz
Been Around the Block
Actually Guzzi alloy holds a polish finish extremely well
I polished up the surface and only ever needed a touch up now and again.

I polished up the surface and only ever needed a touch up now and again.
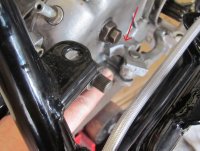
Bevelheadmhr said:In the meantime, I bead blasted the bevel box and caliper mount at a local machine shop, they look much better but they'll need to be painted to stop corrosion, so the next task is to buy some suitable paint.. etch primer, primer and silver alloy paint. Don't know what brand to go for, need to do some research before ordering..
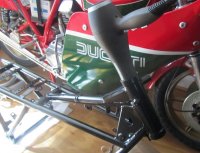
The old Tonti framed Guzzis are very adaptable, looks like you've got an Ducati Imola tank fitted?
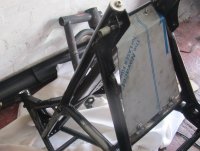
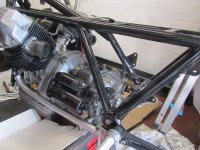
The last job I did before being laid low with a god awful winter flu virus, was to add a few brackets and tabs to the frame, which will make the final build much easy, when it comes to fitting a new seat, splash guard etc.
The last job I did before being laid low with a god awful winter flu virus, was to add a few brackets and tabs to the frame, which will make the final build much easy, when it comes to fitting a new seat, splash guard etc.
Attachments
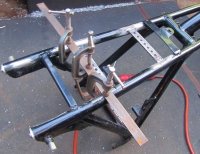
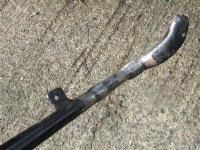
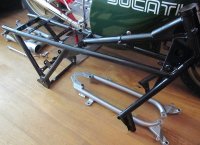
More work done on the frame, first extend the side stand by a couple of inches, as it was way too short before. Guzzis have a few different side stand lengths, I suspect mine must have been the wrong one for the bike.
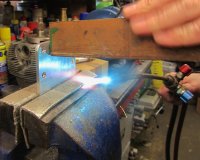
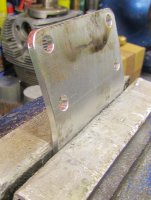
Next a stainless splash plate was made from 1.5mm plate, which is thicker than I'd normally use, but I may end up bolting stuff to it, so wanted the extra strength.
Finally some of the flat spots I'd put into the frame tubes when grinding off the old brackets have been tidied up, they don't look quite so ugly now.
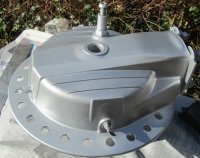
While the bevel box has been painted with 'alloy' look spray paint, not sure if it'll stay, looks too bright to me.
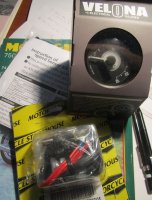
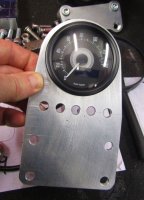
Also bought a 60mm electronic speedo, which will need mounting on the top yoke..
Next a stainless splash plate was made from 1.5mm plate, which is thicker than I'd normally use, but I may end up bolting stuff to it, so wanted the extra strength.
Finally some of the flat spots I'd put into the frame tubes when grinding off the old brackets have been tidied up, they don't look quite so ugly now.
While the bevel box has been painted with 'alloy' look spray paint, not sure if it'll stay, looks too bright to me.
Also bought a 60mm electronic speedo, which will need mounting on the top yoke..
Attachments
LateralSage
New Member
I absolutely love your seat and tank combo!!! It looks gorgeous to me! (Saved it to my phone for motivation ") )
)
)LateralSage said:I absolutely love your seat and tank combo!!! It looks gorgeous to me! (Saved it to my phone for motivation
I wish I had your enthusiasm for the tank / seat combo, but I don't, so something better will have to be found..
Today I stripped the bearings out of the swing arm, in readiness to get the frame powder coated. The big shaft drive support bearing was tricky to remove, as it was so far inside the swing arm. Eventually, I gave up and went to my local bike shop who got the circlip out for me in about 30 seconds using a neat pair of snap-on circlip pliers.
The current plan is to have the frame powder coated gloss black, while the frame lowers and swing arm will be silver..
Attachments

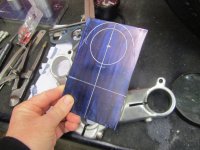
The speedo mount is being made from a scrap piece of 3mm alloy plate, fortunately its going to be shaped by Jeff on his miller when he has time, which will save me a lot of effort with a hacksaw and file. I've also opened my wallet for once and ordered some new shiny bits.. stainless engine mount bolts and stainless pins for the Brembo P8 calipers. Not strictly necessary, but the old rusty ones were annoying me.
Back from Triple S the coating specialist, I was a bit shocked when told the price..£307 inc Vat.. I was expecting about half that. He said its because the frame had already been powder coated, it will cost more to blast it down to bare metal, as powder coating is much harder to remove than OE paint. Oh well, its only money! Should be ready for collection in a week or so..
Back from Triple S the coating specialist, I was a bit shocked when told the price..£307 inc Vat.. I was expecting about half that. He said its because the frame had already been powder coated, it will cost more to blast it down to bare metal, as powder coating is much harder to remove than OE paint. Oh well, its only money! Should be ready for collection in a week or so..
Attachments
Love the build. I just bought a ugly but running 77 V1000 with a 850T motor.
Not sure why you didn't wait to get the frame coated since you are making major changes to the bodywork. You are always better off getting built right and then breaking it down for paint and powder.
Also, what is going on with that rear brake linkage. Seems like a mess and it could have been simplified by using a more modern style vertical master and a single linkage.
I am jealous that you are getting an alloy endurance tank, I don't think that I have the budget for something like that and it can't seem to find a tank I like on the bike.
Rusnak_322 said:Love the build. I just bought a ugly but running 77 V1000 with a 850T motor.
Not sure why you didn't wait to get the frame coated since you are making major changes to the bodywork. You are always better off getting built right and then breaking it down for paint and powder.
Also, what is going on with that rear brake linkage. Seems like a mess and it could have been simplified by using a more modern style vertical master and a single linkage.
I am jealous that you are getting an alloy endurance tank, I don't think that I have the budget for something like that and it can't seem to find a tank I like on the bike.
First good luck with your V1000, do you plan on modifying it?
Your right in that its normally a good idea to get the dry build completed before moving on to paint, but in this case I've added mounting brackets that will be easily adapted to whatever seat I end up using, or indeed I may make a one off seat to fit the frame. While the Endurance tank will be spec'd to use the original Guzzi front mounts and a simple rubber O ring to hold down the rear, so again no problems for the frame.
The rear brake set up is the same as that of a LeMans, which I wanted to keep, though the brakes have been delinked, and the rear caliper and mount will be replaced by something lighter and a touch more modern.
In the UK early Le Mans tanks are rare and expensive, so going for an aluminium Endurance tank makes financial sense, if that's the look you want..which I do.
Very nice and well made project, appreciate to see how this Guzzi turns into an unique creation.
I was wondering if you would be interested in selling the black LM gas tank now you got the alloy one on order? If yo do, I might be interested. It's not alloy but looks far better than my 1000SP I tank
I was wondering if you would be interested in selling the black LM gas tank now you got the alloy one on order? If yo do, I might be interested. It's not alloy but looks far better than my 1000SP I tank
Perter said:Very nice and well made project, appreciate to see how this Guzzi turns into an unique creation.
I was wondering if you would be interested in selling the black LM gas tank now you got the alloy one on order? If yo do, I might be interested. It's not alloy but looks far better than my 1000SP I tank
Its possible, but you know that I'm in the UK, where are you?
Yes, I know and I'm in Denmark so shipping should be reasonable. I've sent you a PMBevelheadmhr said:Its possible, but you know that I'm in the UK, where are you?
Perter said:Yes, I know and I'm in Denmark so shipping should be reasonable. I've sent you a PM
Replied to your PM Pers.
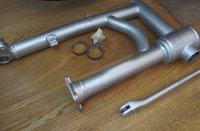
While the frame is away, got a couple more jobs done. First (almost) finished the speedo bracket which will bolt to the top yoke, it needed a lot of heat to put a bend in it, cant just use force, as alloy tends to crack if your not careful. I'm also getting a billet cover machined for the speedo body, which should be ready next week.
Attachments
Next I spend sometime looking at alternative ways of mounting the rear brake caliper, as I didn't like the way it was positioned below the swing arm, where its perfectly placed to get covered in crap from the road. But the design of the caliper meant placing it where I wanted tricky, and it looked odd too. Gave me the excuse to order a new smaller Brembo caliper which turned up at my local bike shop this morning. It'll need new alloy mount, which will have to wait till the back end is back together.
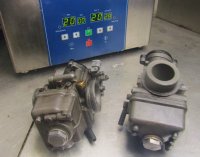
While I was at the bike shop, I dropped off the two carbs for a soak in their ultrasonic cleaner, not sure how well it'll work, will wait and see.
While I was at the bike shop, I dropped off the two carbs for a soak in their ultrasonic cleaner, not sure how well it'll work, will wait and see.
Attachments

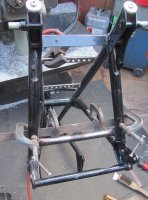
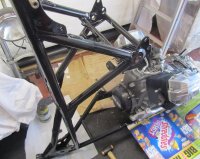
I'm just back from collecting the frame, looks so much better than the first attempt elsewhere. Unfortunately a big pallet arrived last week which is sitting in my garage taking up the last bit of room, so I cant do much assembly work on the Guzzi for now. That's ok, there's plenty of other jobs to do in the meantime.
Attachments
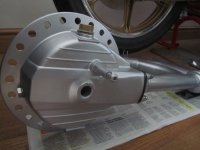
Despite the lack of space in the garage, I decided to press on and try to get the frame back onto the engine today. But first I assembled the rear bevel box and swing arm, cos it was easy and looked like I'd done something. I also replaced the old drain / level plugs with stainless bolts which had their head machined to make them look a bit better.
Ideally an extra pair of hands would've helpful when fitting the frame, but I was working alone so I managed to bolt the front engine mount first, with the frame up ended, then it was a case of pivoting the frame down and bolting up the lower frame rails. This worked surprisingly well with no damage to the new powder coat. The only problem I hit was that the clutch arm on the back of the gearbox needed its adjuster bolt removing to clear the frame as it pivoted down. This little issue turned into a massive nightmare soon after..
It was all going so well, once the frame was on, I decided to remove a few alloy parts and bead blast / polish them before refitting..
One part I wanted to tidy up was the clutch arm on the back of the gearbox, its not that noticeable, but it all helps. Its held in place by a pivot bolt which in turn is kept secure by a split pin. The split pin was rusty and fell apart when I tried to remove it, ended up having to grind off its remnants, which still left the pivot bolt not wanting to come out. So I used a small drift and hammer to gently know it out. It was stubborn, but moved eventually, or rather it seemed to move. What had actually happened was that the casting it pivoted in on the gearbox cover had snapped. What I nightmare. I was shocked as I hadn't used much force at all, god knows how it had failed.
I don't know if the gearbox end cover can be removed without first removing the frame (does anyone?), if not I'll have to reverse everything done today to remove the cover and repair the broken mount. At that point, I downed tool, I was to annoyed to carry on today.
Attachments
It seems the best way of fixing the broken gearbox cover is to dismantle the bike, reversing all the work done yesterday, then remove the whole gearbox, which can be taken to be welded. So that's the plan for next week.
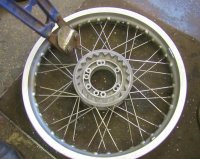
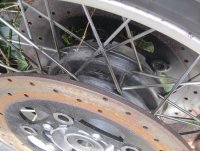
In the meantime, I decided the wheels weren't good enough, the anodised Akront rims were scuffed and scratched, while the hubs had been painted badly along with the rest of the bike by a previous owner. When I got the bike, I tried to remove as much paint as possible, the stainless spokes turned out ok, but it was impossible to clean up the hubs with the spokes in the way.
I'm not sure yet whether the original rims can be restored to a good enough finish to be re-used, if not I'll get new Morad rims. Expensive but worth it. While ideally I wanted to also reuse the stainless spokes, as they looked to be in good condition.
Attachments
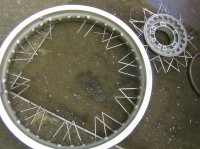
Early this morning I took the wheels to my LBS, who removed the tyres for me, then it was off to my mates workshop to dismantle the wheels, shouldn't take long, just need to unscrew 80 spoke nipples. How wrong could I be ! The first few spokes snapped inside the nipple as I tried to unscrew them. Not good, and a surprise given that the spokes were stainless.
There was nothing more that could be done, but to cut the spokes, as they were beyond saving anyway. At least that didn't take long, five minutes with the bolt cutters and the hubs were free. But my wheel troubles weren't over yet. The spokes were seized solid into the hubs, they didn't want to come out, even applying a blowtorch didn't make any difference. Instead I spend 4 hours
hammering each spoke out of the hubs. What a pita, if I hit the spoke hard enough to move it, it would bend the spoke like a cheap nail. Don't hit it hard enough and its going nowhere.
Eventually, they were all out, and with the old wheel bearings removed, the hubs, rims and disc carriers are ready for the blasting cabinet next week.